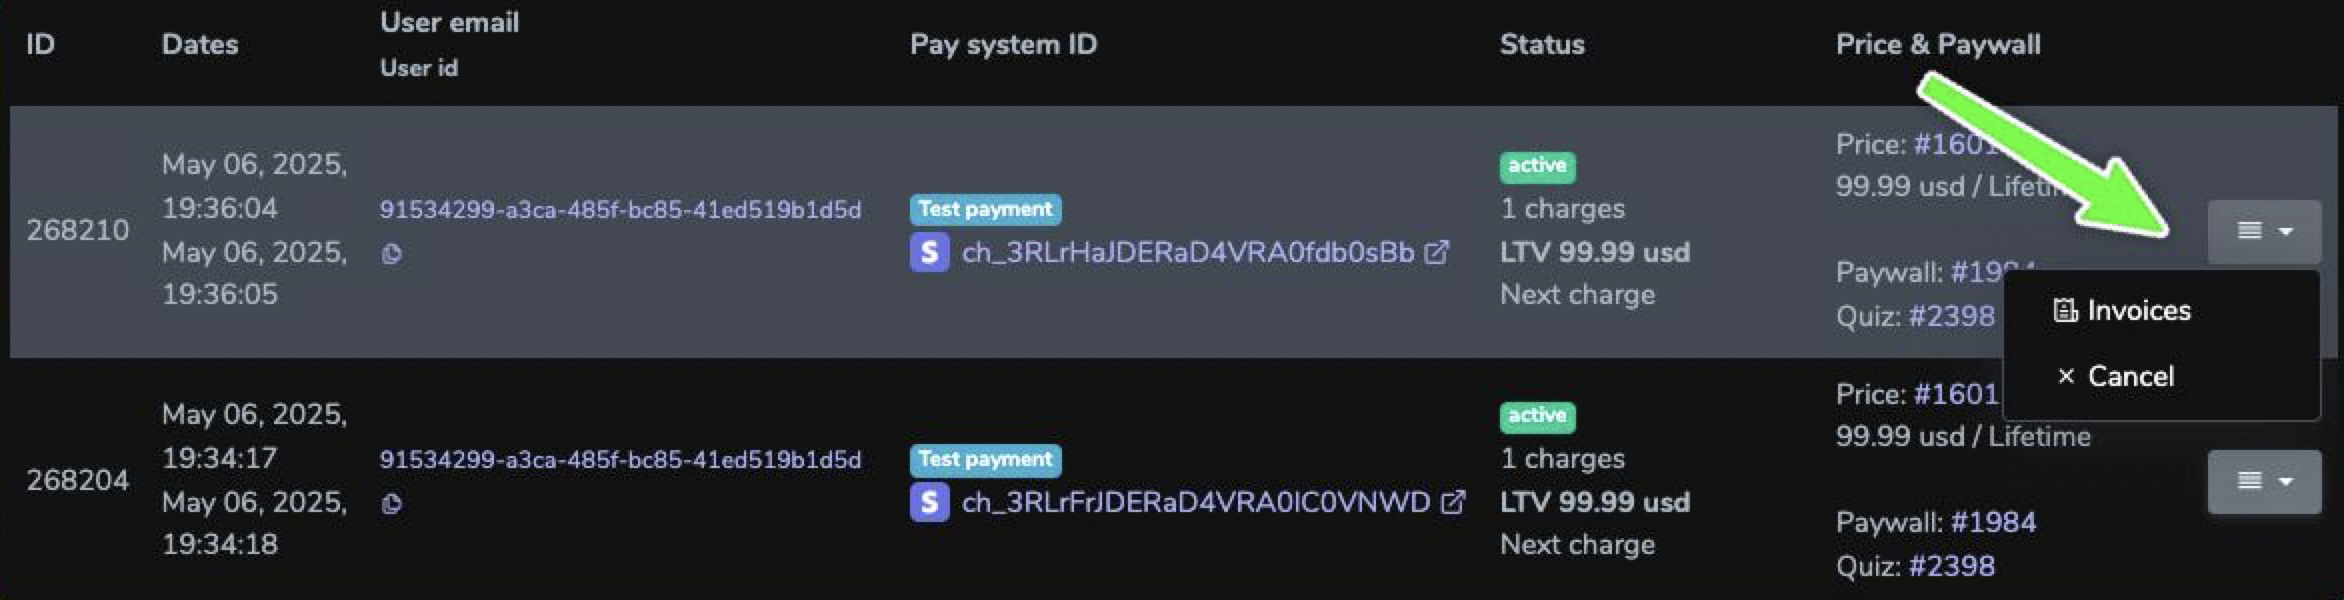
Self-service subscription portal (customizable quiz), email login, user_id links, downsell on cancel, and admin refunds.
We recommend giving users a self-service link to manage their subscription — cancel, change plan, or accept retention offers — without contacting support. In web2wave, that experience is a quiz: a fully customizable flow built from blocks such as User Subscription List, User Subscription Cancel, and Button Update Subscription.
Where to put the link
- Mobile app — add it under Settings → Subscription (or similar). Users expect to manage billing from the app menu.
- Website, emails, support — same portal URL or the email login page (see below).
- Your backend — read
manage_linkfrom the Subscriptions API or webhooks and pass it to the app.
The sections below cover setup, how users sign in, downsell/cancellation flows, and admin refunds.
Set up the customer portal
Overview
| Step | What to do |
|---|---|
| 1 | Find or create the portal quiz in your project |
| 2 | Customize the quiz (copy, screens, downsell logic) |
| 3 | Save the portal URL in Project → General → Customer portal link |
| 4 | Give users a way to open it (with or without user_id) |
Step 1: Find or create the portal quiz
- Open Quizzes & Pages in your project and look for an existing Manage subscriptions quiz (many projects already have one from onboarding).
- If it is not there: go to New quiz from template, copy Manage subscriptions, and publish it.
- Note the quiz URL (slug), e.g.
https://quiz.yourdomain.com/manage-subscriptions.
You can edit this quiz like any other — change copy, add screens, questions, or retention flows. For cancellation with downsell offers, see Subscription cancellation with downsell offer below.
Step 2: Add the link in project settings
In Project → General, set Customer portal link to your portal quiz URL. Include the USER_ID placeholder so web2wave can authorize each user:
https://quiz.yourdomain.com/manage-subscriptions?user_id=USER_IDIf USER_ID is omitted from the URL, web2wave appends ?user_id=... (or &user_id=...) automatically when sending login emails or building API links.
Fallback: if the General field is empty, web2wave uses Stripe → Customer Portal Link from payment settings.
Step 3: How users open the portal
Once the portal quiz and project link are configured, choose how users authenticate. Both options land on the same quiz; only the sign-in step differs.
Option A — Direct link with user_id (app, API, support)
user_id (app, API, support)Use this when you already know the web2wave user_id — for example after purchase, from a deeplink, your database, or the Subscriptions API.
- Get
user_idfrom your integration (API response, webhook payload, or stored after checkout). - Open the portal with
user_idin the URL, or use the ready-mademanage_linkfrom API/webhooks (it already includes the correctuser_id):
https://quiz.yourdomain.com/manage-subscriptions?user_id=abc123-def456- The user sees their subscriptions immediately — no extra login step.
Typical use: deep link from the mobile app Settings screen after you sync user_id from web2wave.
Option B — Email login, no user_id required (magic link)
user_id required (magic link)Use this when you only have the user's email — for example a “Manage subscription” link on your website or in a support reply.
-
Share your login page:
https://YOUR-DOMAIN/manage-account. Example - https://app.web2wave.com/manage-account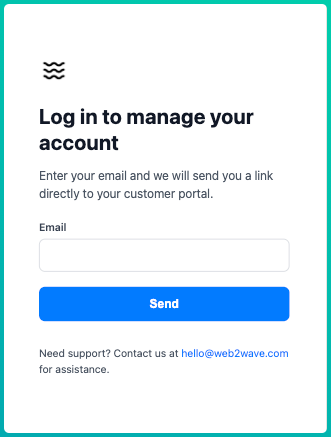
-
The user enters their email.
-
If that email exists in the project, web2wave sends Your customer portal login link — a magic link to the portal with their
user_idalready in the URL. -
The user opens the email and lands in the portal quiz, authorized.
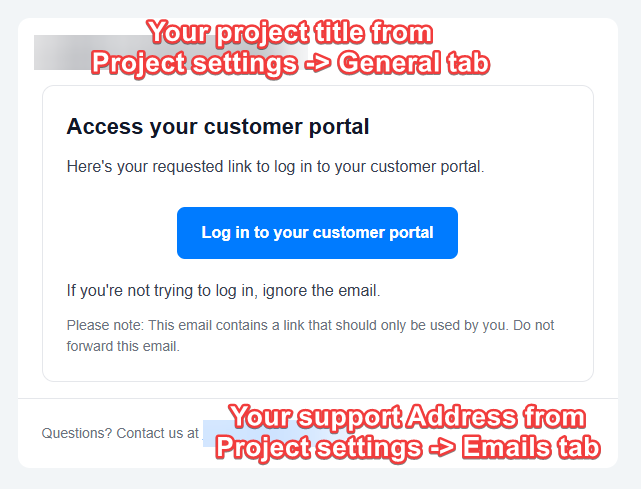
This is how email with magic link will look like in user's inbox
Requirements: Send from email address plus SMTP or a verified Resend domain in email settings. The /manage-account page shows a warning if something is missing.
Notes:
- The confirmation screen looks the same whether or not the email exists (for privacy).
- If several users share one email, web2wave picks the user with the most relevant subscription (active first, then most recent).
- A
Customer portal login link sentevent is written to analytics for the matched user. - For staging on a shared domain, append
?test_project_id=YOUR_PROJECT_SLUG.
Summary how to configure:
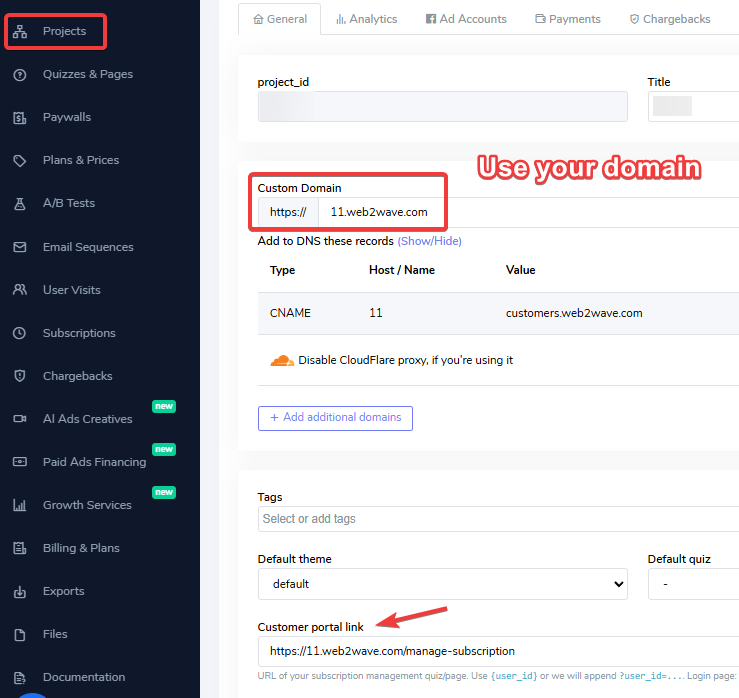
- Project settings -> General add Customer portal link with your domain URL.
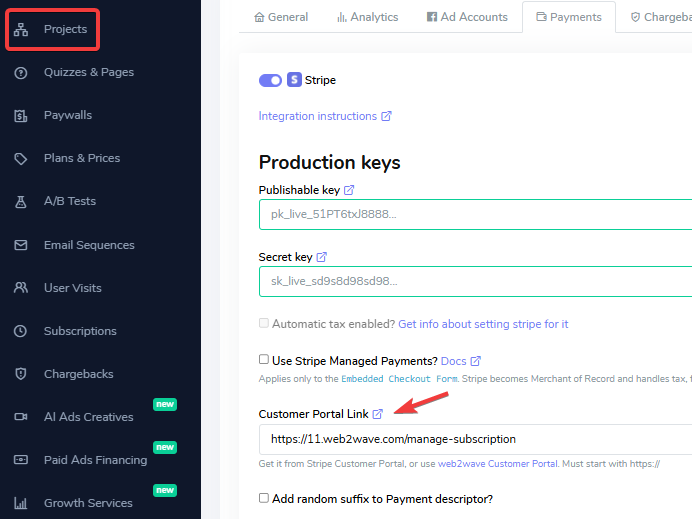
- Project settings -> Payments add same URL from previous step for Customer Portal Link.
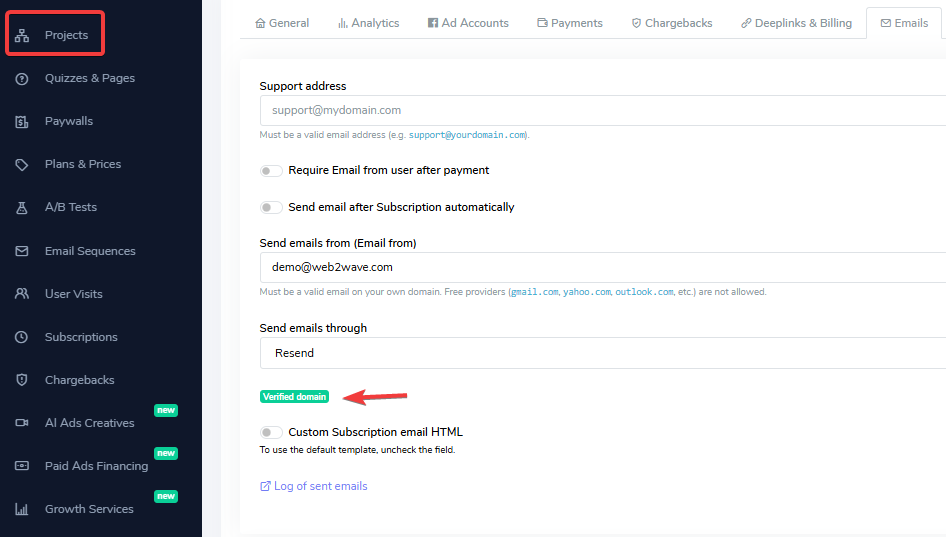
- Project Settings -> Emails make sure you have a Verified domain for Send emails from (Email from).
Subscription cancellation with downsell offer
The portal quiz can include retention flows — confirmation screens, downsell prices, and conditional cancellation paths. Everything below applies to the same portal quiz you configured above.
Quick setup checklist
Copy downsell template
- Use "Button Update Subscription" to offer downsell
- Hardcode the offer – e.g. always use "50% OFF"
- Define Downsell price ID for each Downsell price in Button settings
- Main price ID 1 => Downsell Price ID 1
- Main price ID 2 => Downsell Price ID 2
- 37837 => 21988
- 37823 => 21129
- Use selected_subscription.price.id in the Conditions to modify target prices
- Skip screen with "Button Update Subscription" for each Downsell price, so user will not be in constant loop
Detailed setup (step-by-step, as in the video)
Subscription cancellation flow with downsell offer
Use this flow to let users cancel subscriptions while offering a personalized downsell price before final cancellation.
1. Start from the downsell template
Create a new quiz from the Downsell template so you don’t have to build the flow from scratch.
- The template already includes the key blocks and screens for subscription selection, confirmation, downsell, and cancellation. You will only adjust content, prices, and conditions to match your offers.
2. Show user subscriptions
Add the User Subscription List block to the first screen of your flow.
- Option A or B above: user opens the portal and sees their own subscriptions in User Subscription List.
- Let the user select which subscription they want to cancel, and optionally show a “reason for cancellation” question and custom follow-up screens (for example, if they choose “Other,” show an extra text question screen).
3. Build confirmation screens before cancellation
Insert 1–2 “are you sure?” confirmation screens between subscription selection and actual cancellation to reduce accidental churn.
- A typical pattern is:
- Screen 1: title, paragraph, and two buttons:
- Keep plan → sends user to a “Great choice” / “Glad you decided to stay” screen (no cancellation happens).
- Cancel plan → sends user to the next pre-cancellation screen.
- Screen 2: repeat confirmation (“Are you sure?”) with the same logic:
- Yes, keep plan → “Great choice” screen.
- Still cancel → sends user to the downsell offer screen.
- Screen 1: title, paragraph, and two buttons:
4. Configure the downsell offer (Button Update Subscription)
On the downsell screen, use the Button Update Subscription block to switch the selected subscription to a lower-priced Stripe price instead of canceling.
- In the Subscription_Id parameter set
{subscription_id}placeholder that points to the subscription selected in User Subscription List, so the button updates the correct subscription for this user. - In the button settings, specifically the Price parameter downsell discounts cannot be calculated dynamically; instead, define a fixed discount (for example, 50% off) and create a separate mapping of “main price → downsell price.”
Example mapping table:
- Main price A → Downsell price A
- Main price B → Downsell price B
- Main price C → Downsell price C
5. Set conditional overrides for each main price
- In Button Update Subscription, leave the default price empty or set a neutral default.
- Use the Price → Has Conditions to override the price based on the selected subscription’s price ID:
- Condition 1: if
selected_subscription.price.id = MAIN_PRICE_1, set button price ID = DOWNSELL_PRICE_1. - Condition 2: if
selected_subscription.price.id = MAIN_PRICE_2, set button price ID = DOWNSELL_PRICE_2. - Repeat for every main price you support.
- Condition 1: if
In the Stripe create new downsell price and import it. In the Plans & Prices, import new prices and retrieve the downsell Price ID.
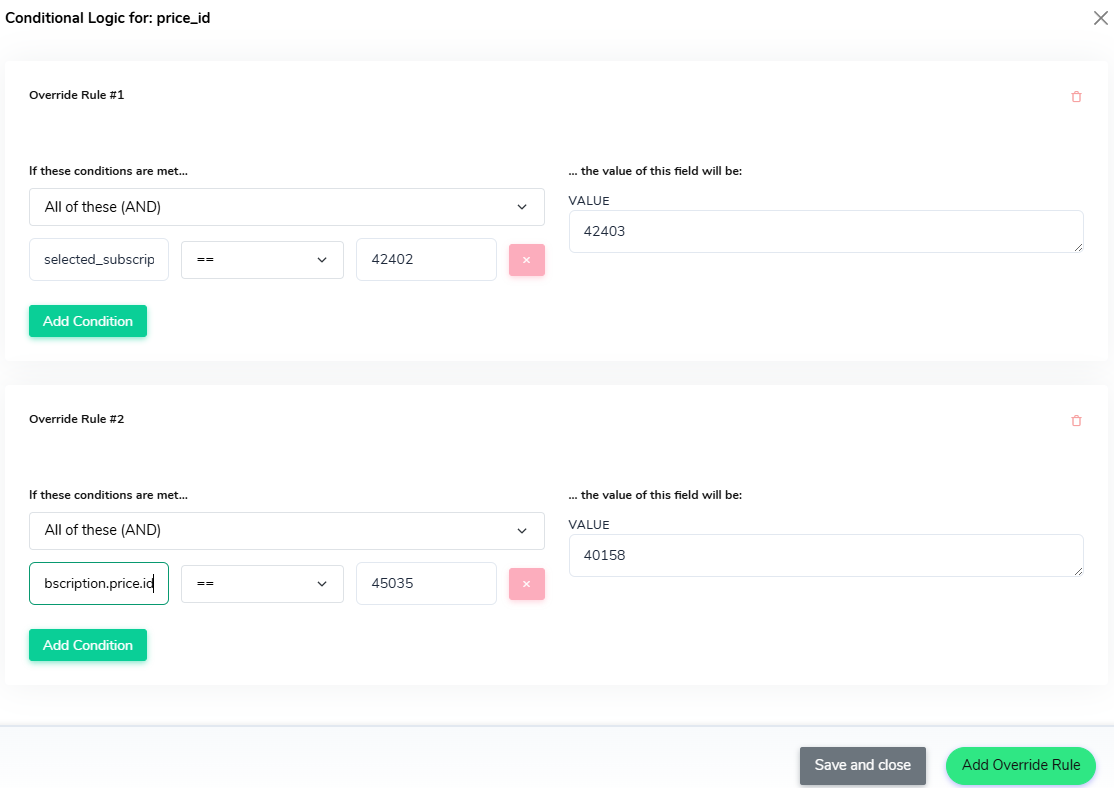
Conditional logic for the Price parameter to map base price with downsell price
This creates one rule per main price.
For On success of the downsell button, send the user to the “Great choice / Thanks for staying” screen so they clearly see that their plan has been updated instead of canceled.
6. Keep the standard cancellation path
Keep a User Subscription Cancel button in the flow for users who decline the downsell and still want to cancel.
- This button should use the selected subscription and call the standard cancellation logic (for example, cancel at period end or immediately, depending on your configuration).
7. Handle users who already have a downsell or PayPal subscription
If a user accepted a downsell earlier and later returns to the Manage subscription flow, they will now see the subscription with the already discounted price.
For these cases, you should skip the downsell offer and send them directly to cancellation, because you don’t want to offer a second downsell on top of an existing one.
- The same applies to subscriptions with PayPal payment system when subscription price updates are not supported via the downsell button.
On the pre-cancellation screen where you show the “Cancel plan” button that leads to the downsell offer:
- Add conditions to Visibility → Has conditions parameter:
selected_subscription.price.idis one of your downsell prices (user is already on a downsell), valuehideselected_subscription.payment_system_label=PayPal(downsells not supported via this flow), valuehide
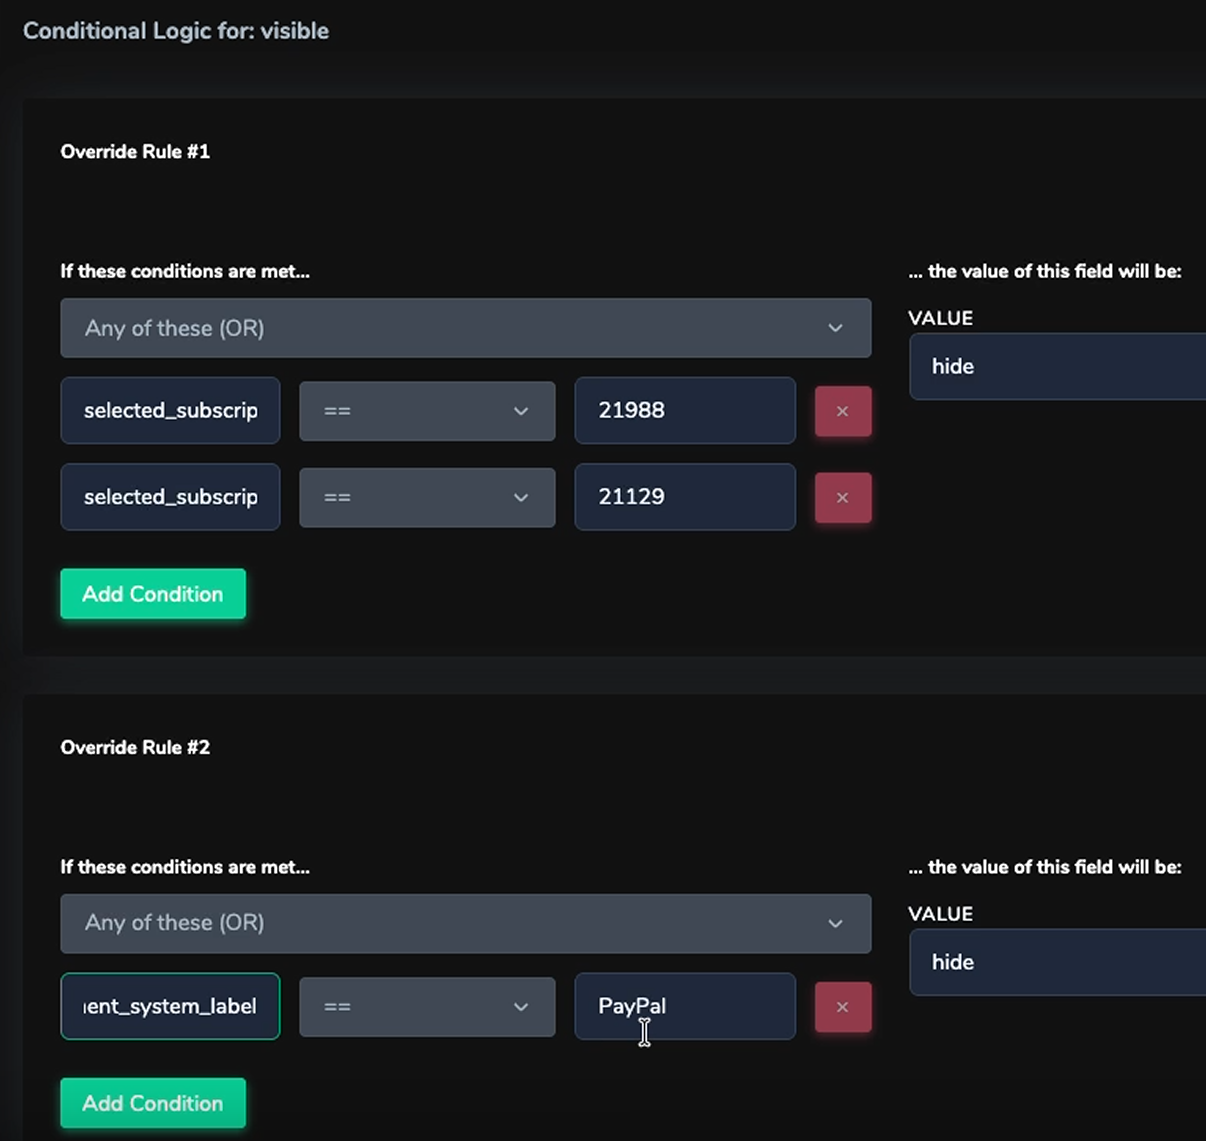
Conditional logic for Visibility parameter to hide it from users that already purchased it or if you're using PayPal
For the User Subscription Cancel Button block that cancels the subscription immediately:
- Hide this button by default (Visibility - hide).
- Add inverse conditions to Visibility → Has Conditions it if:
selected_subscription.payment_system_label=PayPal, valueshowselected_subscription.price.idequals any of your downsell prices, valueshow
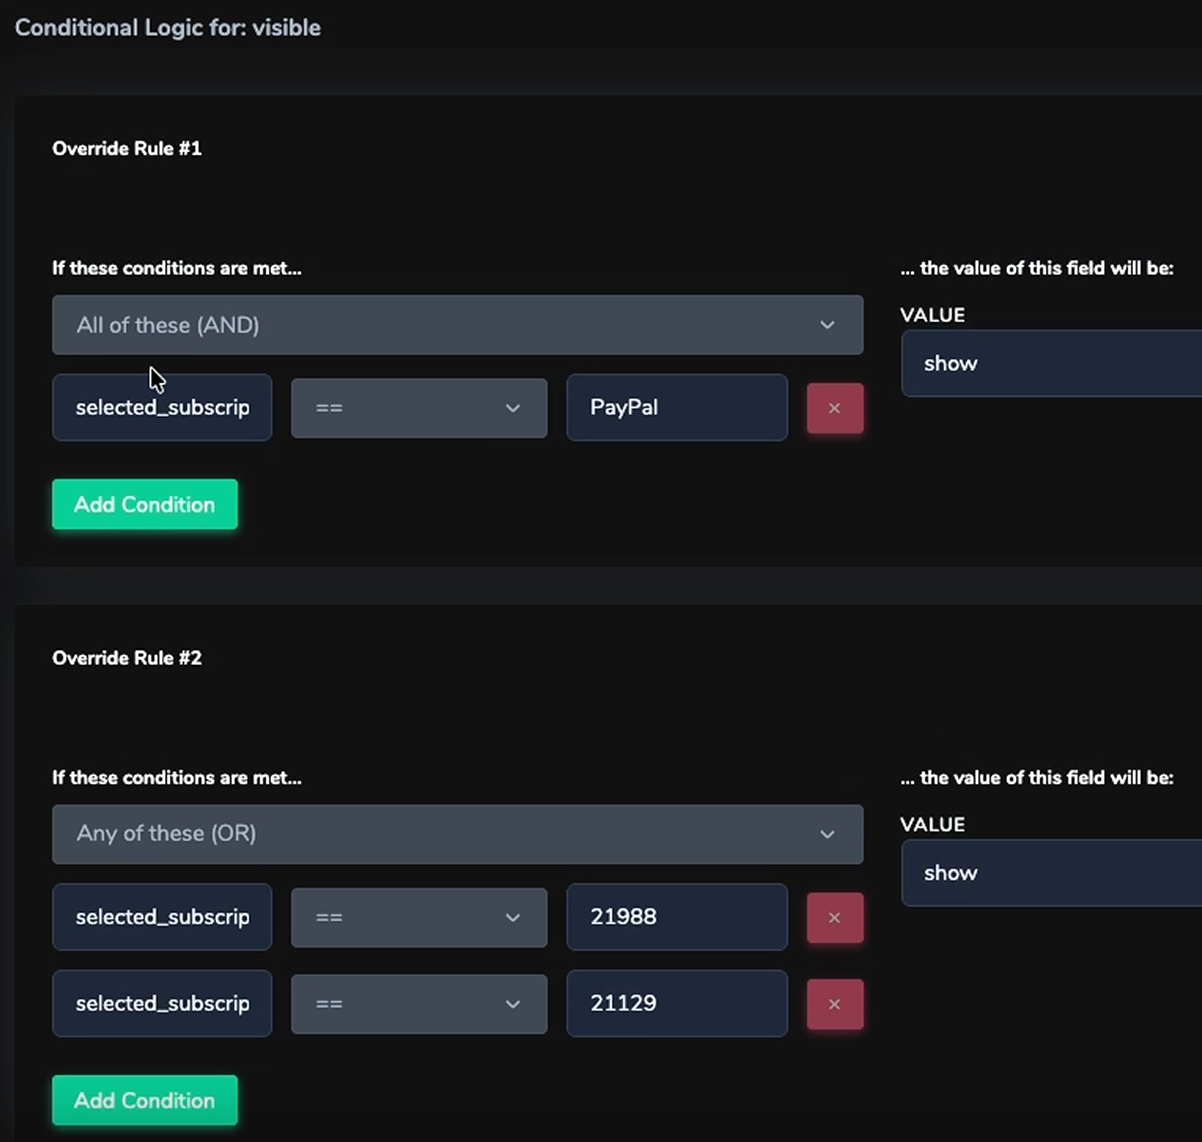
Conditional logic to show the button if user already has purchased downsell or if PayPal is used
In this case, clicking the button sends the user directly through the cancellation (without going to the downsell screen).
8. Resulting behavior
With this setup:
- First-time cancellation attempts on full-price Stripe plans will go through the pre-cancellation screens and receive a matching downsell offer based on the selected price ID.
- Users on an existing downsell price, or those paying via PayPal, will skip the downsell screen and go directly to an immediate cancellation button.
- You can extend the flow with additional questions, screens, or more complex conditions, but this structure covers the most common retention plus cancellation cases supported today.
Refunds and subscription cancellations right on the platform
Now you can refund users their payments and cancel their subscriptions right on the platform – no need to go to payment system and look for payment, everything from web2wave interface
It works for Stripe, Paddle, PayPal and Primer