
To integrate your LearnWorlds account with web2wave, follow these steps. This integration ensures that after a user's first purchase, they are automatically created as a user in LearnWorlds and are granted access to the course.
✅ Step 1: Enable LearnWorlds Synchronization
In your web2wave dashboard, navigate to the "Project" settings, "Deeplinks & Billing" tab and check the box that says “Synchronize with LearnWorlds” (as shown in the UI). This activates the fields where you will enter your API credentials and course data.
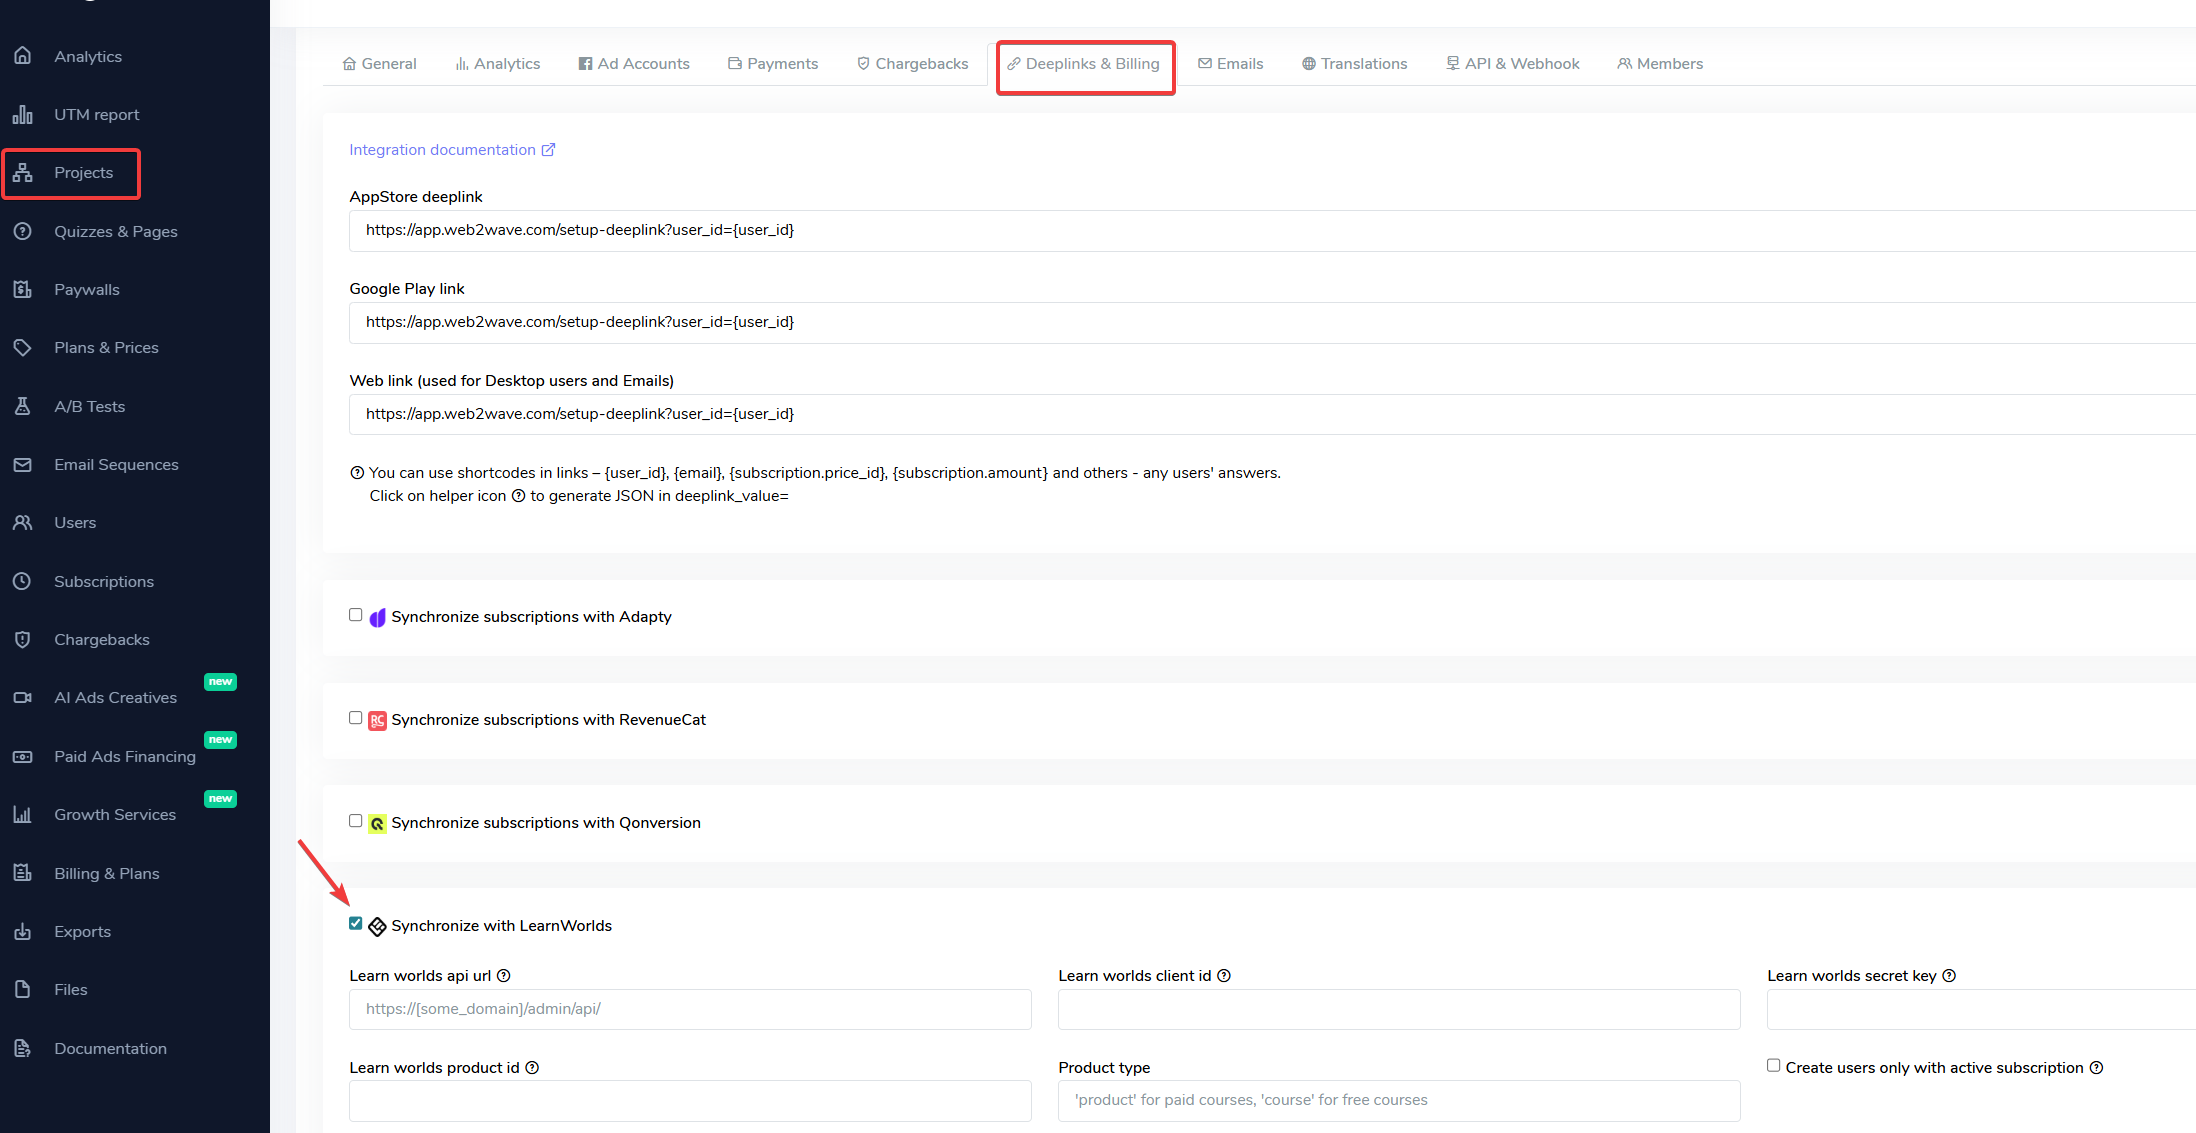
How to enable synchronization with LearnWorlds
🔐 Step 2: Retrieve Your LearnWorlds API Credentials
You need the following four pieces of information from LearnWorlds:
-
Learn worlds api url – Format:
https://<your_subdomain>.learnworlds.com/admin/api
Replace<your_subdomain>with your actual LearnWorlds subdomain. -
Client ID and Secret Key
To get these:- Go to your LearnWorlds Admin Panel
- Navigate to Settings > Integrations > API & Webhooks
- Click on Create API Client
- Copy the generated Client ID and Secret Key
-
Learn worlds product id
- This is the internal ID of your course or product in LearnWorlds.
- You can find it by going to Courses, selecting the relevant course, and checking the URL or course settings.
-
Product Type
- Set this to
'product'for paid courses - Set this to
'course'for free courses
- Set this to
-
Create users only with active subscription
- If enabled, users will be created in LearnWorlds only when they have an active subscription (active or trialing status)
📘 Official LearnWorlds API Documentation:
LearnWorlds API Guide
🛒 What Happens After a User Purchases
Once LearnWorlds is connected and active:
- On the first successful purchase made through your web2wave funnel,
- A new user will be automatically created in your LearnWorlds school,
- That user will be granted access to the specified product or course.
This ensures a seamless experience without requiring the user to register again or manually navigate between platforms.
Recommended setup
- Navigate to "Quiz" section and use "New Quiz from Template" button.
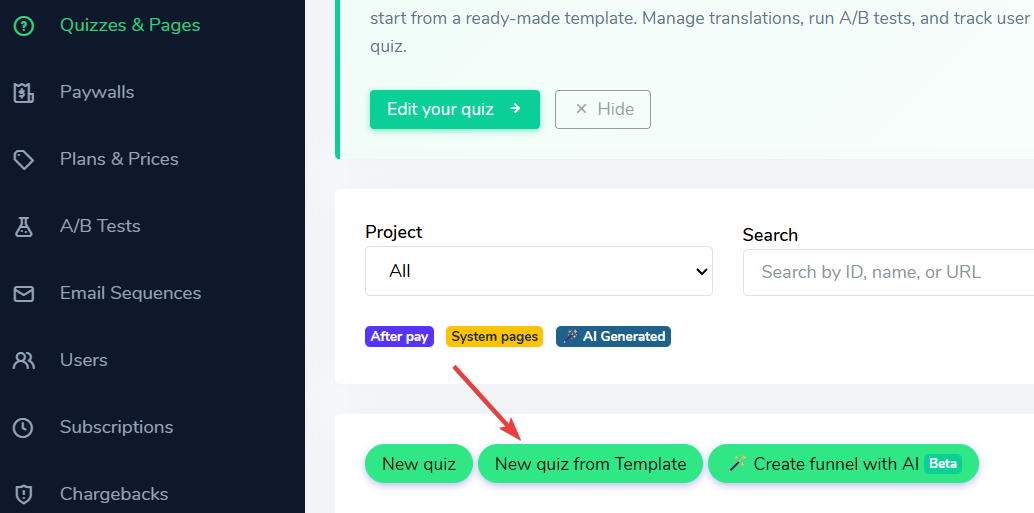
Creating new quiz from template
- Use the "After pay" button (1 at the screenshot) to filter the templates. Then Copy to your project (2 at the screenshot)
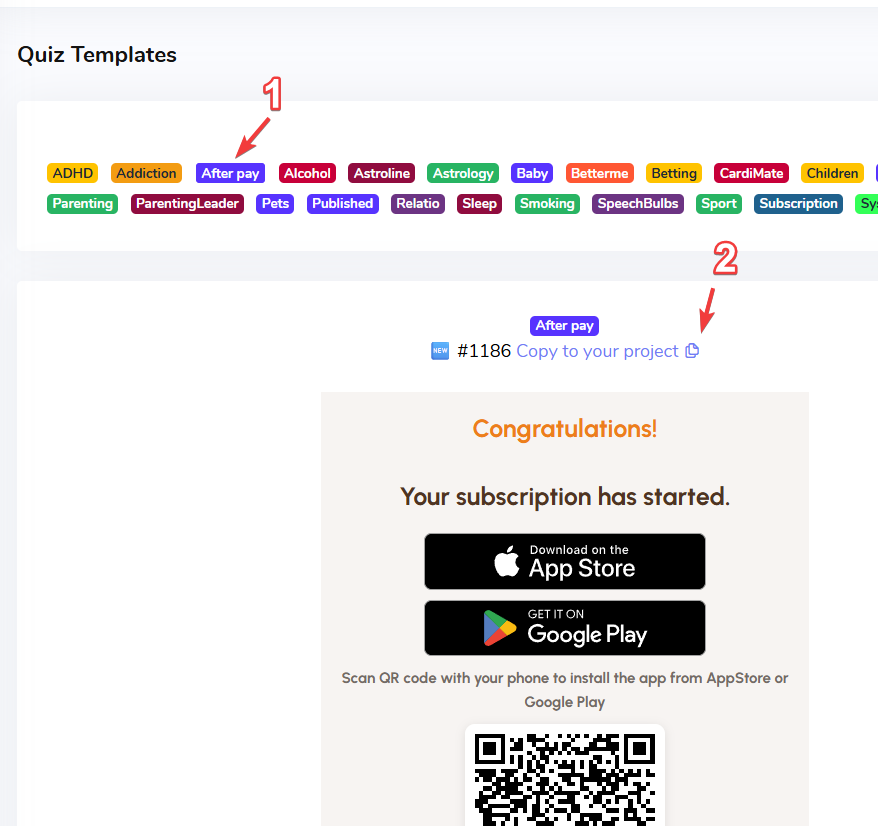
Creating of After Pay page
- Edit this new "After pay" Quiz and add "Redirect to URL" block.
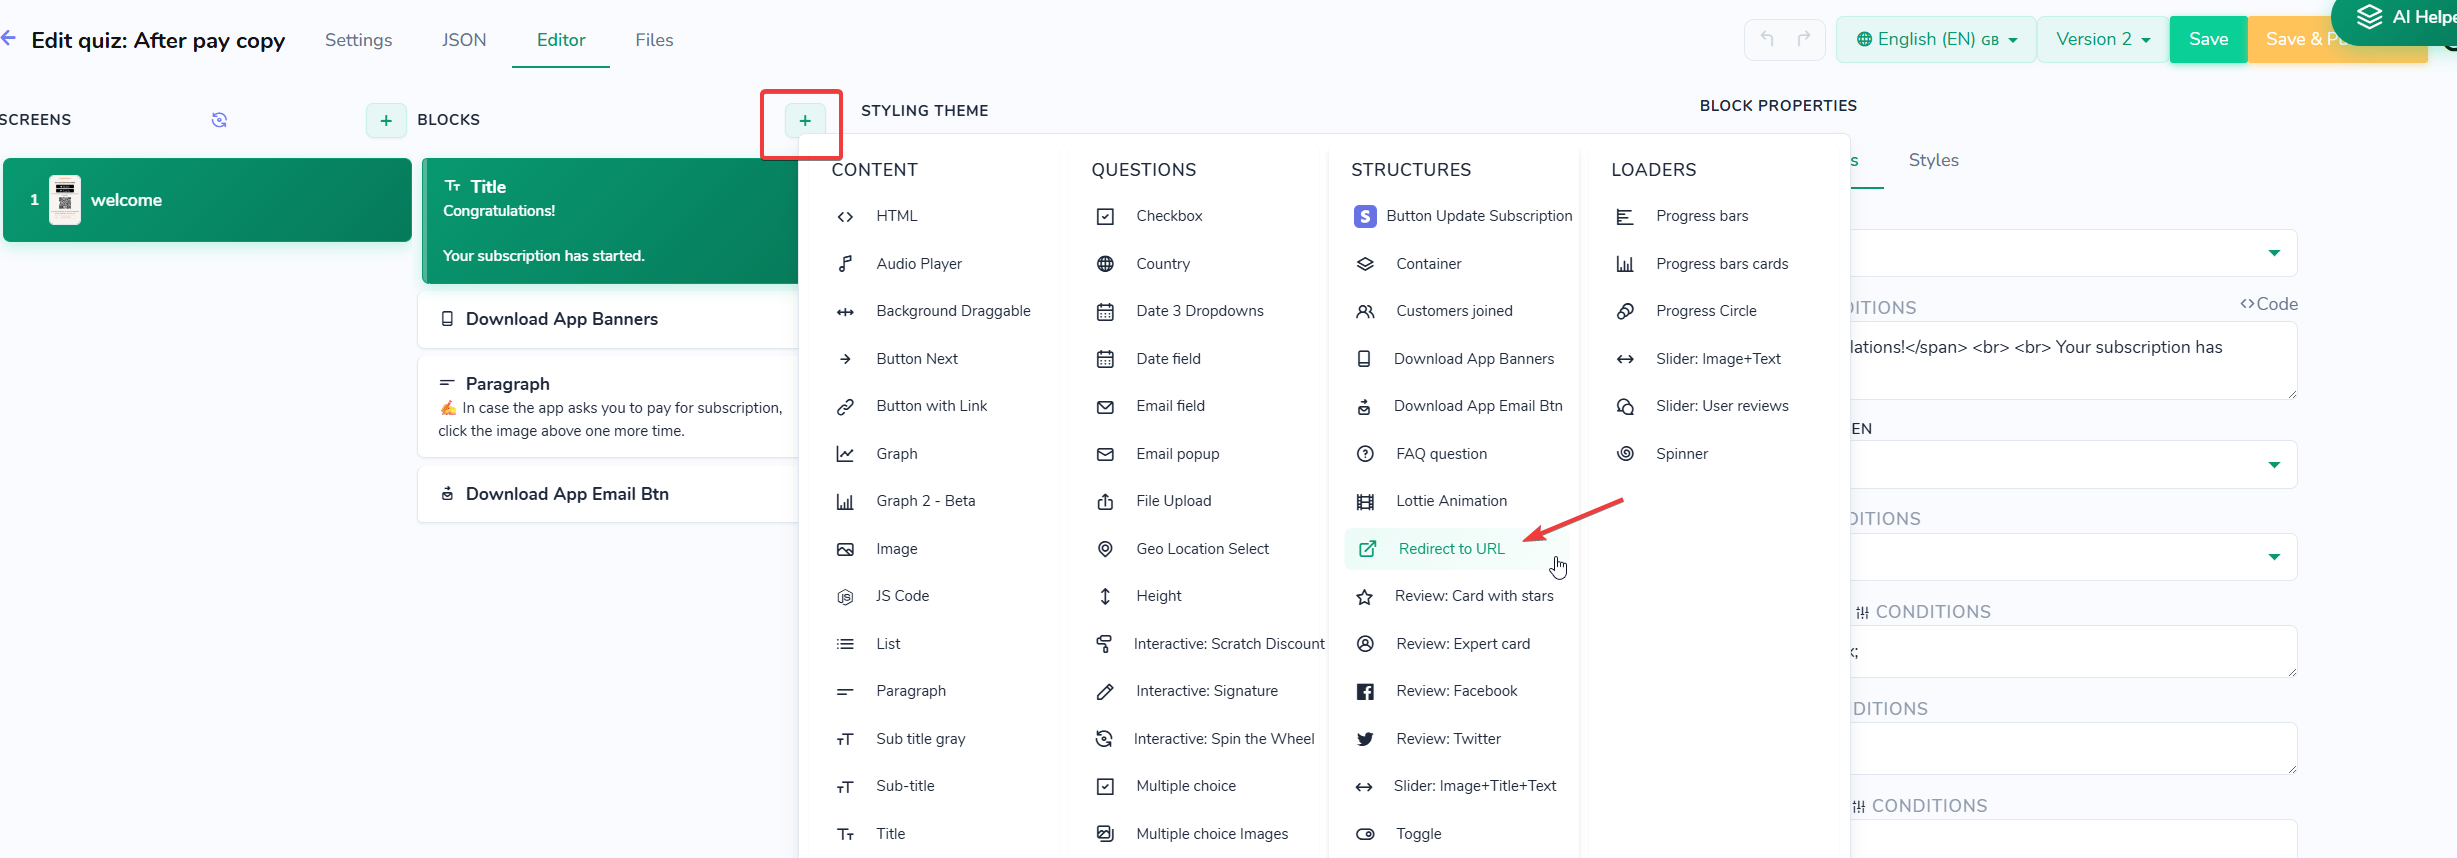
Adjusting after pay page to redirect users in the LearnWorlds
- In the editor, you can use "Settings" button to review current URL.
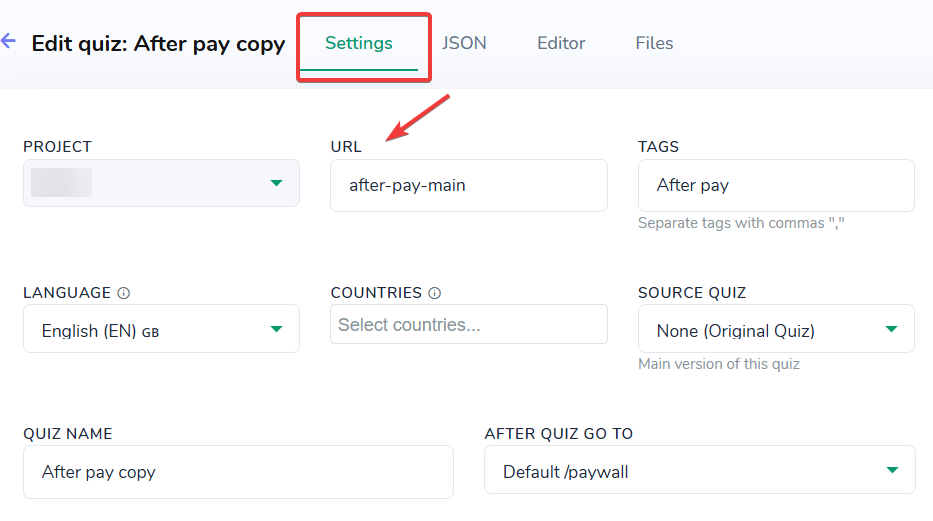
How to check current Quiz URL
This URL is now required to be pasted in "URL" section of this block /after-pay-main, "Delay in Miliseconds" must be equal to 2000 and the "Visibility" must use "hide" by default, use "Conditions" button.
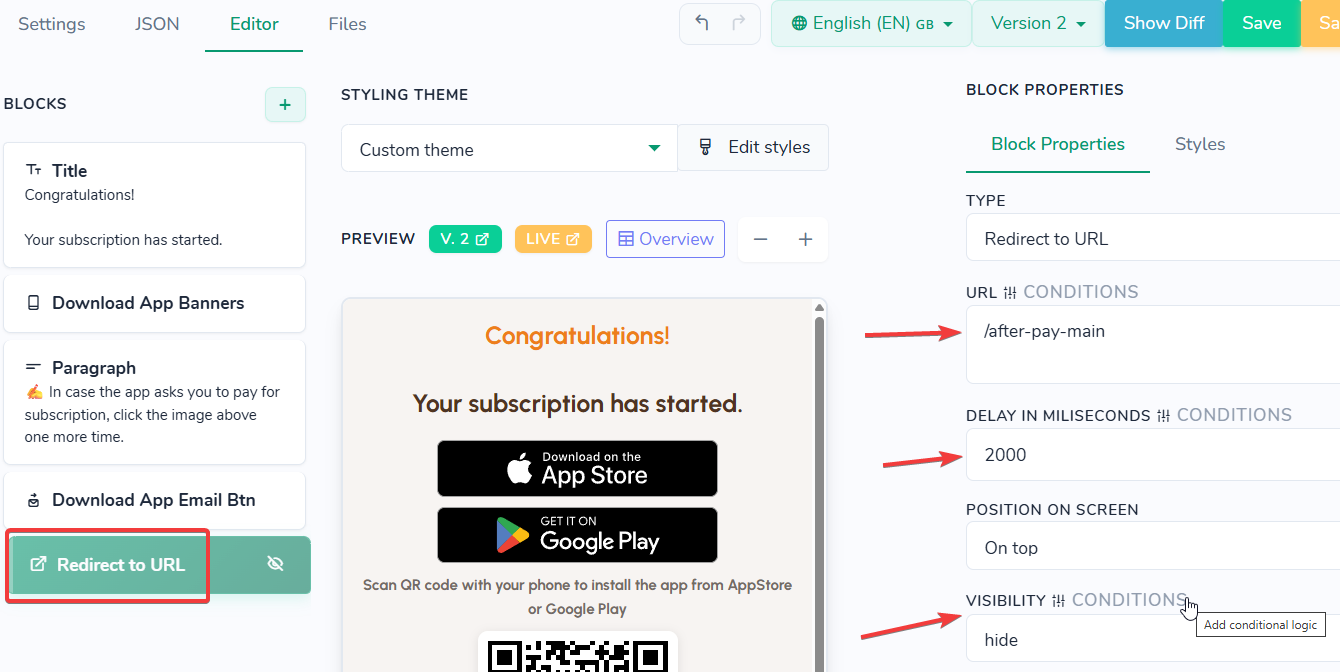
Illustration how to configure Redirect to URL block for LearnWorlds
In Conditional Logic window use "Add override rule" button, then "Add condition" button. "user_property" field must use learnworlds_sso_url, condition "not exists", and value "show".
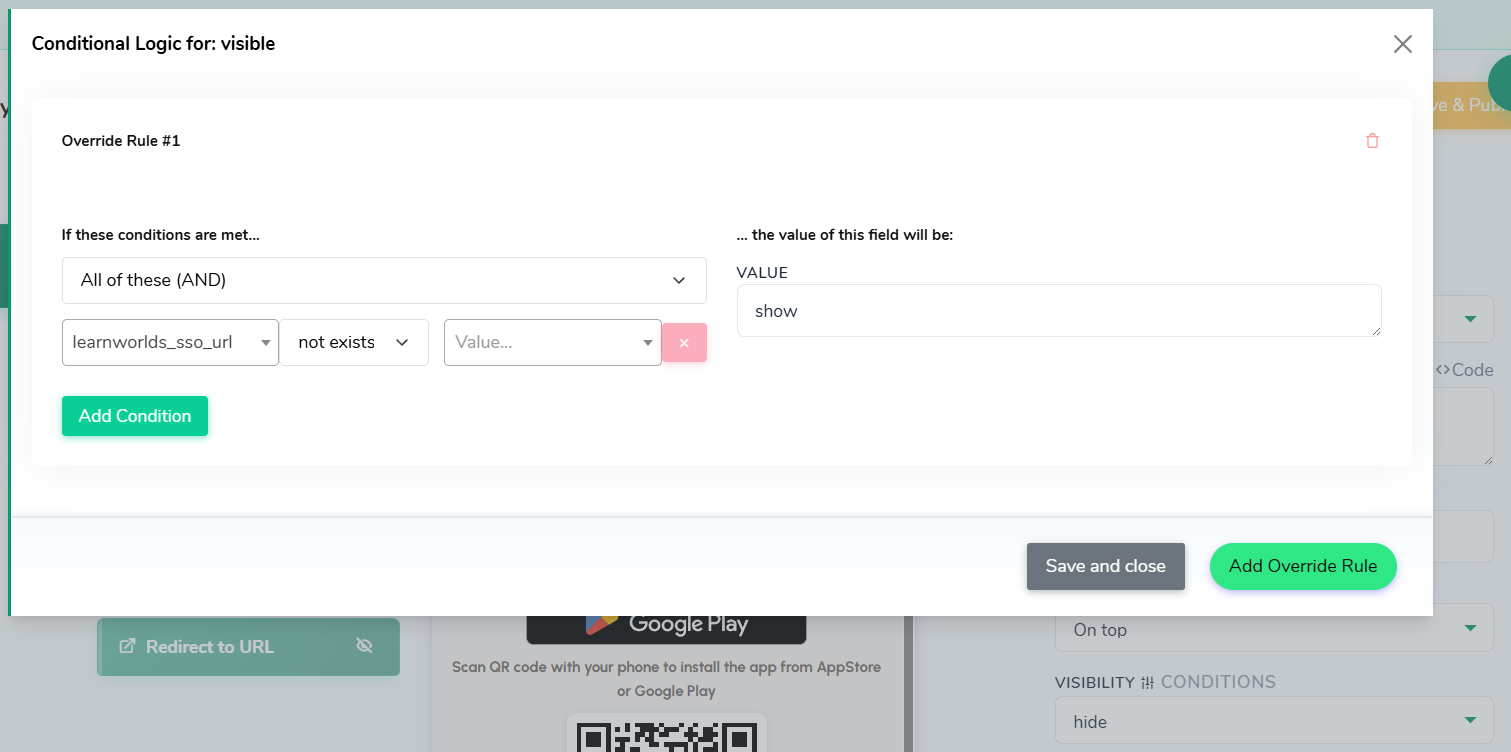
Illustration how to define conditional logic for Redirect to URL block for LearnWorlds
- Now we need to add LearnWorlds link by using "Button with Link" block.
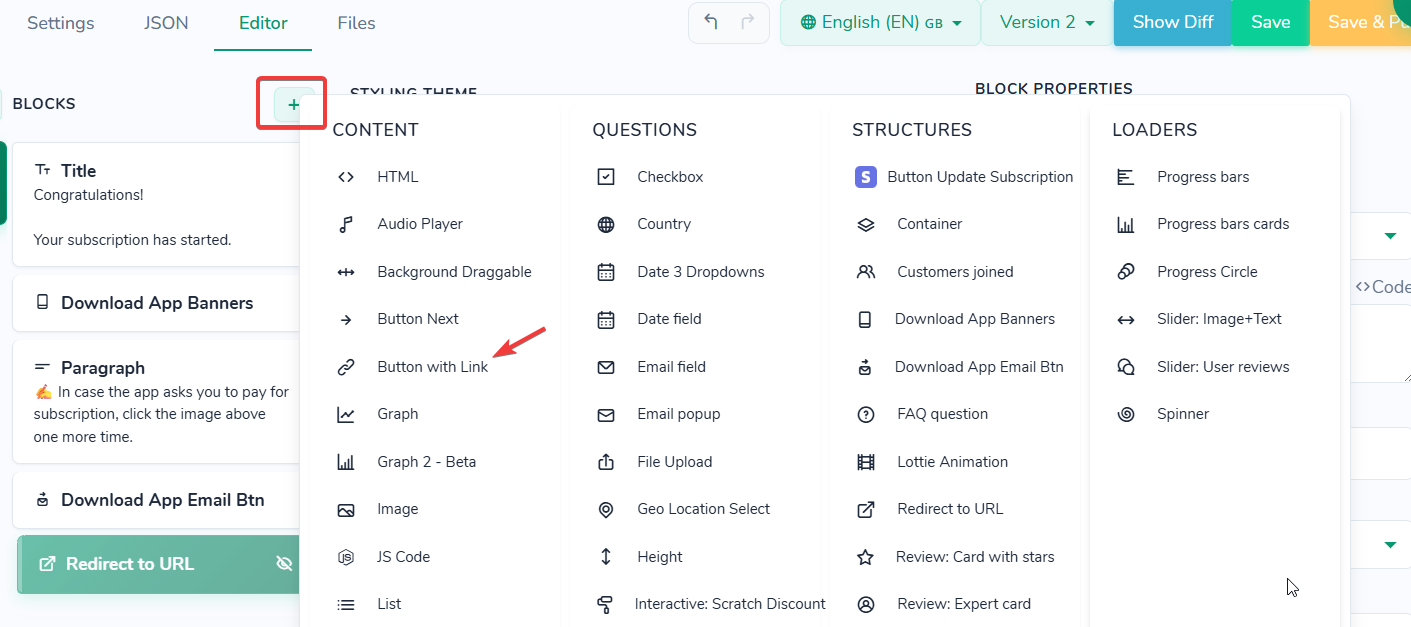
Final touches with after pay configuration, adding LearnWorlds link
In "URL" section LearnWorlds link should look like {learnworlds_sso_url||https://www.yourLearnWorldsURL.com/start}
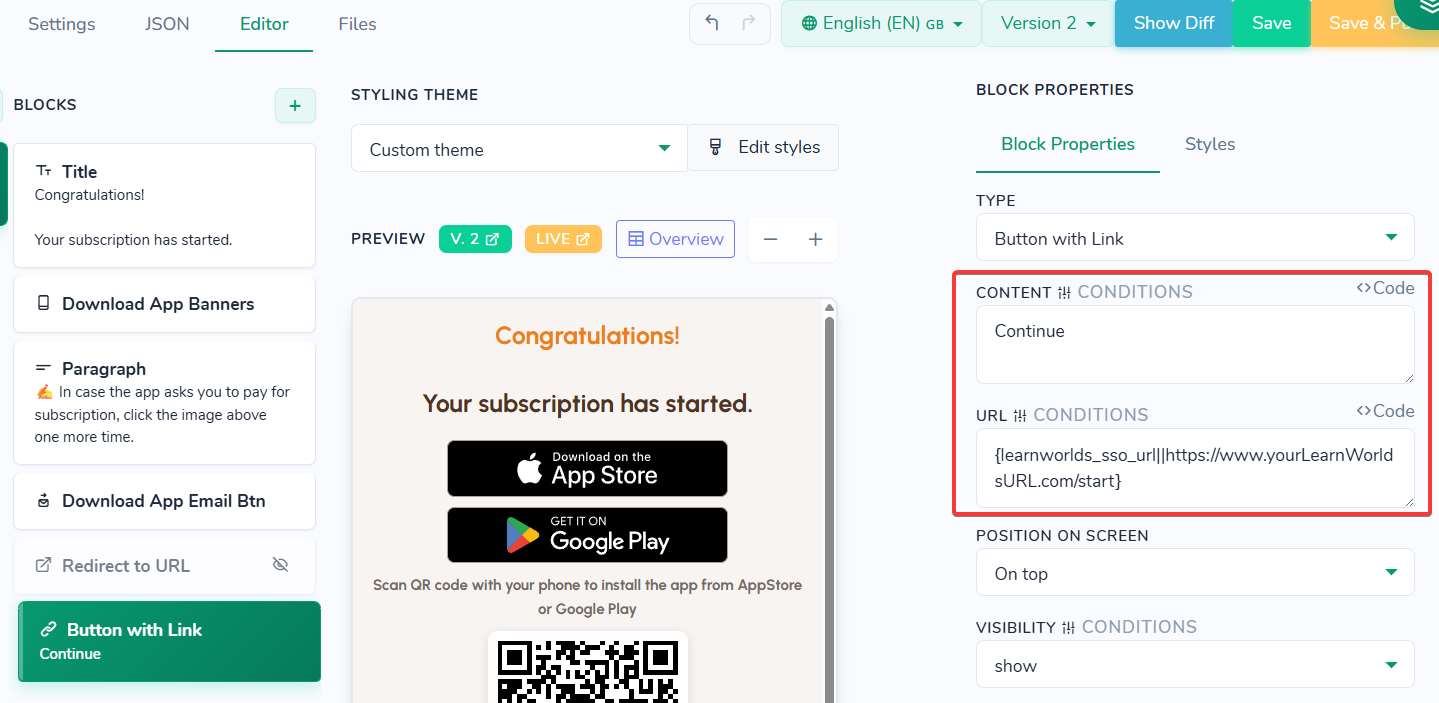
Adding LearnWorlds link
"Visibility" parameter must use "show" value but we need to add reversed conditions from step 4. learnworlds_sso_url must use "hide" now, condition "not exists".
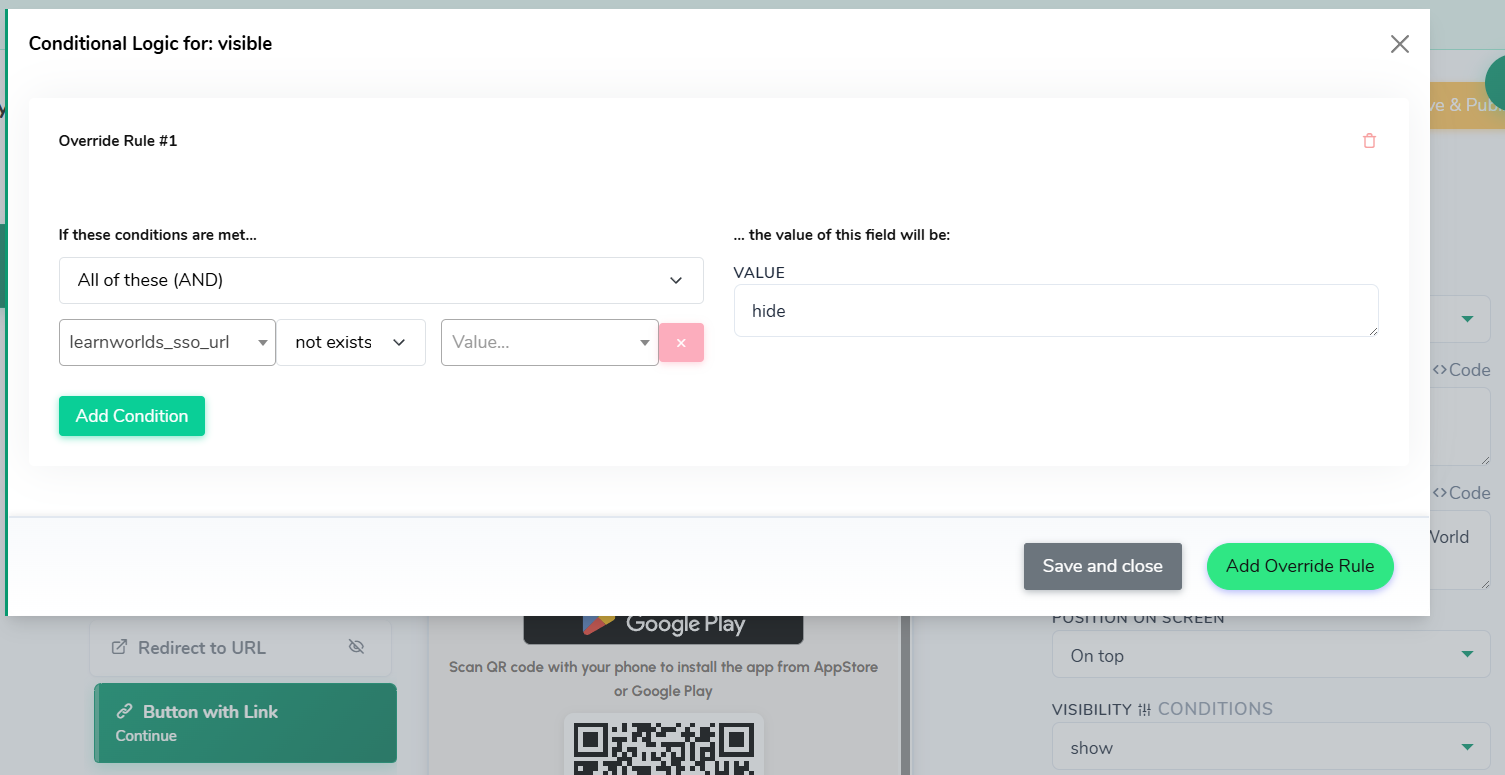
Hiding LearnWorlds link if user is not created
- At last, in your payment flow, at the Paywall "Settings", define the "After Payment go to" to use new "After Pay" page.
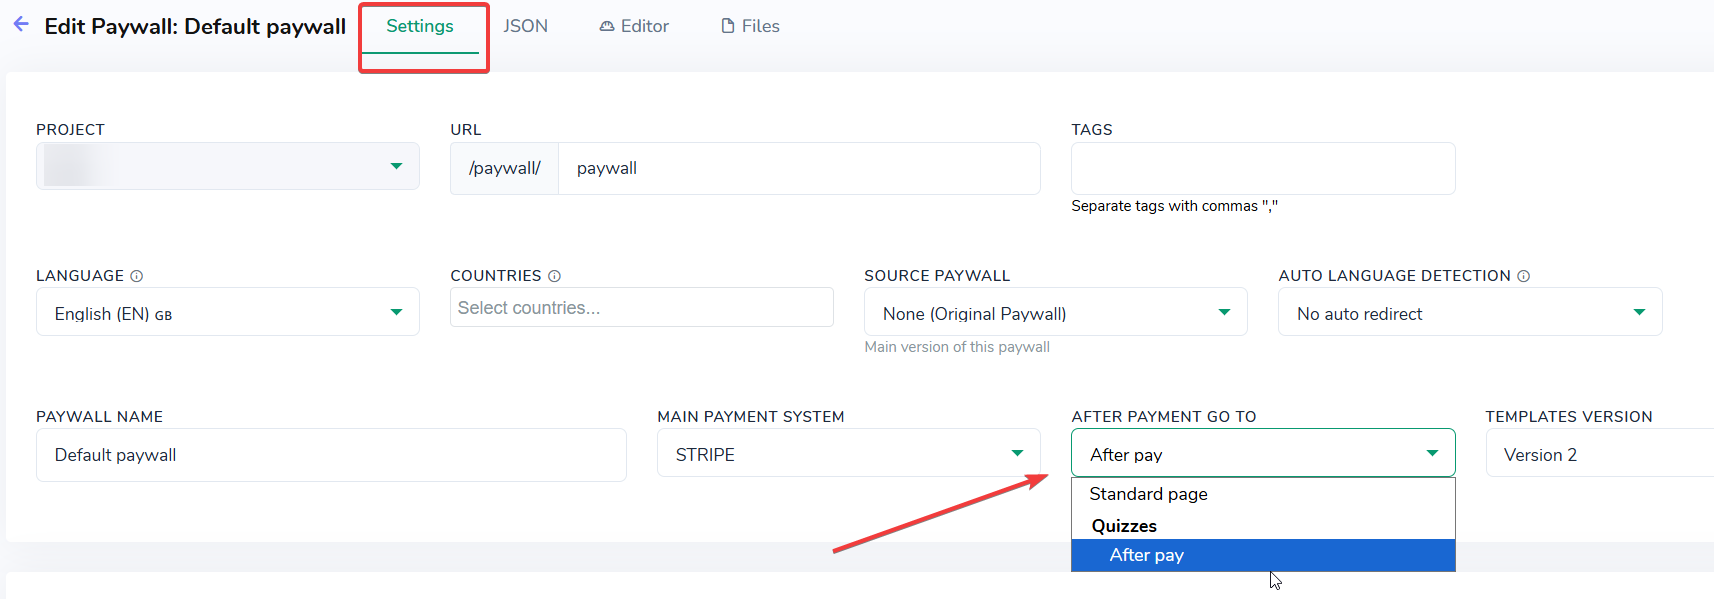
Defining the page to be opened after payment
Why this setup works this way
After a user pays, web2wave starts creating their LearnWorlds account in the background. This takes a moment - the system needs to generate a personal login link learnworlds_sso_url before the user can access the course.
The "After Pay" page is designed to wait for this link automatically. Here is what happens step by step:
- The user lands on the "After Pay" page right after payment.
- At this point, the
learnworlds_sso_urldoes not exist yet, so the "Redirect to URL" block becomes visible and sends the user back to the same page after 2 seconds. - The page reloads and checks again - this repeats until the SSO link is ready.
- Once
learnworlds_sso_urlis generated, the redirect block hides itself and the "Button with Link" appears, showing the user their personal link to LearnWorlds.
This means the user never sees an error or an empty page - they simply wait a few seconds and the button appears automatically when their account is ready.
🧪 Test the Integration
After filling out all required fields:
- Save your settings.
- Make a test purchase using a test user to verify the user is created and course access is granted.
If anything fails, recheck the credentials and product ID, or consult the LearnWorlds API logs.