
Configure Paddle, connect it to web2wave, and import your first product and price.
Paddle is a payment infrastructure company built specifically for software businesses - SaaS products, mobile apps, digital content, and the like. Paddle acts as a Merchant of Record (MoR). This means that legally, Paddle is the seller of your product, not you. Paddle handles everything that normally makes selling software internationally painful - collecting and remitting sales tax and VAT in every country, managing chargebacks and fraud, handling refund disputes, issuing invoices that comply with local laws, and staying current with ever-changing global tax regulations.
Integration guide
Paddle integration is available for users on the Pro plan and Advanced plan. It is not available on the Basic or Starter tiers.
Part 1 – Domain Approval
- Log in to your Paddle account. You will land on the Paddle Sandbox welcome screen (or your live dashboard). In the left sidebar, go to Checkout → Website Approval.
- On the Domain Approval tab, click + Add a New Domain.
- Type your main domain into the field, with any subdomain going into the other field. For example, in the screenshot,
web2wave.comis entered first. Then,app.web2wave.comis also added separately as a subdomain. Click Submit for Approval for each domain. Wait until the status shows Approved before continuing.
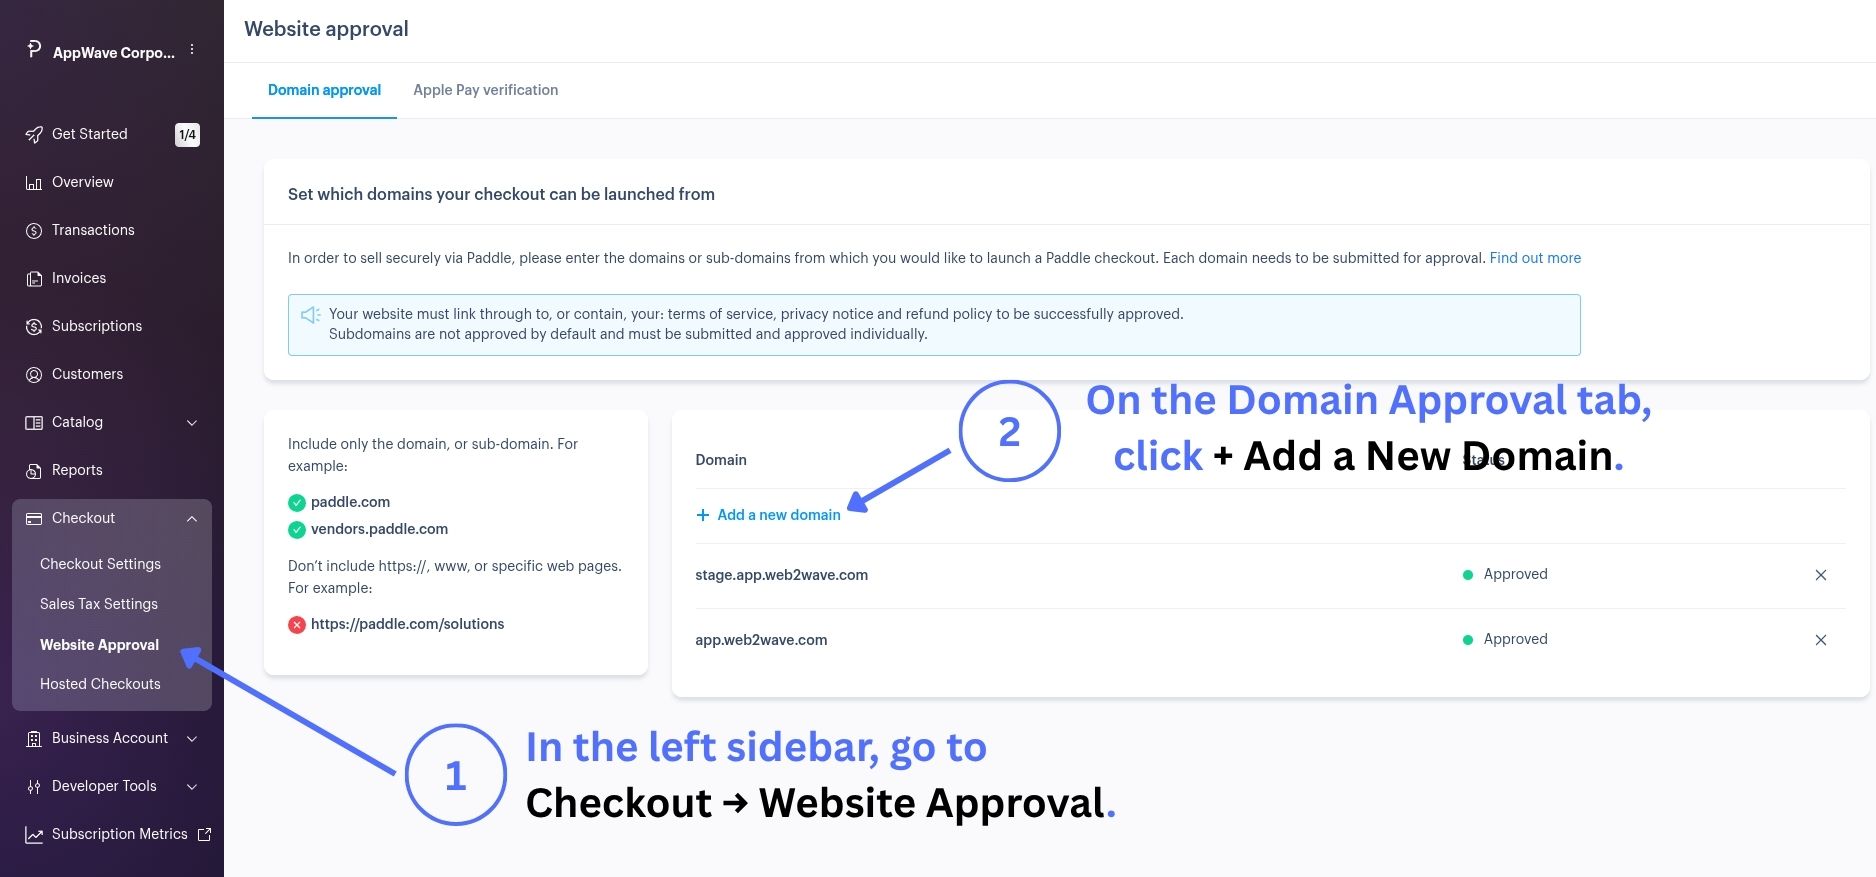
Your website must link to, or contain, your terms of service, privacy notice, and refund policy to be approved. Subdomains must be submitted and approved individually. Integration might function incorrectly if one of the subdomains is not approved while the main domain is approved.
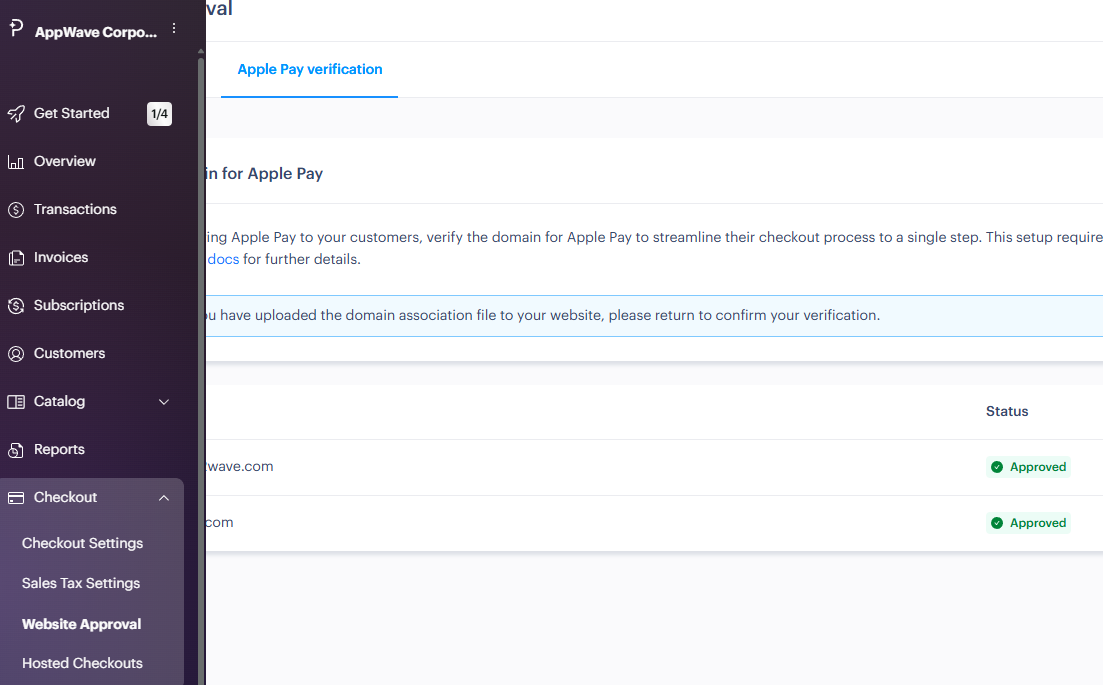
If you are offering Apple Pay to your customers, you must approve your domains one more time on the Apple Pay Verification tab.
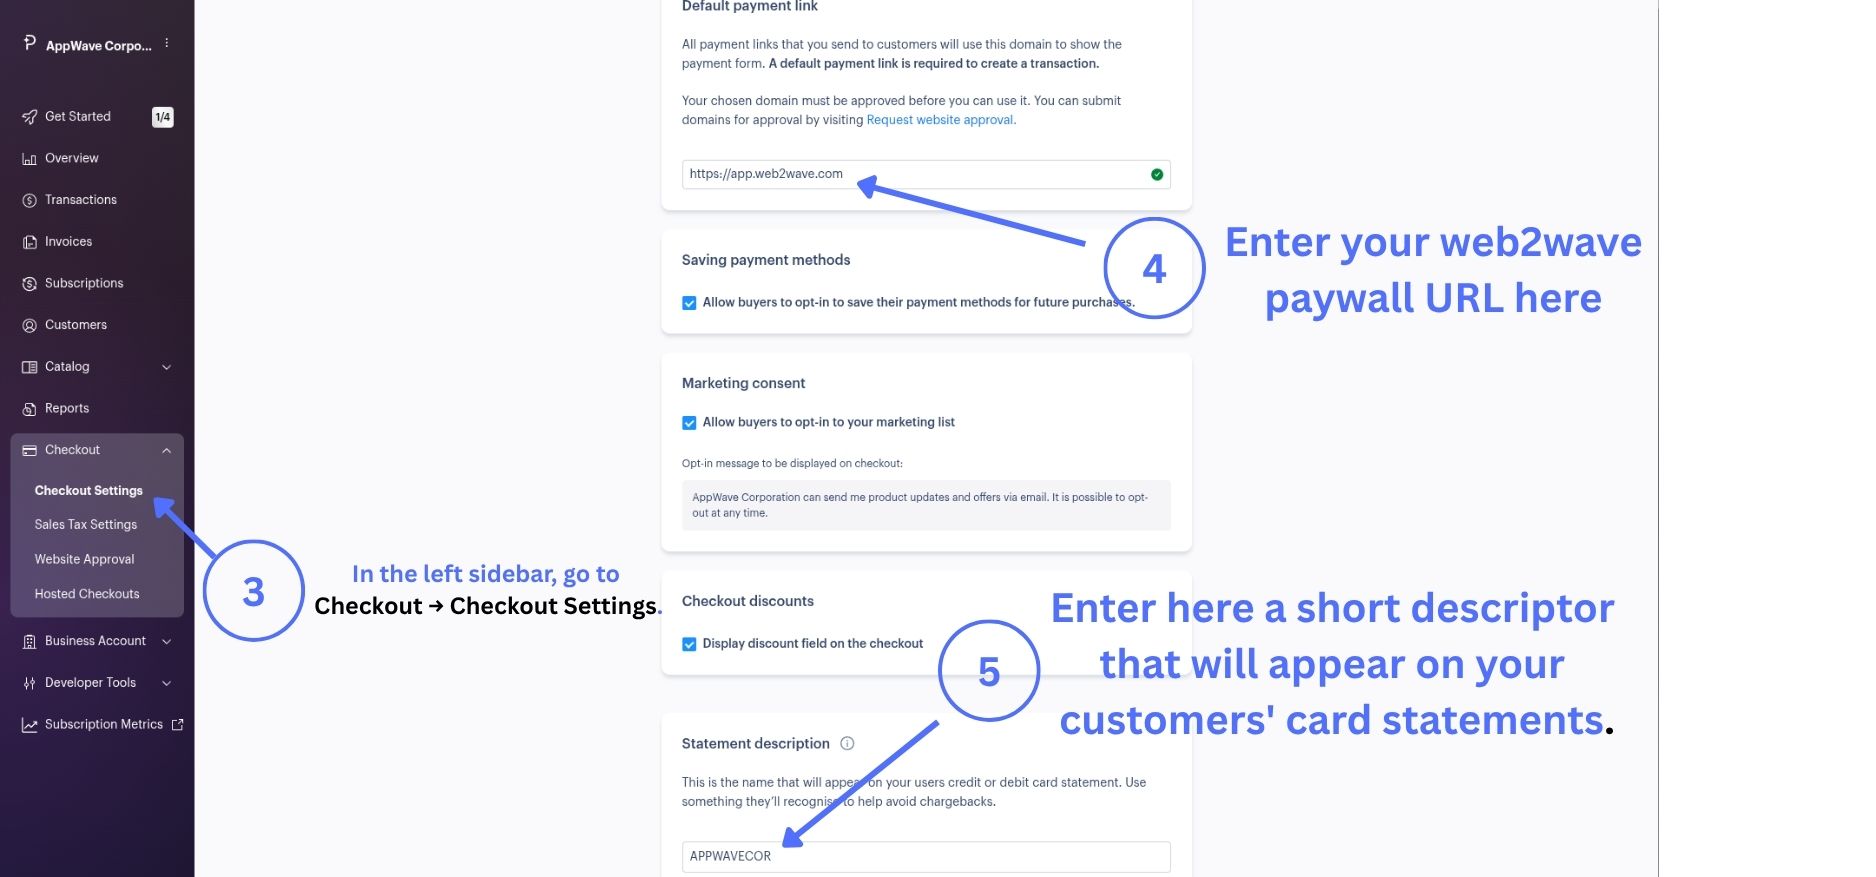
- In the left sidebar, go to Checkout → Checkout Settings.
- Scroll to the Default Payment Link section. Enter your web2wave paywall URL, for example:
https://app.web2wave.com/paywall. This domain must already be approved (see Step 3). - Scroll further to Statement Description. Enter a short descriptor (2–10 uppercase characters, for example,
WE) that will appear on your customers' card statements.
Part 2 – Generate Client-Side and API Tokens in Paddle
Client-side tokens are used for Paddle.js in your frontend. API keys are used for server-side integration.
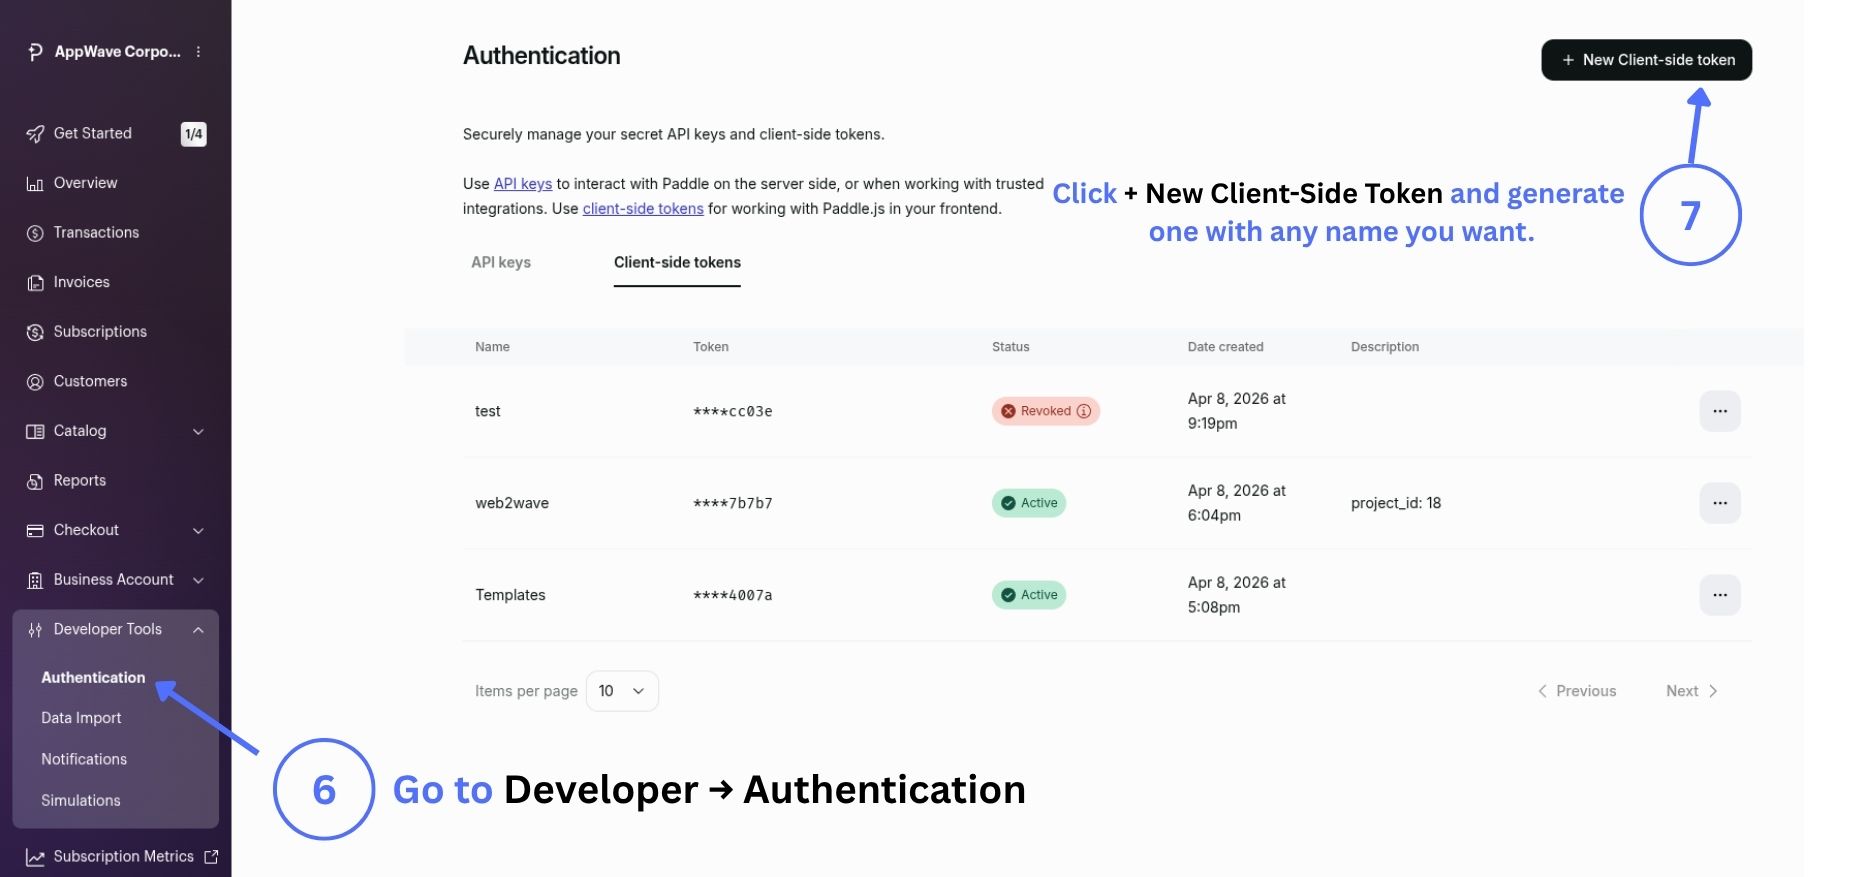
- In the left sidebar, go to Developer → Authentication (or navigate directly to the page via
sandbox-vendors.paddle.com/authentication-v2). Click the Client-Side Tokens tab. - Click + New Client-Side Token and generate one with any name you want.
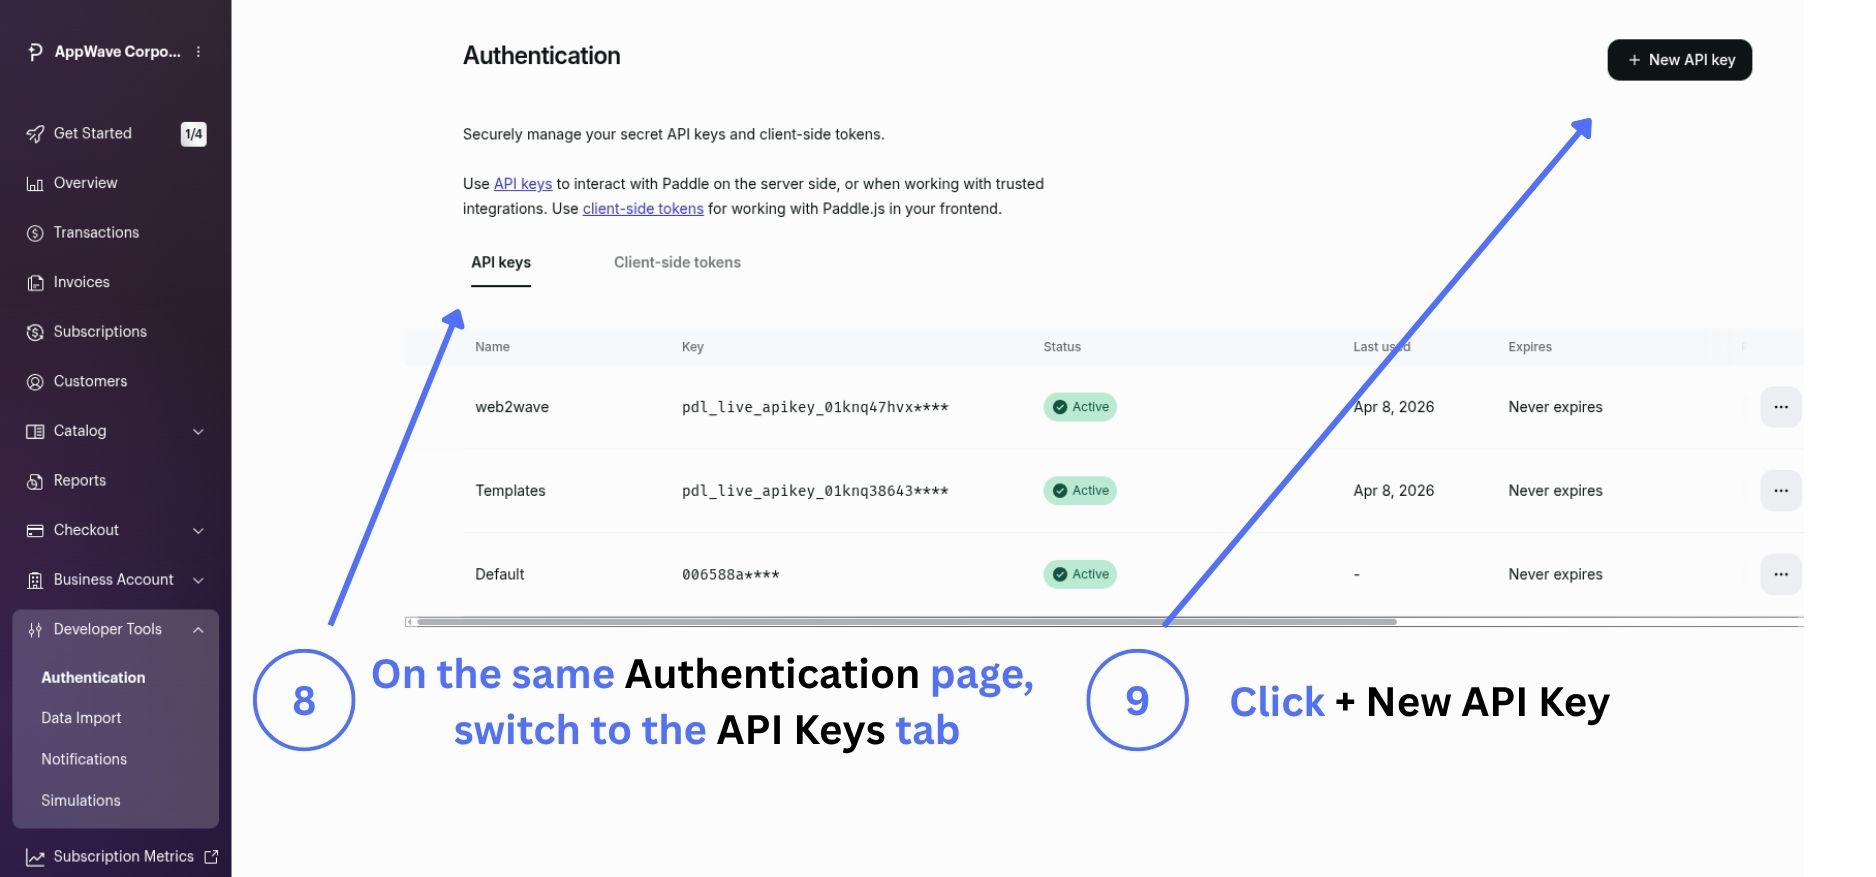
- In the left sidebar, go to Developer → Authentication.
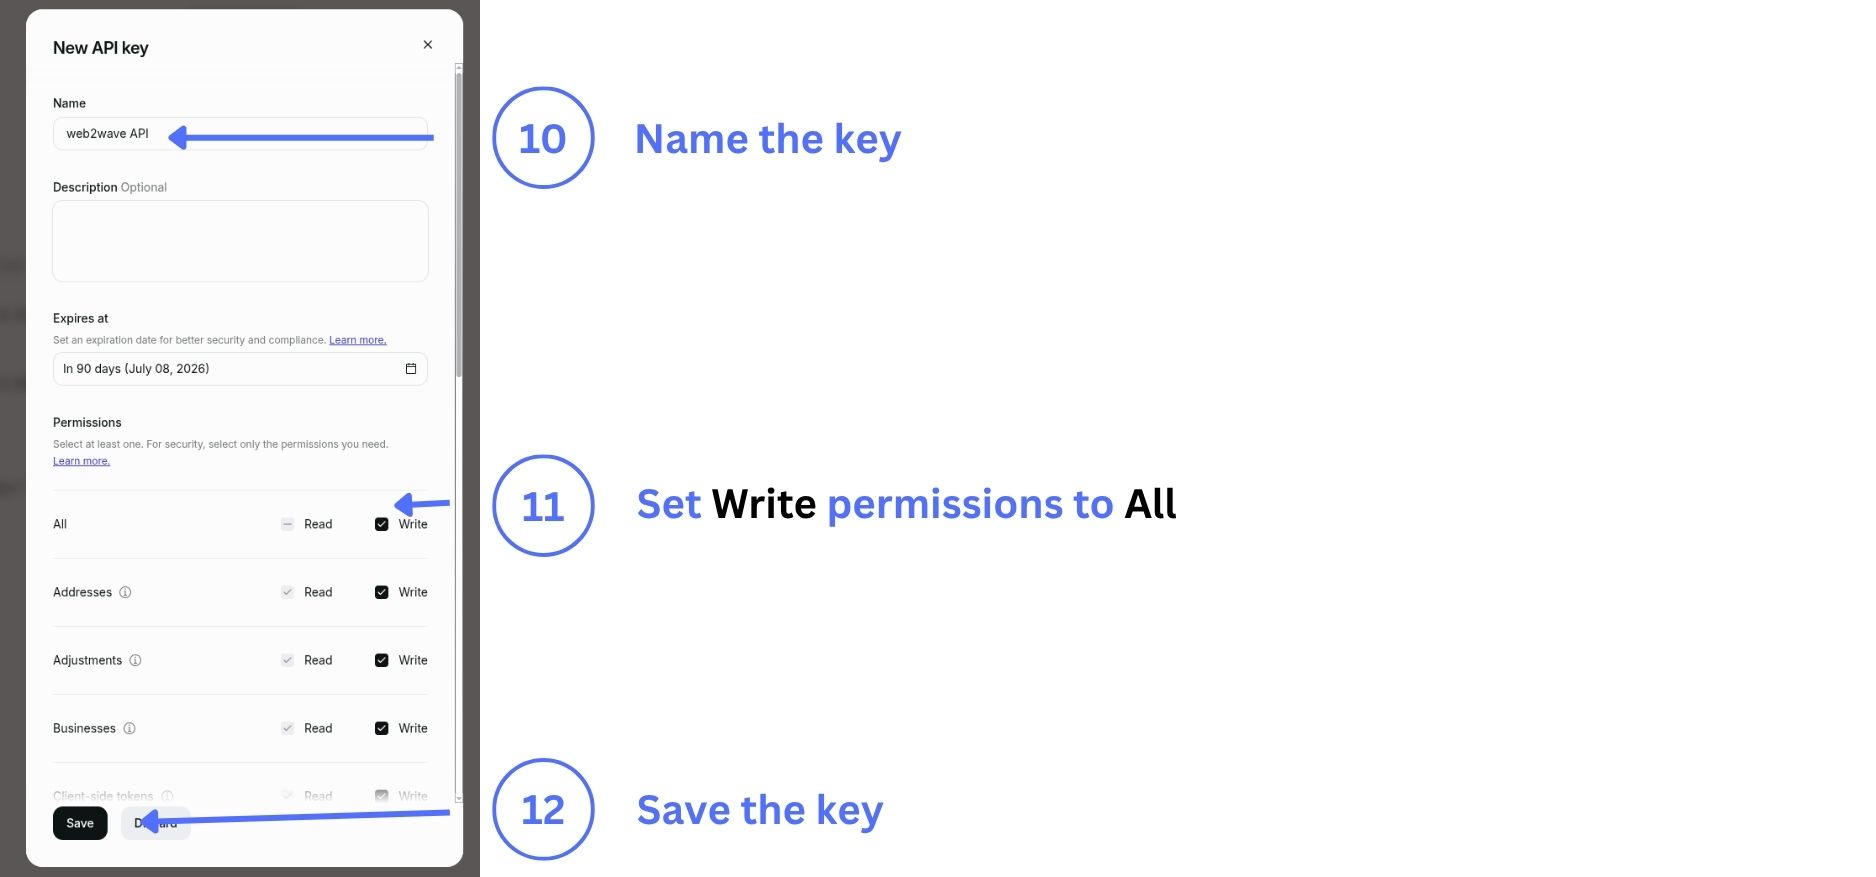
- On the same Authentication page, switch to the API Keys tab, then click + New API Key in the top-right corner. Name the key, set Write permissions to All, and click Save to generate it.
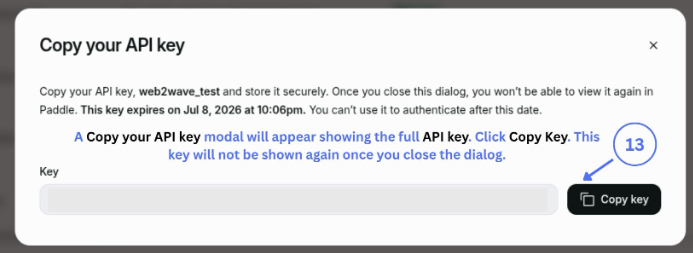
- A Copy your API key modal will appear showing the full API key. Click Copy Key. This key will not be shown again once you close the dialog.
Part 3 – Transfer Your Keys into web2wave
- Switch to your web2wave dashboard. Go to Projects, find your project, and open its settings. Activate the Paddle switch in the project settings menu.
- You will see two sections: Production Keys and Test Keys. Paste the API key that you copied in Step 11 into the API Keys field under the Production Keys column. If you are using a sandbox Paddle account, paste this key into the same field under the Test Keys column.
- Copy and paste your Client-Side Token from Step 8 into the Client-Side Token field under the Production Keys column. If you are using a sandbox Paddle account, paste this key into the same field under the Test Keys column.
- Optional: If needed, paste your customer portal link from Paddle into the field of the same name. You can find this link in Paddle's Customer Portal Settings.
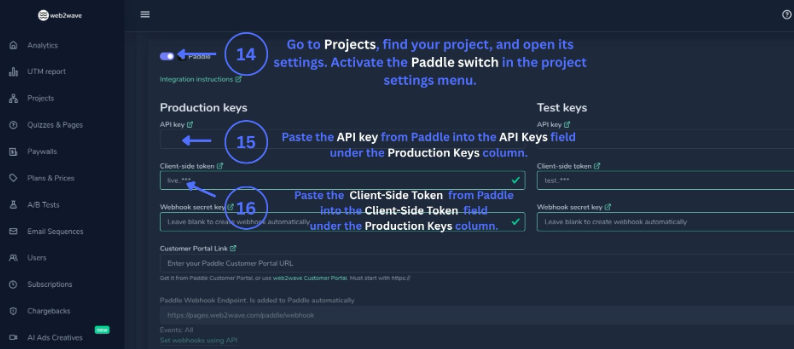
You can leave the Webhook Secret Key field empty for now — it will be automatically created by the web2wave platform. The Paddle Webhook Endpoint is pre-filled by web2wave as https://web2wave.web2wave.com/paddle/webhook and handles all events automatically.
- Click Save.
Part 4 – Import a Product and Price from Paddle into web2wave
- Back in Paddle, verify that you have an active product with a configured price. If you don’t have one, create one for test purposes.
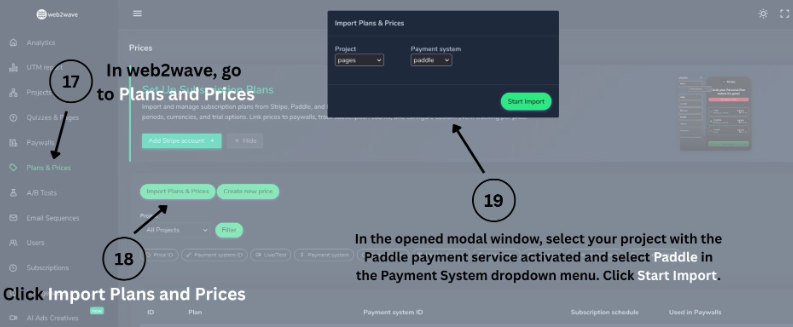
- In web2wave, go to Plans and Prices → Import Plans and Prices. In the opened modal window, select your project with the Paddle payment service activated and select Paddle in the Payment System dropdown menu. Click Start Import.
- Check whether the prices were imported correctly. Open your paywall editor and look for your imported product in the Plans field. If you can see it in the dropdown menu, the integration is complete.
You can test the integration by adding the Paddle form block into the paywall editor. If you encounter "Something went wrong" error, you need to check if API keys in the project settings are correct.
Optional: Webhooks Manual Setup
Sometimes there might be no webhook notifications from web2wave. In this case, you must set up webhooks manually.
In the Paddle left sidebar, go to Developer Tools → Notifications. Click New Destination.
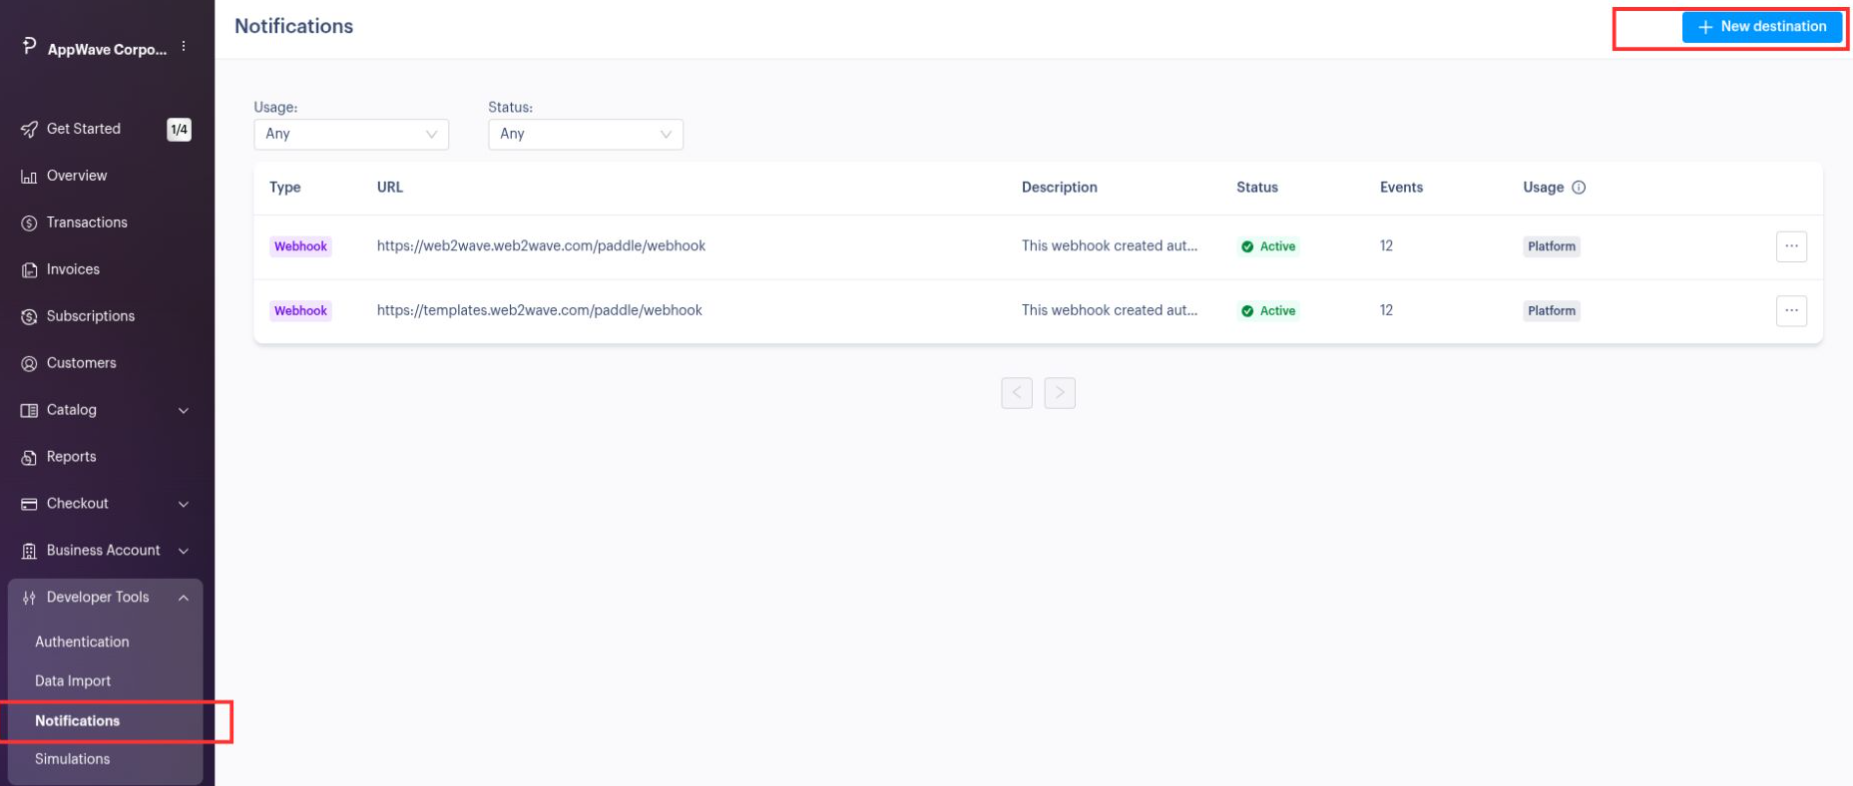
Fill in the Description field with any name you want.
Paste the webhook address from your web2wave Project Settings → Payments → Paddle Webhook Endpoint into the URL field.
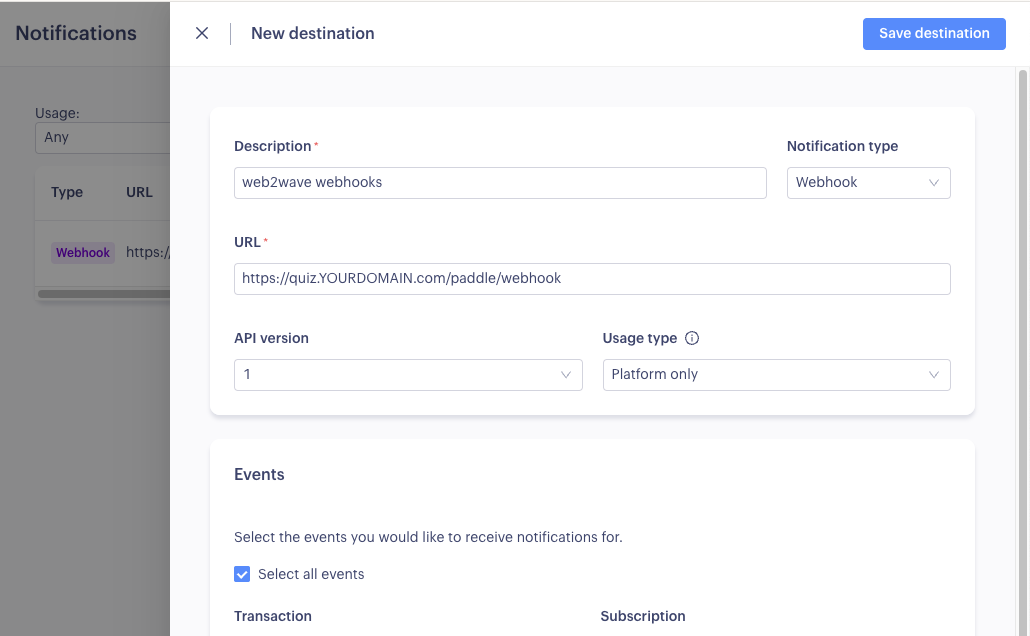
Check the Select All Events checkbox.
Click Save Destination.
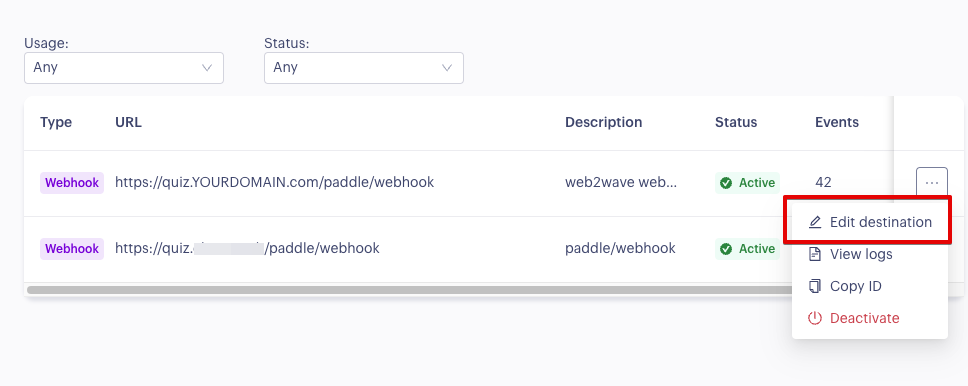
Find your newly created webhook in the list on the next window and click Edit Destination from the context menu on the right.
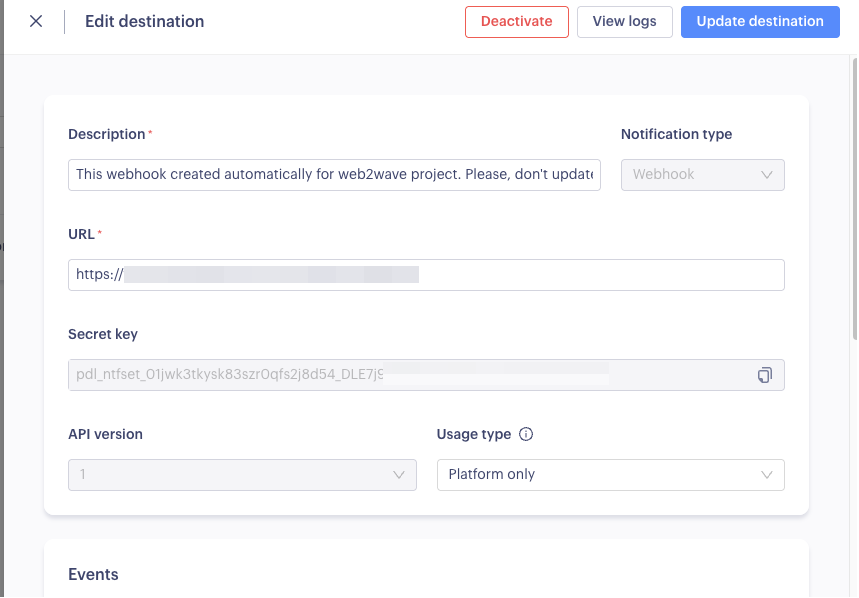
Copy the key from the Secret Key field. Switch to the web2wave platform and go to Projects → Payments → Paddle. Find the Webhook Secret Key field, paste the copied key there, and click Save.
Optional: enable Express checkout for Apple Pay
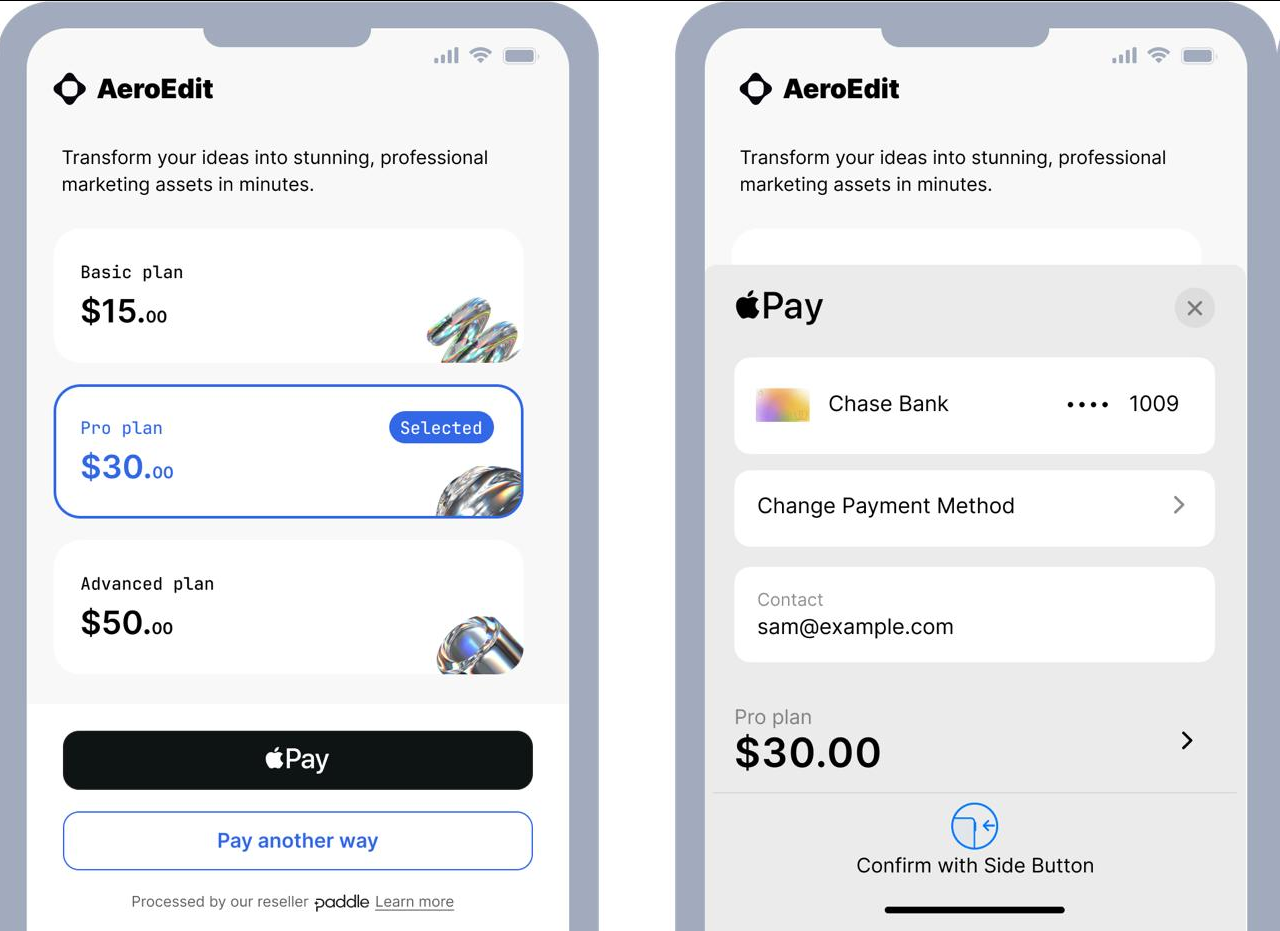
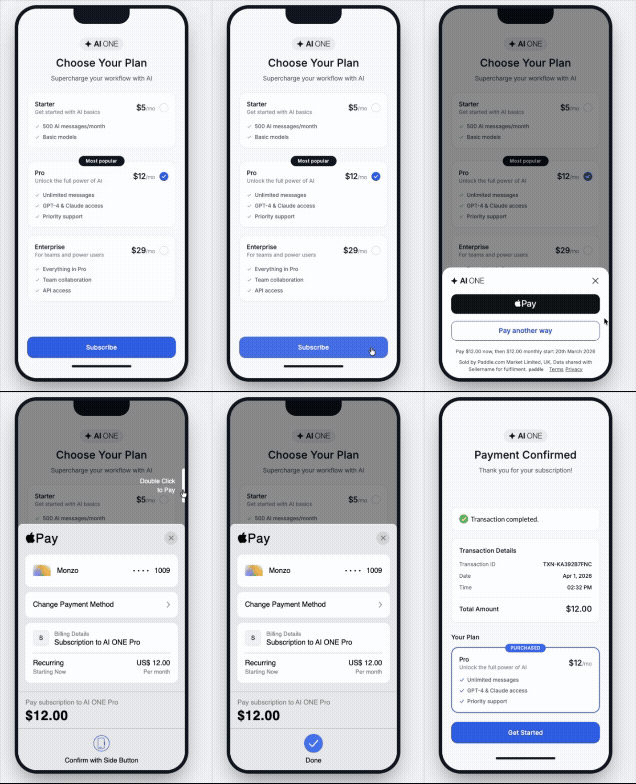
This checkout variant is designed for mobile and prioritizes digital wallets for a faster, one-click payment experience.
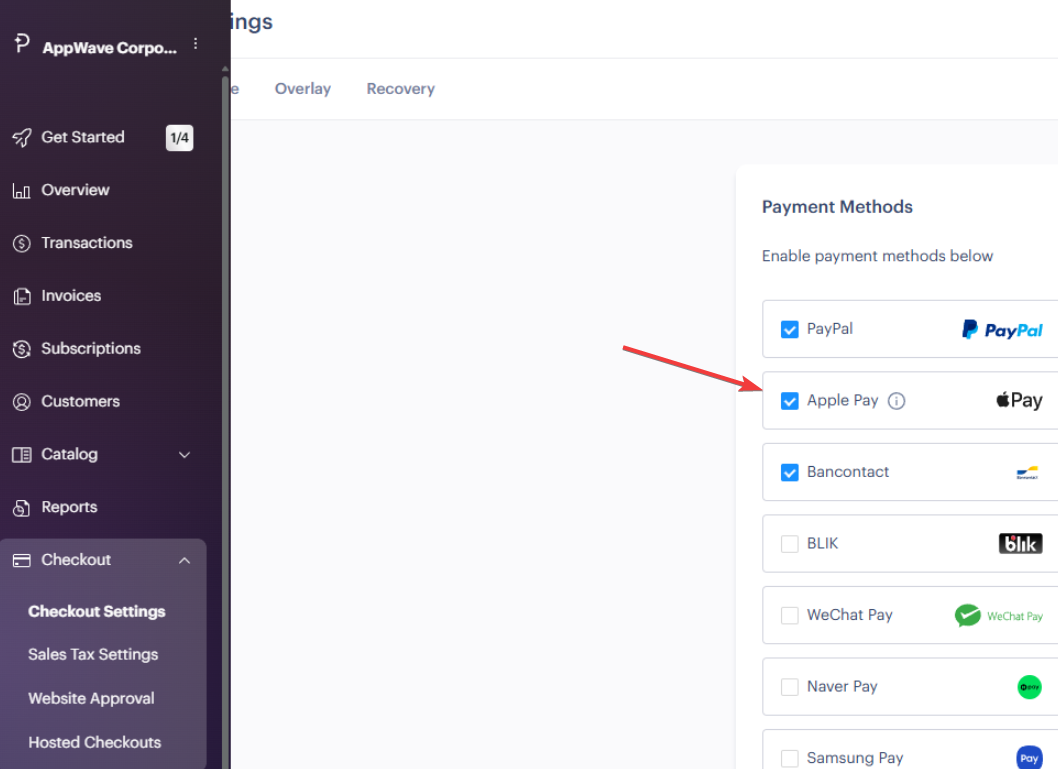
Step 1: "Checkout" -> "Checkout Settings" and enable Apple Pay.
Step 2: "Checkout" -> "Website approval" -> "Apple Pay verification" and complete the verification.
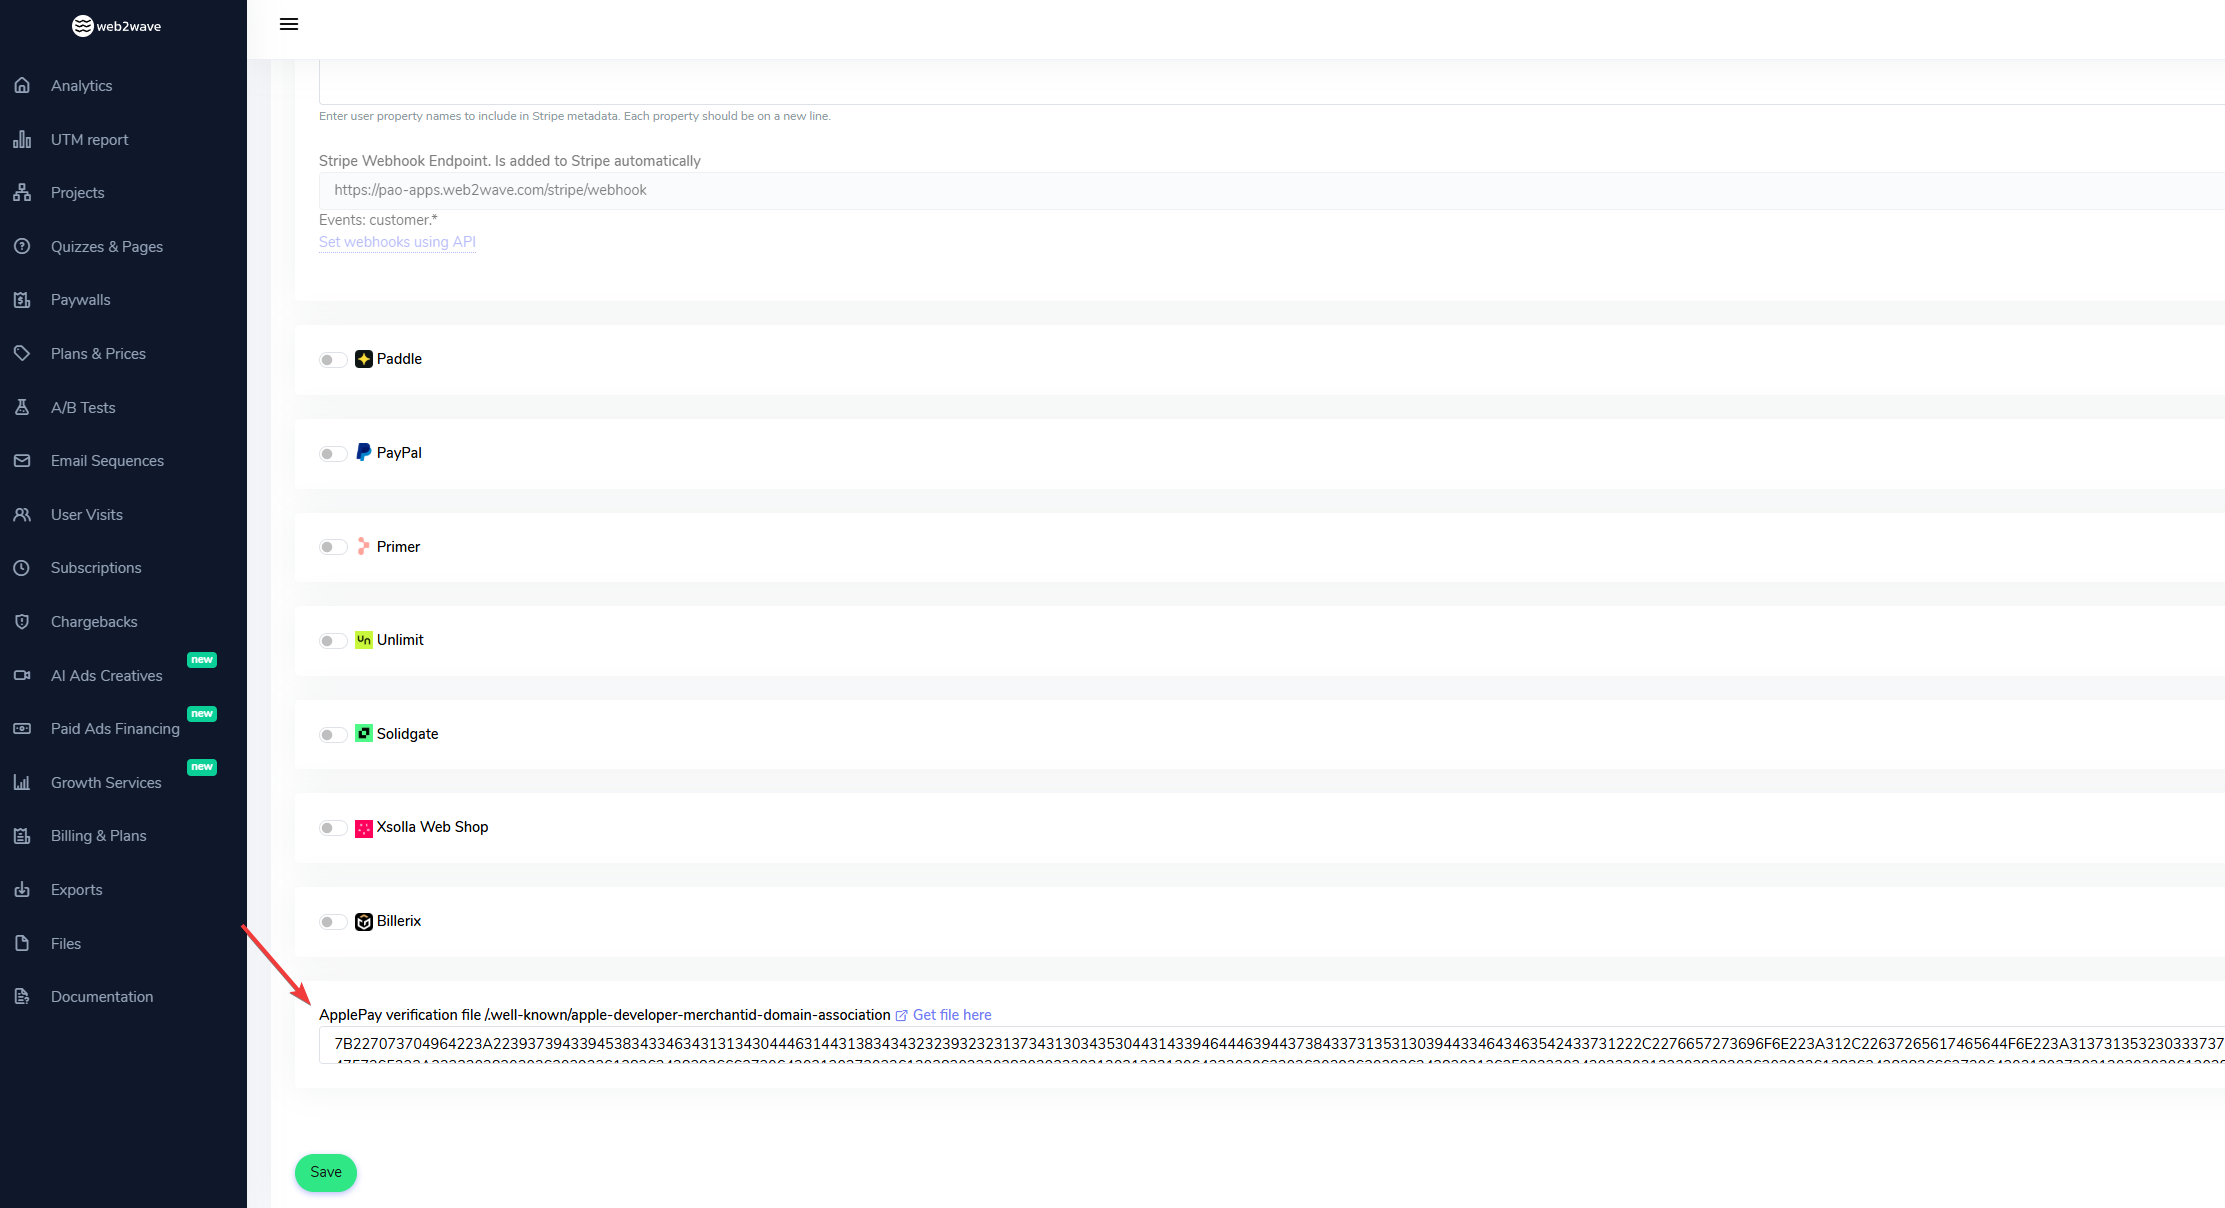
To Approve Apple Pay, download the Apple Pay domain association file and open it in any text editor. File typically looks like this:
7B227073704964223A2239373943394538343346343131343044463144313834343232393232313734313034353044314339464446394437384337313531303944334643463542433731222C2276657273696F6E223A312C22637265617465644F6E223A313731353230333737303832312C227369676E6174757265223A223330383030363039326138363438383666373064303130373032613038303330383030323031303133Copy the file contents, then go to Projects -> Payments tab and paste it to the "ApplePay verification file /.well-known/apple-developer-merchantid-domain-association" field. Save the changes.
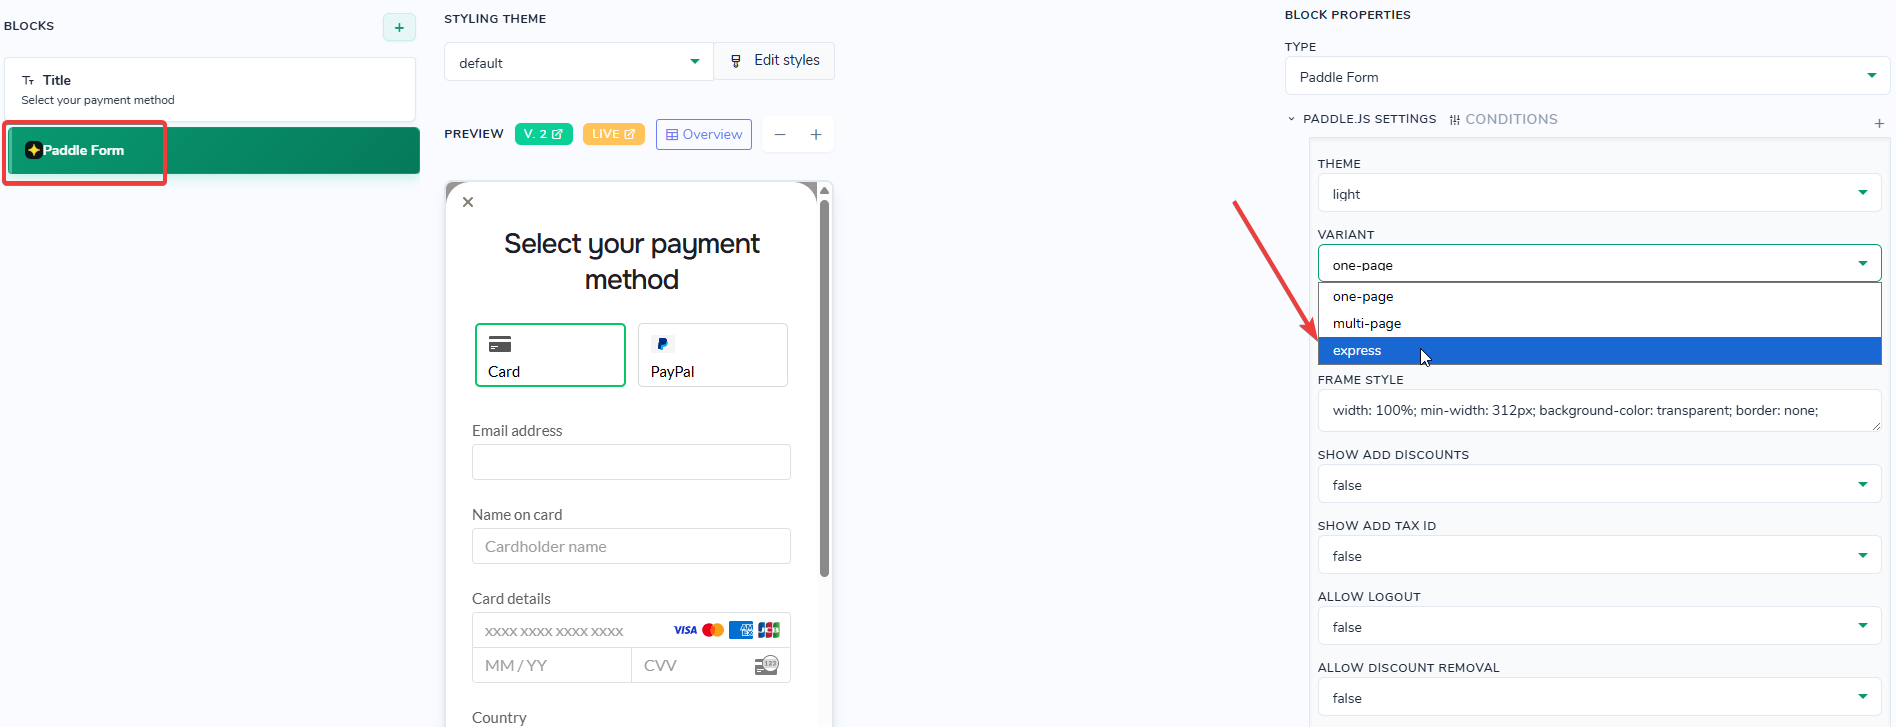
After verification is complete, in the "Paddle Form" block it will be possible to adjust the "Variant" parameter to "express".
Behavior illustration:
Troubleshooting
Q: Is it possible to create an upsell where the customer does not need to re-enter their card details?
- What it means: You cannot enable saving the payment data by default on behalf of the customer, Paddle requires it to be a strict customer opt-in action.
- Resolution: For a Paddle upsell to function as a "1-click" experience, the user must check the Save card details checkbox during their initial purchase on the main paywall
Q: Error: There was a problem with Paddle init. Please check that the domain is verified and you added the Default Checkout URL.
- What it means: Paddle Checkout cannot be initialized because either the current domain is not approved in Paddle or the Default Checkout URL is not configured in your Paddle account.
- Resolution: Check Part 1 described above.
Q: Missing Standalone Apple Pay Button in a checkout form.
- What it means: You are looking for a separate "Apple Pay" or "Express" button similar to what is available for Stripe integrations. Paddle does not support standalone express buttons.
- Resolution: Use the standard Paddle Checkout Form block. Apple Pay is automatically integrated inside the Paddle form itself and will appear as a payment option for users on compatible devices.
Q: Error During Price Import.
- What it means: When attempting to sync products from Paddle to web2wave through the Plans and Imports window, the process fails. This is almost always caused by a 255-character limit on the description field in Paddle.
- Resolution: Go to your Paddle dashboard and trim your plan descriptions so they are under 255 characters, then attempt the import again.
Q: Subscription Phases Not Available.
- What it means: You are trying to use the "Subscription Phases" setting for a Paddle product, but the option is missing or not working. This feature is exclusive to Stripe.
- Resolution: To set up trials or discounts with Paddle, use the Additional Paddle Price fields within the Prices List block settings to create flexible introductory offers (e.g., $1.99 for the first week, then $19.99 monthly).
Q: Is an SDK integration required for Paddle?
- What it means: You may be hesitant to integrate the web2wave SDK because of strict Apple app review guidelines regarding third-party code.
- Resolution: The web2wave SDK is a simple API wrapper and is safe to use. However, it is not mandatory, you can choose to make direct queries to the web2wave API from your app instead.