
Integration guide
Part 1 – Connect Stripe to web2wave
1: Log in to your Stripe account at dashboard.stripe.com. Click Developers in the top navigation bar, then select API keys from the submenu. This opens the Standard keys section.
2: Under Standard keys, you will see the Publishable key row and the Secret key row. The Secret key value is masked by default. Keep this page open and switch to the web2wave app.
3: In web2wave, click Projects in the left sidebar. Find the project you want to connect Stripe to and click its edit (pencil) icon. This opens the Update project page. On the Update project page, navigate to Payments → Stripe.
4: The Stripe tab has the following fields:
- Publishable key — paste your Stripe Publishable key from Step 2 here.
- Secret key — paste your Stripe Secret key from Step 2 here.
- Customer Portal Link — an optional link to the Stripe Customer Portal for subscription management.
- Stripe Webhook Endpoint — a read-only URL (
https://app.web2wave.com/stripe/webhook) that is added to Stripe automatically.
Callout: Stripe provides a sandbox environment along with live mode. Before pasting the keys into web2wave, verify which Stripe mode you are currently using. Depending on the selected mode, paste the keys either under the Production keys column for live mode or under Test keys for sandbox mode.
5: After pasting both keys into the corresponding fields, click Save at the bottom of the tab. web2wave will save the settings.
Part 2 – Create Prices in Stripe and Import into web2wave
Callout: Skip this part if you already have a product catalog with prices set up.
6: In the Stripe Dashboard, go to Products in the left sidebar and click Product catalog. Locate the product you want to manage and click it to open the product detail page.
7: To add a new price, click the + button in the upper-right corner of the Pricing section. Fill in the price amount, currency, and billing interval, then save. The new price will appear immediately in the list.
8: In web2wave, click Plans & Prices in the left sidebar. This opens the Prices page, which lists all prices already imported into web2wave. On the Prices page, click the green Import Plans & Prices button.
9: From the Project dropdown, select the project whose Stripe product you want to import prices from. Leave Payment system set to stripe. Click Start Import. web2wave will pull all plans and prices from the connected Stripe account for that project and add them to the Prices list.
Tip: After import, each price row will show a Test or Live badge next to the Stripe icon, indicating whether it is a test-mode or live-mode price. Live prices show a green Live badge.
10: Test the integration by opening any paywall within the project that has Stripe activated and clicking the plans from the paywall settings. If you can see all your products in the dropdown menu, the integration is complete.
Stripe Checkout Form vs Stripe Embedded Form
A Stripe paywall collects payment through one of two checkout blocks: Stripe Checkout Form or Stripe Embedded Form. They are not interchangeable. Each one supports a different set of pricing and discount features, so decide what the offer has to do first, then pick the block.
Screenshot: Paywall editor → block list → Stripe Checkout Form and Stripe Embedded Form.
Feature support at a glance
| Feature | Stripe Checkout Form | Stripe Embedded Form |
|---|---|---|
| Multi-phase introductory pricing from Introductory offers & Trials in price settings | ✓ Applied | ✗ Not applied |
| Free trial days from the legacy Subscription trials fields | ✓ Applied | ✓ Applied |
| Legacy Paid trial discounted price for the opening period | ✓ Applied | ✓ Applied |
Stripe discount code passed in the quiz link (?discount_code=) | ✗ Not supported | ✓ Supported |
Customer-entered promotion code field (?allow_promotion_codes=1) | ✗ Not supported | ✓ Supported |
| Form layout, appearance, and available payment methods configured on the paywall block | ✓ Configurable | ✗ Rendered by Stripe |
| Included in the Payment Method Selector composite block | ✓ Included | ✗ Not included |
Use the Stripe Checkout Form when
- The price uses Introductory offers & Trials phases, for example free days, then a cheaper period, then the regular price.
- You need to control the form layout, theme, colors, or the list of available payment methods from the paywall editor.
- You want the grouped Payment Method Selector, or a separately styled Apple Pay or express checkout button next to the card form.
Use the Stripe Embedded Form when
- You run Stripe discount codes from campaigns and pass them in the quiz link.
- You want customers to enter their own promotion code at checkout.
- The offer is a plain recurring price, optionally with a legacy free trial or a legacy discounted first period.
Phased pricing and promocodes cannot run on the same checkout
⚠️ IMPORTANT: These two requirements point at different blocks. Introductory phases are applied only by the Stripe Checkout Form, and discount codes work only with the Stripe Embedded Form. If a price that has introductory phases is sold through the Embedded Form, the subscription starts at the regular price and the configured phases are not applied. The price settings also warn that phases and trials are not compatible with the Embedded Form.
If a campaign needs both a coupon code and a discounted opening period, choose one of these routes:
- Keep the offer on the Stripe Embedded Form and express the opening discount with the legacy Subscription trials fields instead of introductory phases.
- Split the traffic: send code-driven audiences to a paywall that uses the Stripe Embedded Form, and keep the phased offer on a paywall that uses the Stripe Checkout Form.
Wallets and express buttons
Apple Pay, Google Pay, PayPal, and Stripe Link are configured on the Payment Method Selector, Stripe Apple Pay, Stripe Payment Request, and Stripe Wallets Express blocks, which sit alongside the Stripe Checkout Form. See Understanding Payment Block Differences for the differences between those blocks and Choosing the Right Block for when to use each one.
The Stripe Embedded Form is rendered by Stripe, so its payment methods and appearance follow the Stripe checkout configuration rather than the paywall block settings described in those sections.
Managing the resulting subscription
Subscriptions created from Introductory offers & Trials phases cannot be canceled in the native Stripe Customer Portal. Send those customers to the web2wave Customer Portal instead.
Before you publish
Preview the paywall and complete a test purchase using the exact link you plan to advertise, including any discount_code or allow_promotion_codes parameter, and confirm that the amount charged matches the offer.
Callout: For how introductory phases and legacy first-period discounts are configured on a price, see Stripe subscription schedules vs first-period discounts.
Stripe Discount promocodes
Discount promocodes from Stripe acts as a universal tool to run structured discounts across email campaigns, paid ads, social posts, affiliate programs, and even in‑product offers like win‑back or checkout‑nudge discounts.
Callout: Discount codes require the Stripe Embedded Form, which does not apply multi-phase Introductory offers & Trials pricing. See Stripe Checkout Form vs Stripe Embedded Form before you build the paywall.
We can use discount codes from Stripe, to do that:
- On paywall you will need to use Stripe Embedded Form block. Discount codes will not work with other blocks.
- Add ?discount_code=XXX to the quiz link.
- Example: https://app.web2wave.com/myquiz?discount_code=XX
- Optionally add other parameters: https://app.web2wave.com/myquiz?discount_code=XX&utm_source=facebook&utm_campaign={{campaign.name}}
- This discount_code will be forwarded to paywall and to the Stripe payment form.
⚠️ IMPORTANT: If you want the user to land on a specific popup (e.g. #popup_2), put the popup hash at the very end of the URL, otherwise the link may not work correctly:
https://app.web2wave.com/myquiz?discount_code=XX&utm_source=facebook&utm_campaign={{campaign.name}}#popup_2
Q: How to configure?
A: Recommended setup is "Button pay /Popup", on Pay button click -> Popup is opened. And the Popup add "Stripe Embedded Form" and save changes. After that you will see the form.
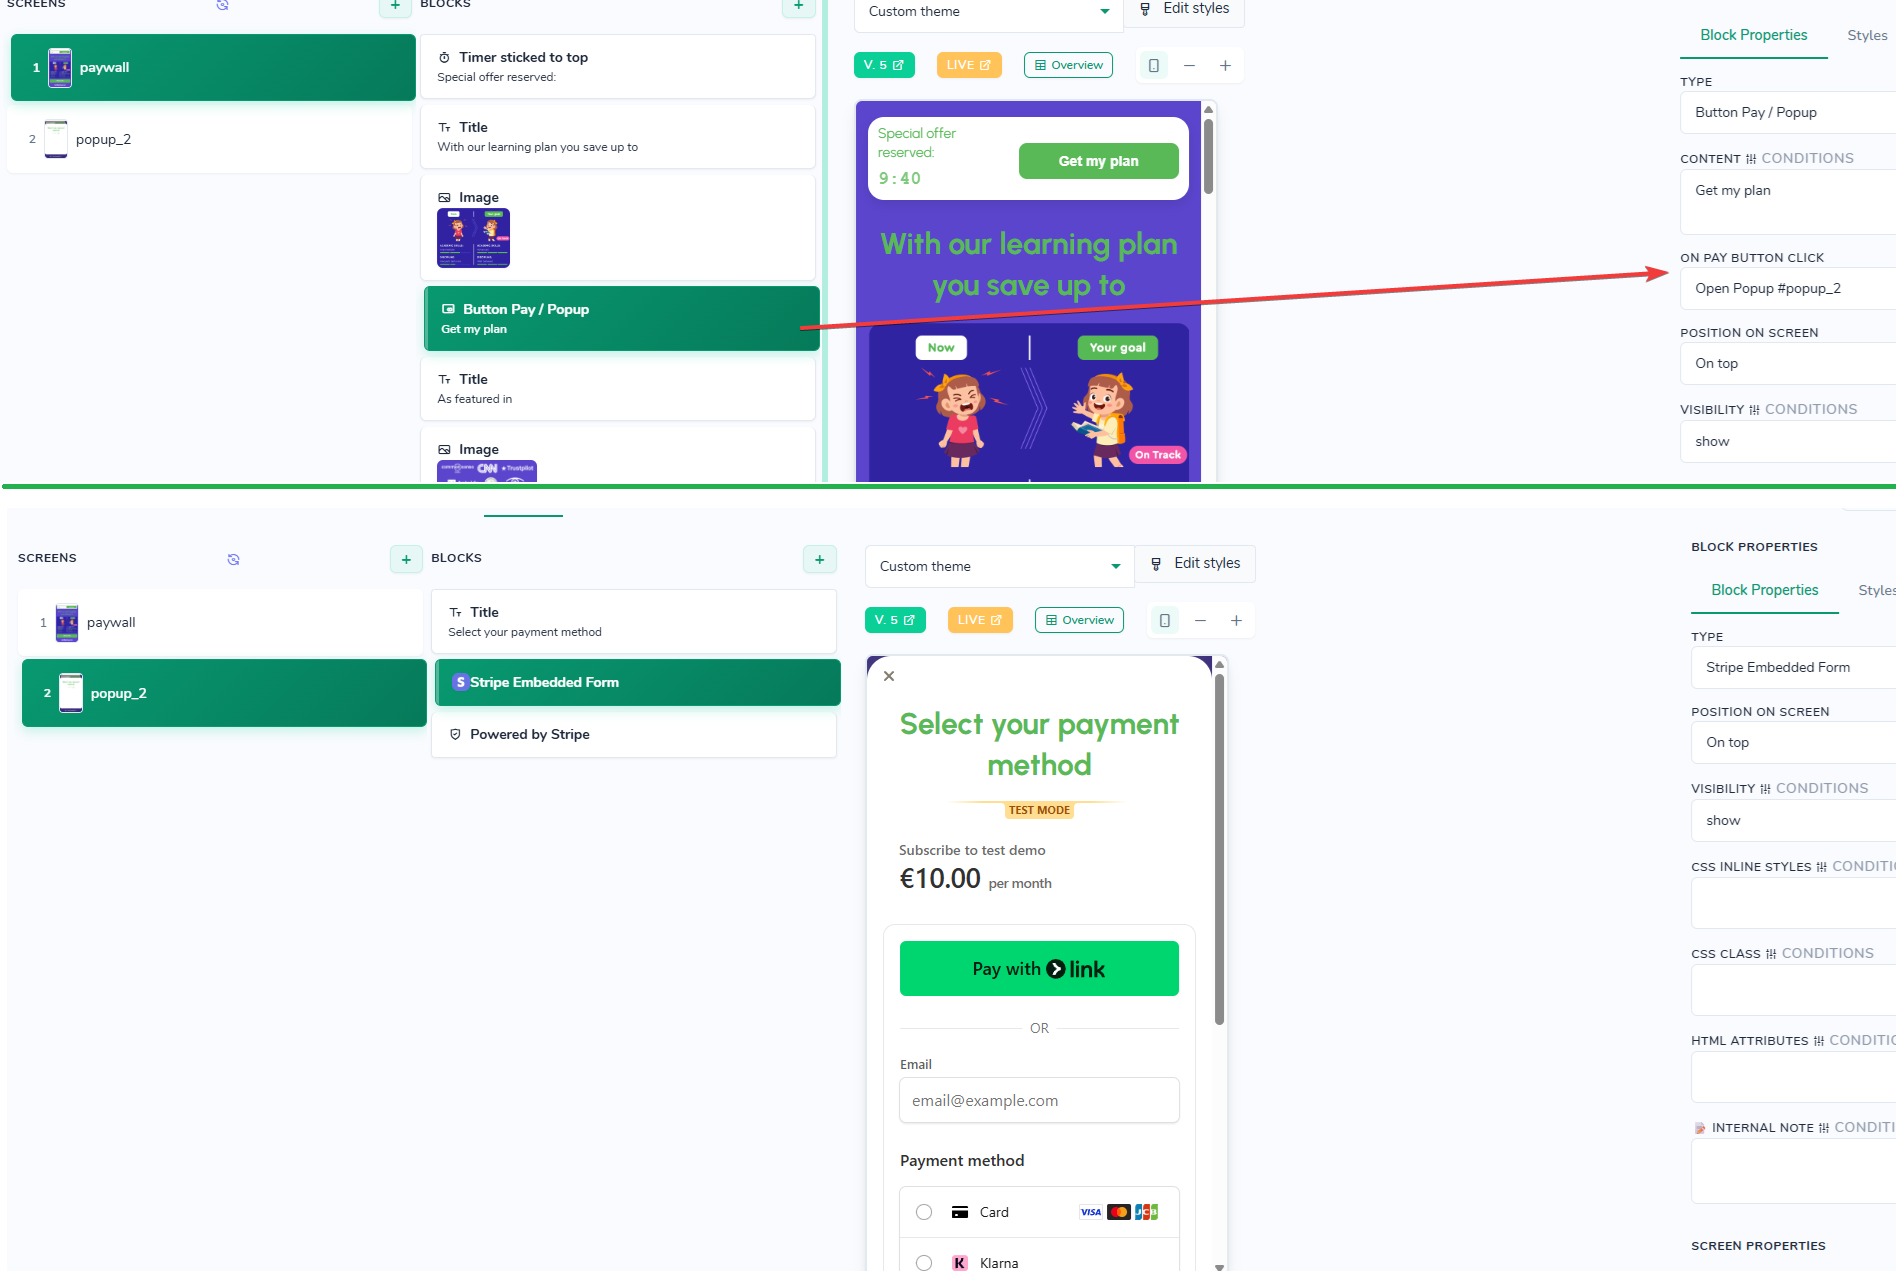
Illustration of Stripe Embedded Form usage
Q: Is it possible to allow users enter their own Promocodes?
A: Yes, all you have to do is to add ?allow_promotion_codes=1 to your Quiz URL, (or the paywall), after that this field will be available. Example: https://app.web2wave.com/myquiz?allow_promotion_codes=1
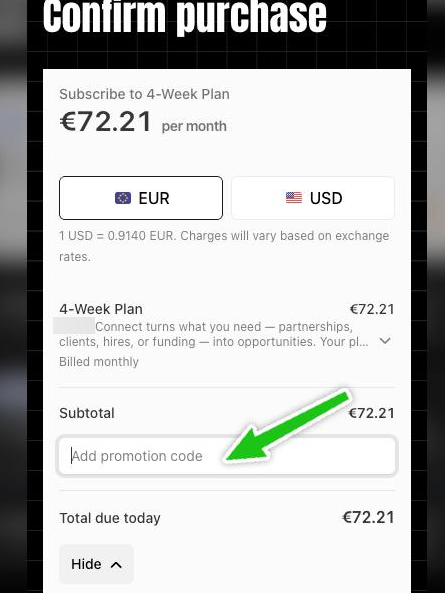
Illustration of manual promocode input field
Adding Upsells after payment
Stripe Forms and Buttons configurations
Understanding Payment Block Differences
There are several Stripe-related blocks available for building payment flows, each with different features and customization options. The blocks below cover card and wallet presentation on a Stripe Checkout Form paywall. To decide between the Stripe Checkout Form and the Stripe Embedded Form first, see Stripe Checkout Form vs Stripe Embedded Form.
Block Types
Payment Method Selector
Type: Composite grouping block
Components: This is a container block that includes:
- Stripe Apple Pay
- PayPal Button (if PayPal is enabled on the page)
- Stripe Checkout Form
Features:
- Includes accordion/toggle functionality
- All-in-one payment solution
- Automatically groups payment options
Alternative Approach: You can use individual blocks (Stripe Payment Request + Stripe Checkout Form) instead of this composite block. The functionality will be the same, but without the accordion and toggle functionality.
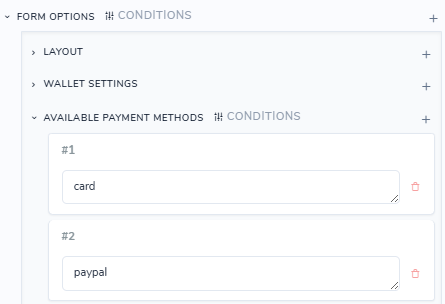
Enabling Paypal "tab" view in the card field by adding "Available payment methods" -> paypal
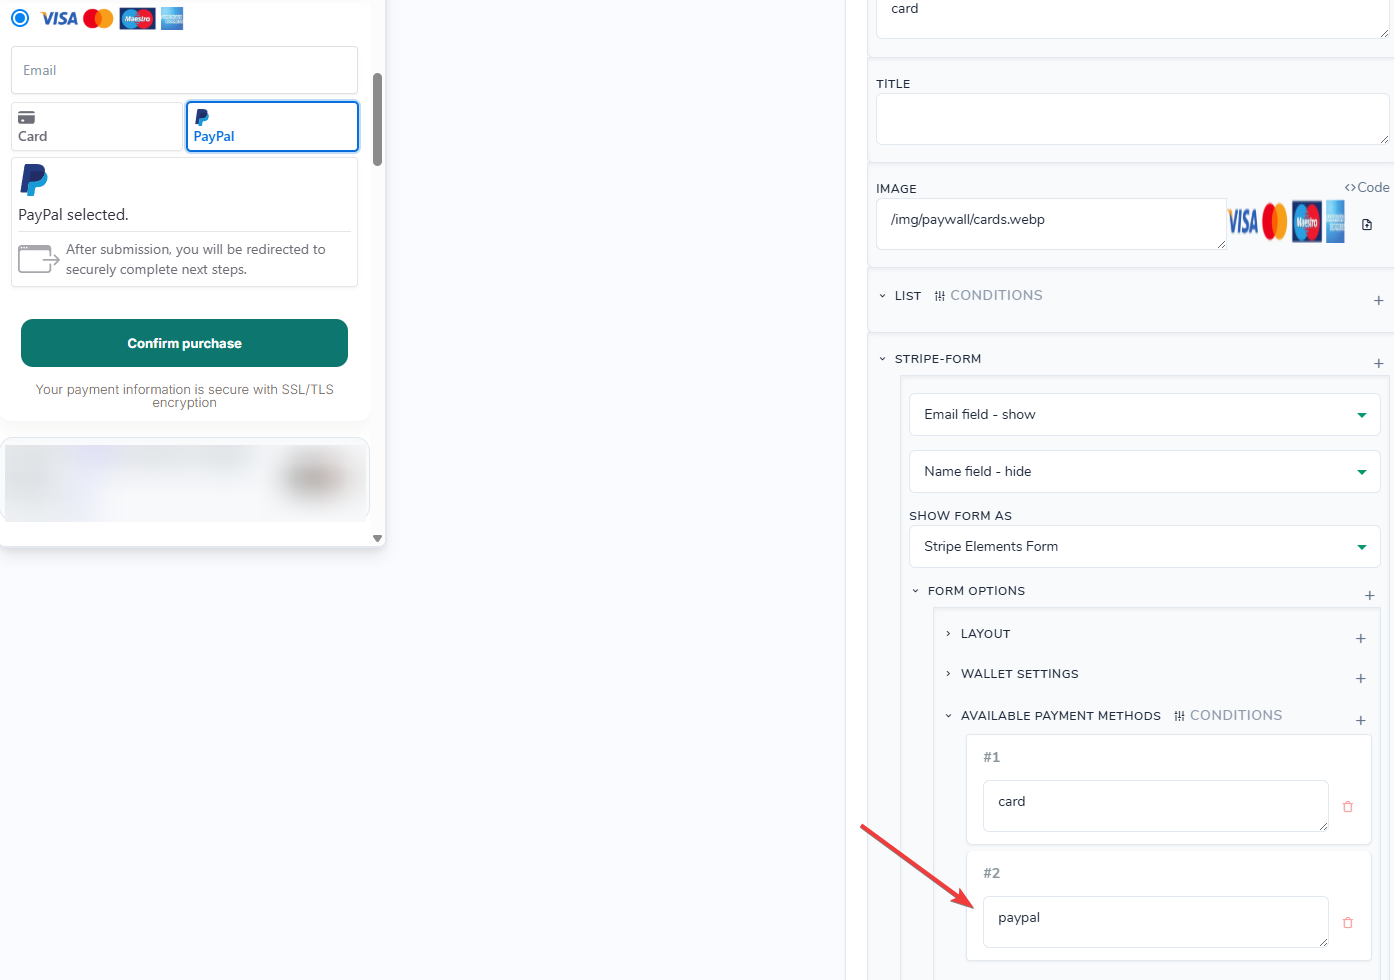
Adding Paypal as a payment method in the block
Stripe Apple Pay
Behavior:
- When Apple Pay is available (user is on a device that supports Apple Pay): Displays as a native Apple Pay button
- When Apple Pay is unavailable: Displays as a standard button
Customization Options:
- Styling: Full customization available
- Text: Can be renamed/changed
- Border radius: Can be modified
- Button text options: Any text including "continue" and custom labels
Use Case: Best for scenarios requiring flexible styling and custom button text.
Stripe Wallets Express
Behavior:
- Strictly follows Stripe's express checkout design
- No visual customization beyond configuration options
Customization Options:
- Limited to Express Checkout Options section only
- Apple Pay button text: Restricted to predefined options (select from dropdown menu)
- Link payment support: Includes Stripe Link payment method
Use Case: Best when you need Stripe Link payment functionality and prefer Stripe's standard express checkout appearance.
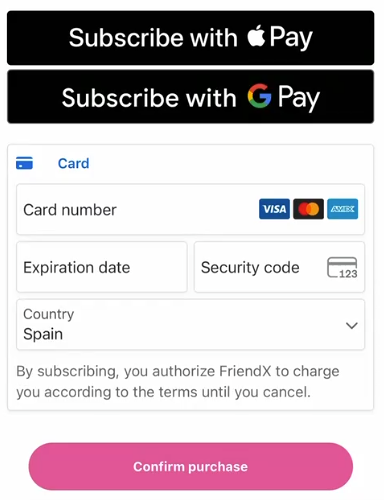
Q: How to configure Apple Pay and Google Pay on the corresponding devices to be available for clients?
A: In the "Express checkout options", navigate to the "Layout" section and define MAXROWS = 2 and Payment Methods to show ApplePay and GooglePay to use "Always" parameters.
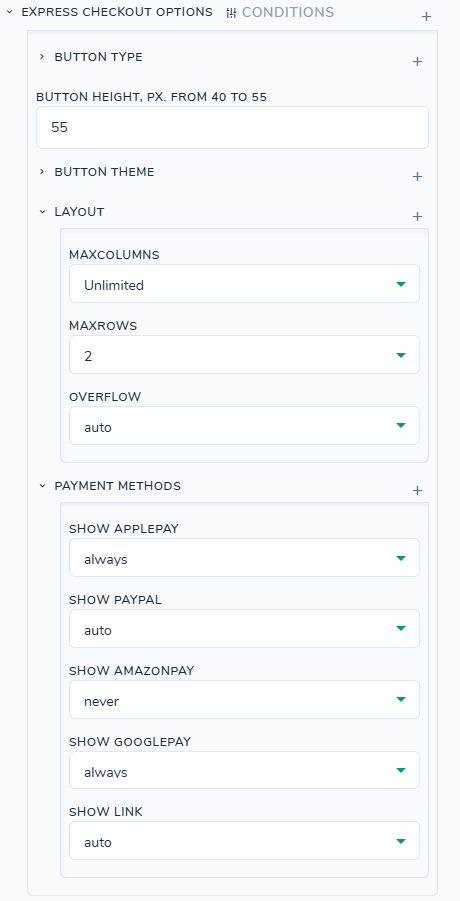
Overview
Stripe integration allows you to create customizable payment experiences with flexible form options, multiple payment methods, and dynamic styling. You can configure checkout forms, Apple Pay buttons, Google Pay, PayPal, and implement upsell flows after successful payments.
| Feature | Stripe Payment Request | Stripe Wallets Express |
|---|---|---|
| Styling | ✓ Fully customizable | ✗ Not available |
| Custom button text | ✓ Any text allowed | ✗ Limited to subscribe/rent/buy |
| Border radius | ✓ Adjustable | ✗ Fixed |
| Stripe Link support | ✗ Not included | ✓ Included |
Choosing the Right Block
Use Payment Method Selector when:
- You want an all-in-one solution with accordion functionality
- You need PayPal integration alongside other methods
- You prefer a grouped payment experience
Use individual blocks (Payment Request + Checkout Form) when:
- You need full layout control
- You don't need accordion functionality
- You want to position blocks separately
Use Stripe Apple Pay when:
- You need custom button styling
- You want flexible button text options
- You don't require Stripe Link payment
Use Stripe Wallets Express when:
- You need Stripe Link payment functionality
- You prefer Stripe's standard express checkout appearance
- You're comfortable with limited customization options
Features
Stripe integration allows you to create customizable payment experiences with flexible form options, multiple payment methods, and dynamic styling.
- Popup-based Checkout: Open Stripe forms in popups instead of redirecting to Stripe's hosted pages
- Custom Form Appearance: Modify colors, themes, and layout options
- Multiple Payment Methods: Support for card payments, Apple Pay, Google Pay, and PayPal
- Express Checkout Buttons: Add Apple Pay and other express payment options
- Payment Upsells: Redirect users to additional offers after payment
- Dynamic Content: Use placeholders to display price information dynamically
Setting Up Stripe Checkout Popup
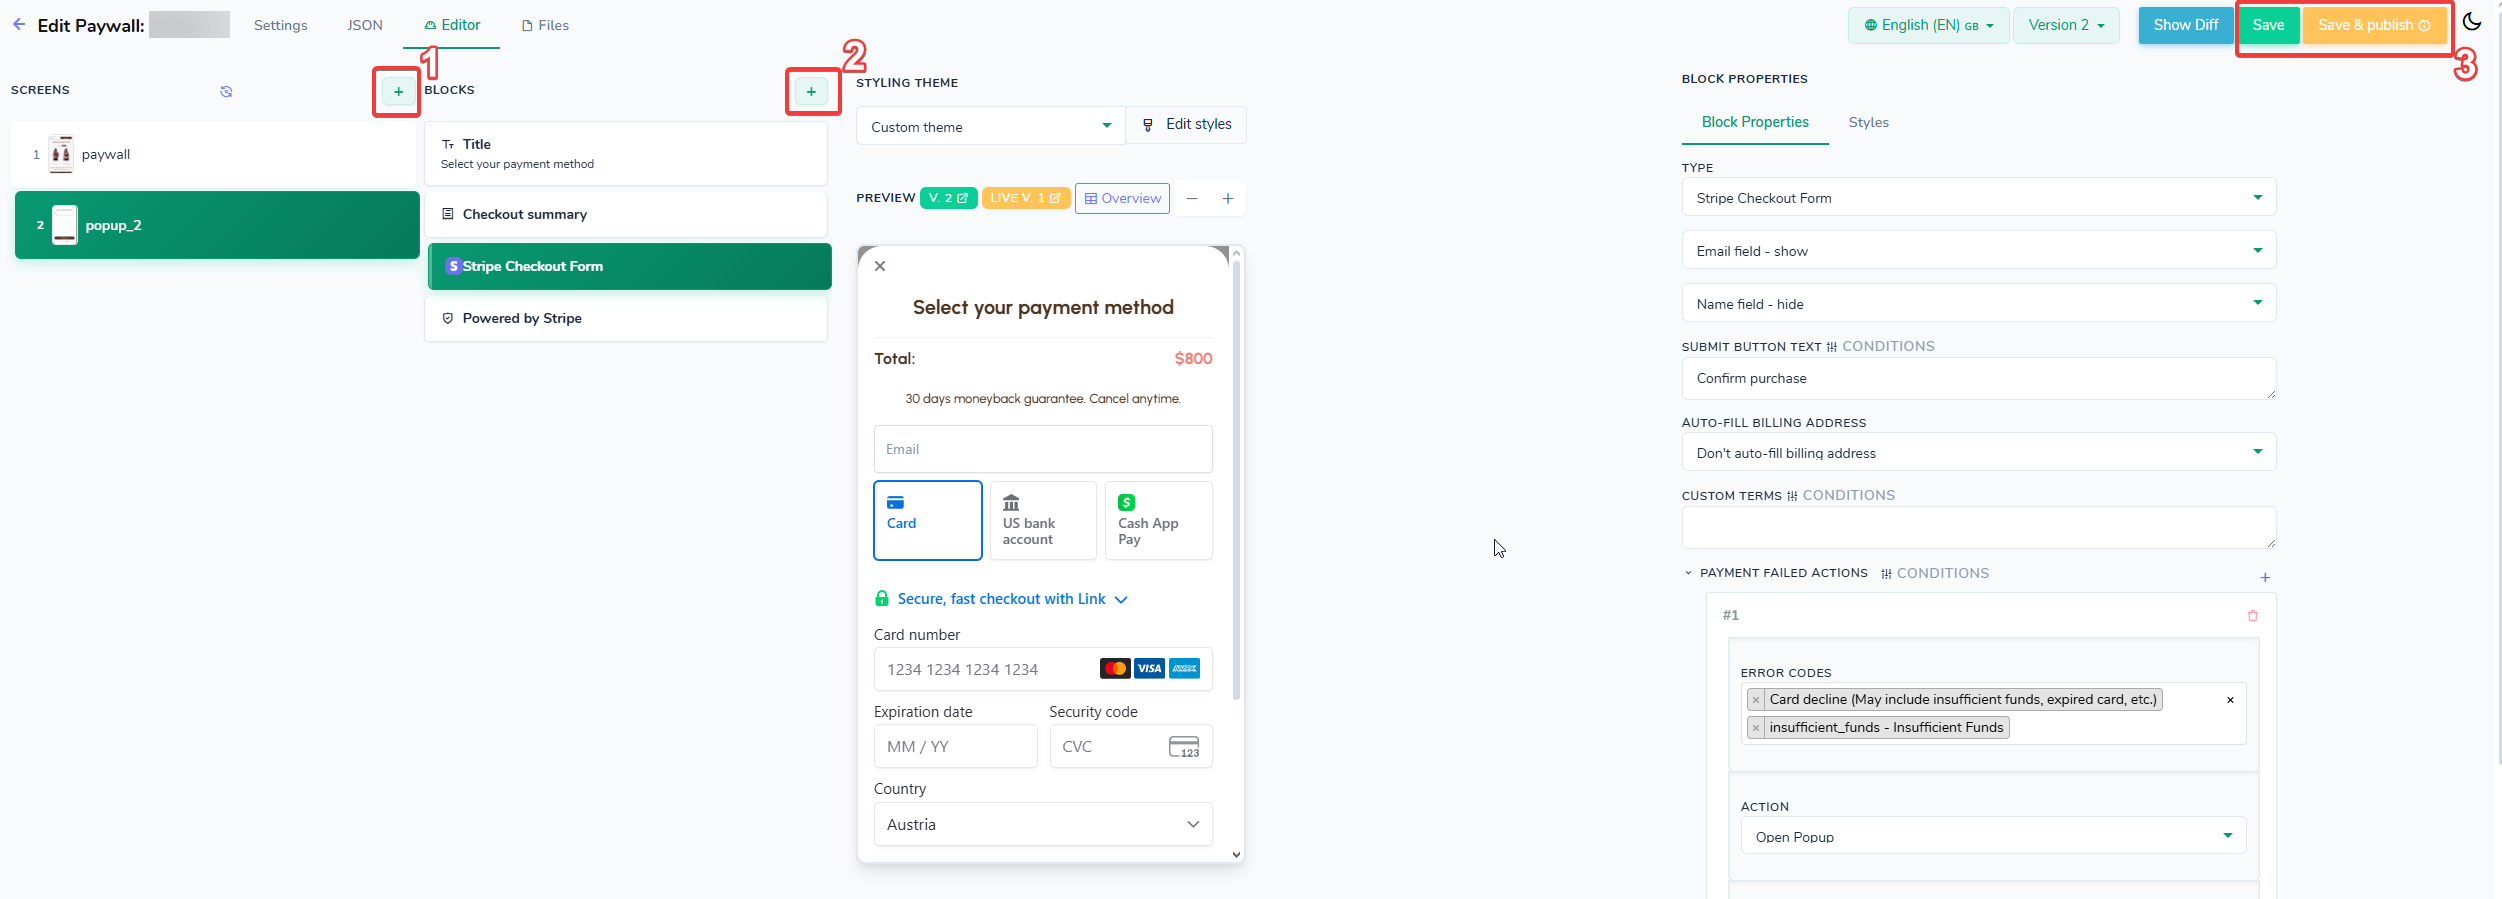
Step 1: Create a New Popup
- Add a new screen and set its type to "popup"
- Add a Stripe Checkout Form block to the popup
- Save your changes
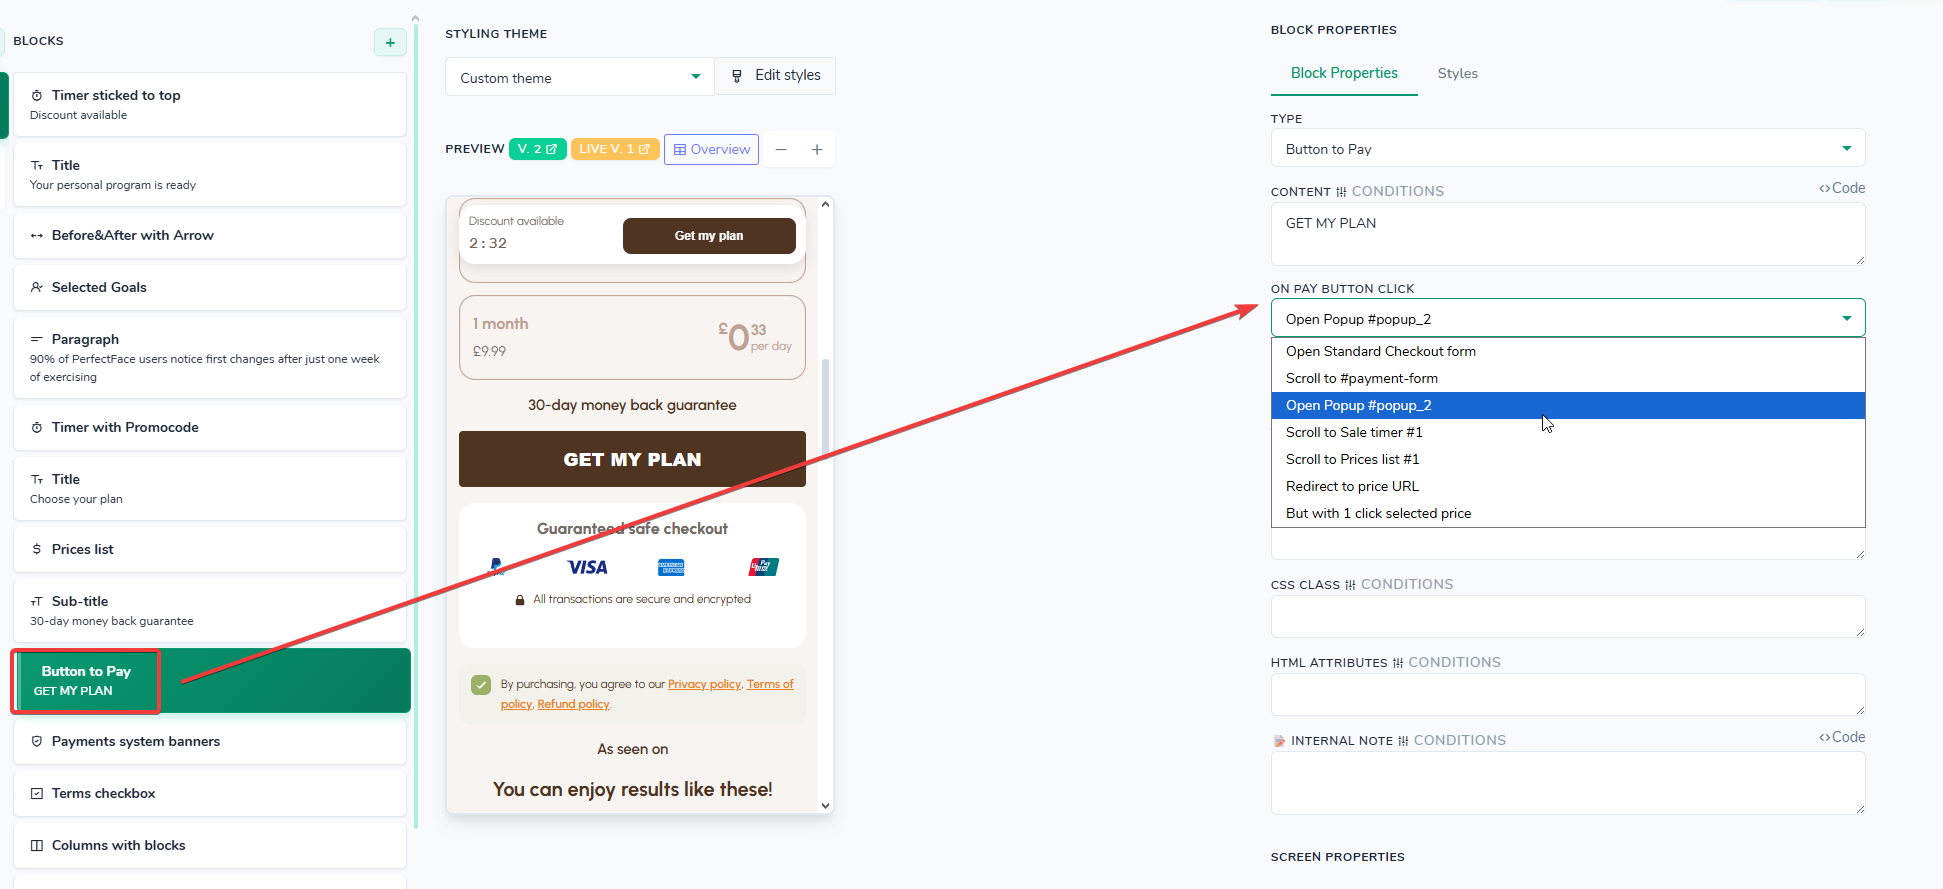
Step 2: Configure Button Actions
- Select the button that should trigger the checkout (e.g., "Get my plan" button)
- In the button properties, find the On Pay button click action
- Change the action from "Open standard Checkout form" to "Open pop-up"
- Select the popup you created (e.g., "pop-up 2")
- Repeat for any other buttons that should open the checkout
Customizing Form Parameters
The Stripe checkout form accepts several parameter groups that are passed directly to Stripe's Payment Element.
Stripe Checkout Form
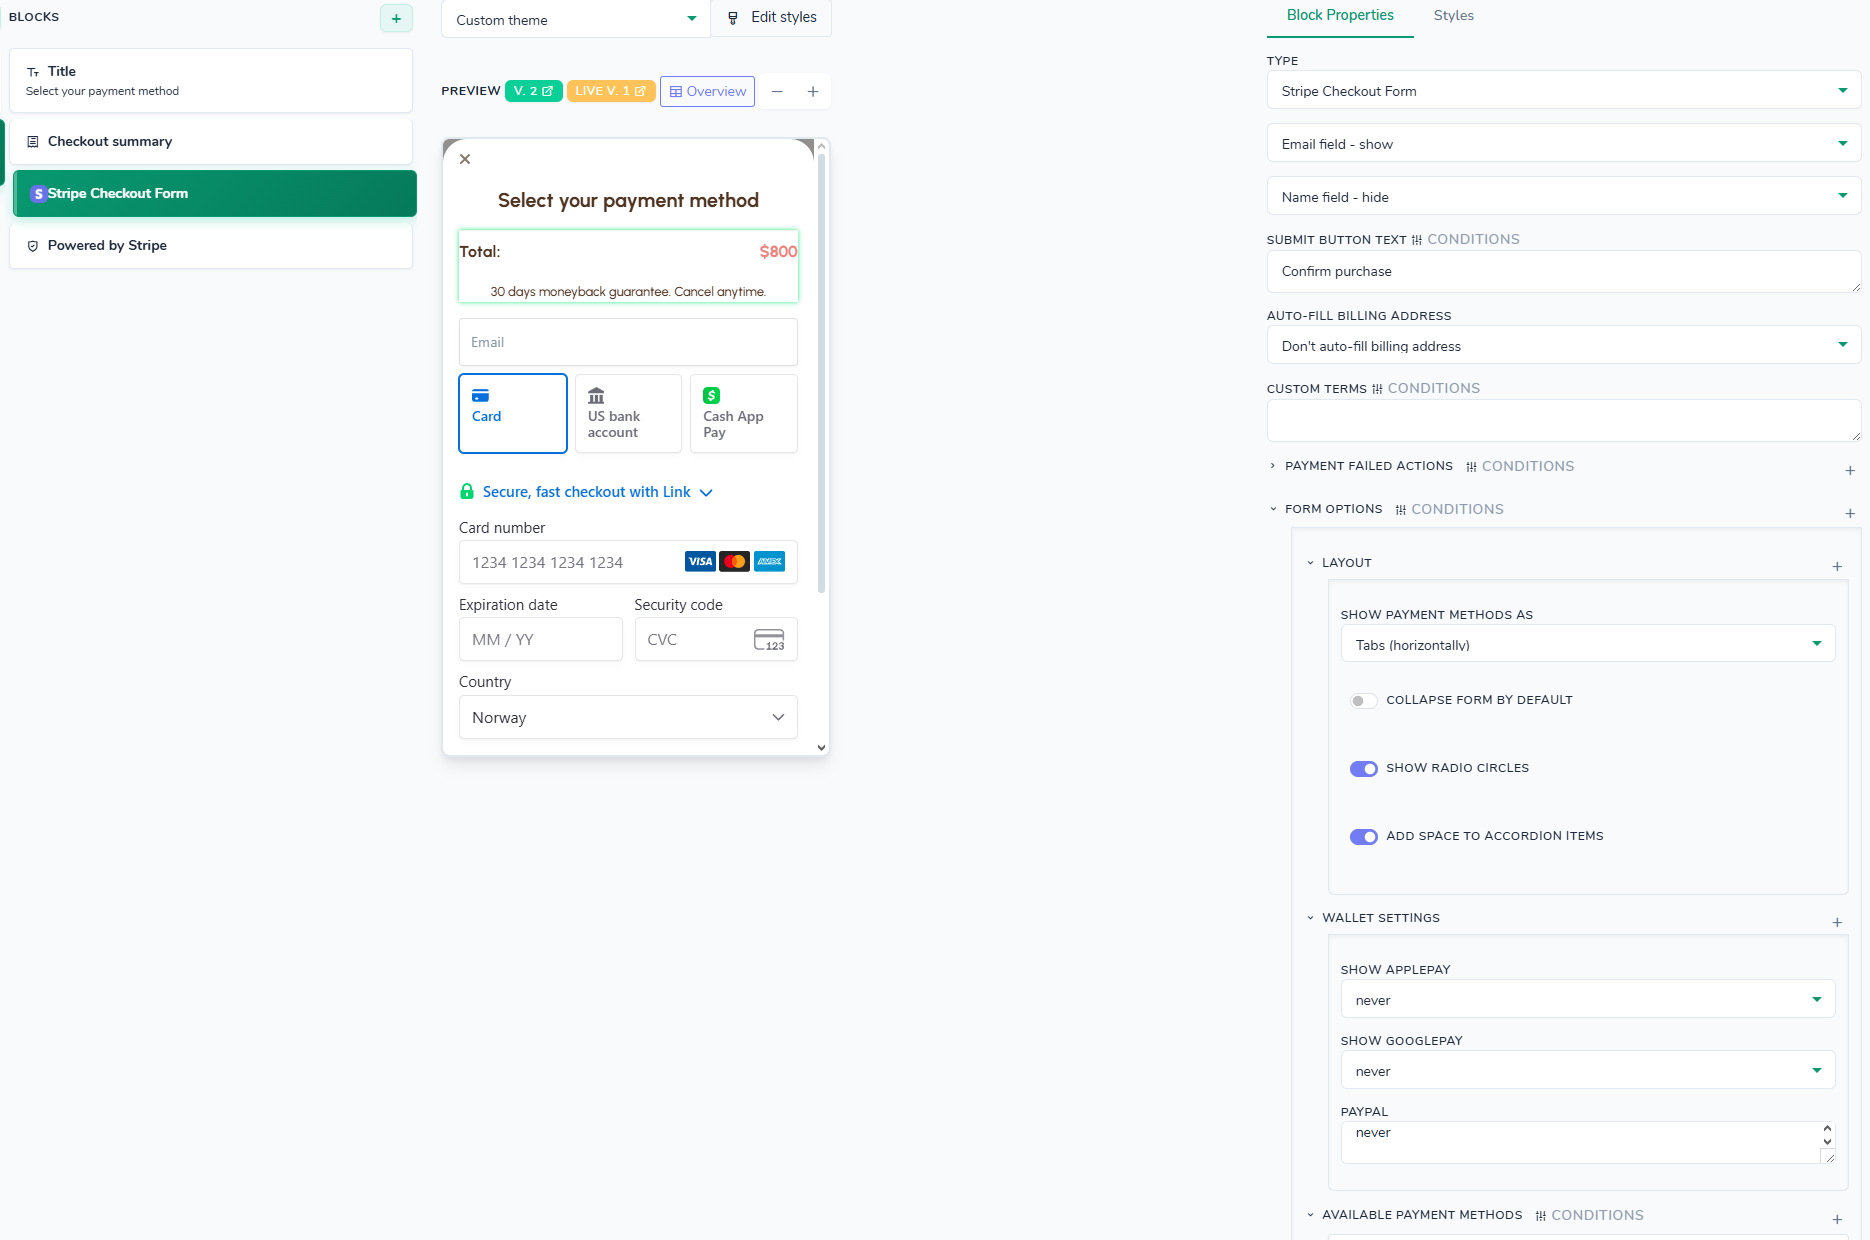
Form Options
Parameters that control form behavior and available payment methods.
Layout
Controls the visual layout of the form:
- type:
tabsoraccordion. - defaultCollapse:
trueorfalse. Controls if the Payment Element renders in a collapsed state (where no payment method is selected by default). - radios:
trueorfalse. Renders each Payment Method with a radio input next to its logo. The radios visually indicate the current selection of the Payment Element. - Add space to accordion items:
trueorfalse. When enabled, render as standalone buttons with space in between them.
Wallets
Configure which digital wallets appear:
- applePay:
auto, ornever - googlePay:
auto, ornever - payPal:
auto, ornever
Available Payment Methods
Define which payment methods to display. To show multiple options, leave empty or specify an array. To show only cards, set to card. apple_pay is for ApplePay, googlePay is for Google Pay and paypal is for PayPal.
Q: How to enable Google Pay and Apple Pay to be available for clients?
A: In the "Form Options", define the "Show Apple Pay" and "Show Google Pay" parameters to use "auto". In the "Available payment methods" make sure "card" and "apple_pay" are set. Check on iOS (for Apple Pay) and Android (for Google Pay) afterwards.
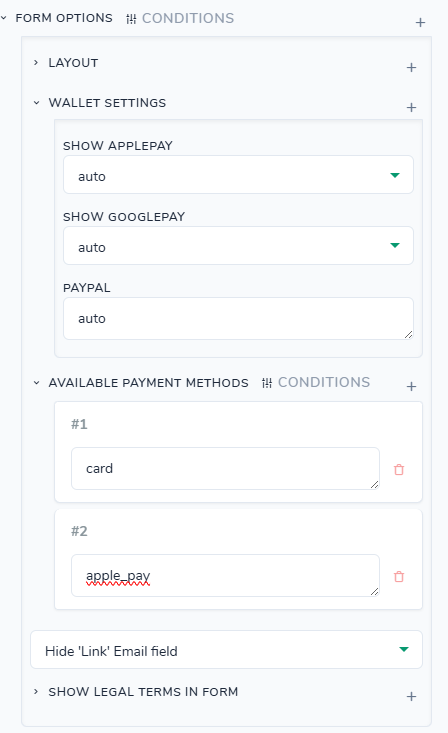
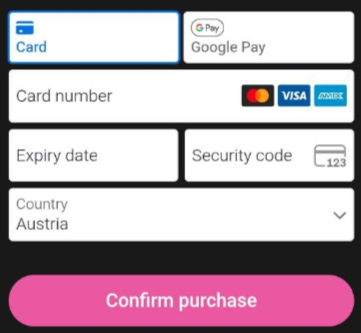
Enabling Google Pay button for Android OS.
Customizing Form Appearance
Themes
Stripe provides built-in themes:
stripe(default)nightflatCustom, use variables
Custom Variables
You can pass custom color variables to match your brand. Example parameters:
- Background colors
- Text colors
- Border colors
- Focus states
Example: Changing Background Color
- Select the Stripe Checkout Form block
- Find the Form appearance property
- Add your color customization (e.g., change background to red)
- Save and preview changes
Fallback Button
When Apple Pay is not available, you can show a fallback button:
- Enable Show fallback button option
- Set the button text (e.g., "Continue with other payment methods")
- Configure the On click action:
- Open another popup
- Scroll to prices list
- Other custom actions
Important: Only one express checkout button (Apple Pay) can be displayed on the page at a time. If an Apple Pay button exists, Apple Pay will not appear in the main checkout form.
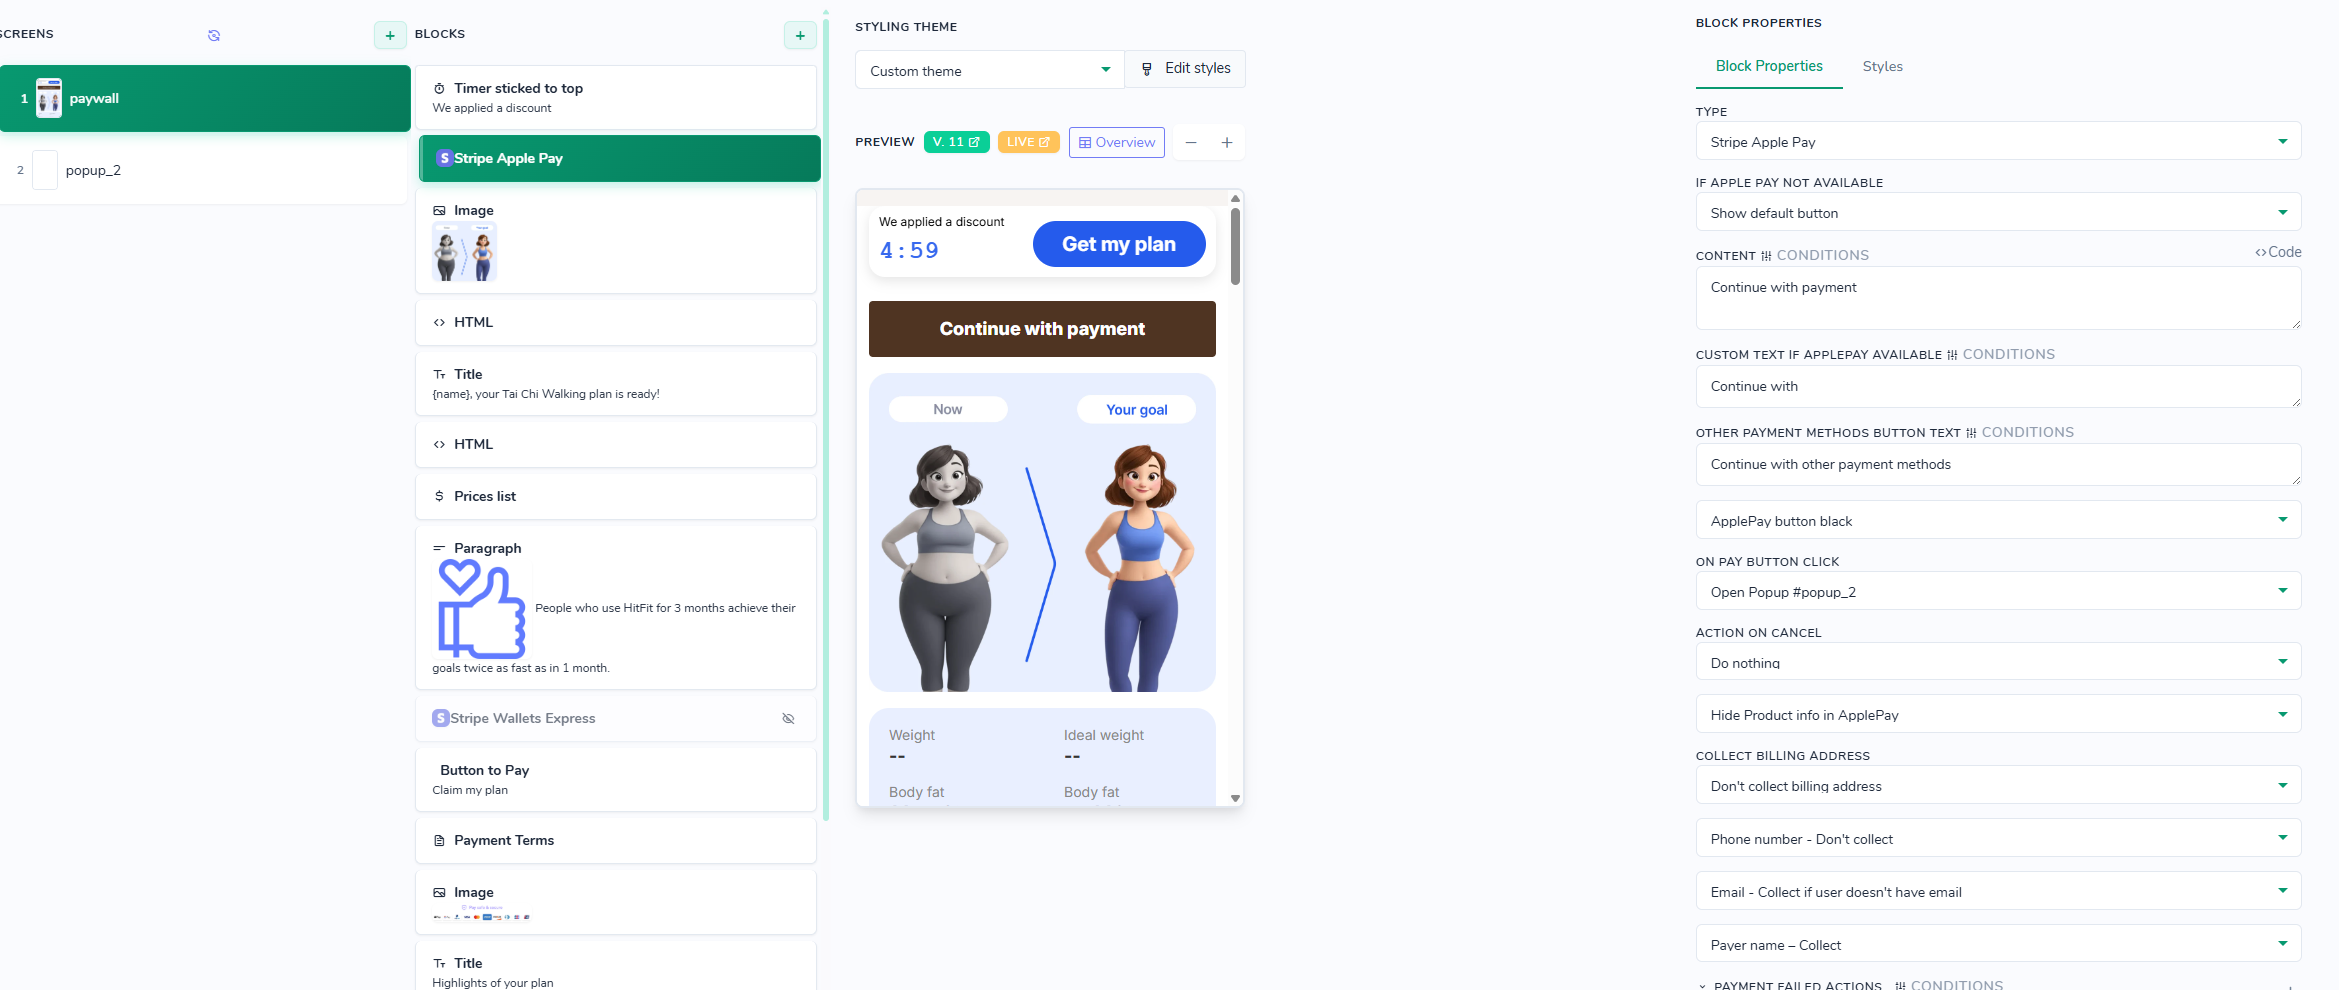
Stripe Apple Pay
For a customizable Apple Pay button that doesn't look like the standard Apple Pay button:
-
Add a Stripe Apple Pay block
-
Customize its appearance
-
Set the onPayButtonClick action for when Apple Pay is unavailable
-
The button will automatically launch Apple Pay when available
Payment Terms Block
The Payment Terms block dynamically updates based on the selected price.
Using Placeholders
You can use placeholders anywhere on the page to display price information:
Format: {{userData.price.[property_name]}}
Available Properties:
- Price amount
- Currency
- Billing period
- Trial information
Behavior: When users select different prices, all placeholders automatically update with the corresponding values.
Best Practices
- Express Buttons: Only display one express checkout button per page to avoid conflicts
- Google Pay: Set to
neverfor Instagram in-app browsers - Fallback Buttons: Always configure fallback actions for express payment buttons
- Testing: Update and preview frequently when making appearance changes
- Layout Types: Choose between
tabsandaccordionbased on your design preferences
Multicurrency paywall
Stripe prices can be sold in more than one currency. Add the amounts under Plans & Prices → the price → Additional Currencies, then enable Auto Currency Switching on the paywall under Paywalls → edit → Settings. Visitors are then charged in the currency matching their country, against the same Stripe price.
Two Stripe-specific limits are worth knowing before you start:
- A price holds one amount per currency code, so you cannot set different EUR amounts for different countries on the same Stripe price.
- Stripe prices are immutable — once the price exists in Stripe, changing an amount means creating a new price and swapping it on the paywall.
Full setup, the country-to-currency matching rules, the URL parameters for testing, and troubleshooting are on Multicurrency and Auto Currency Switching.
Troubleshooting
Q: Empty popup is opened.
A: Check configuration of "Button to Pay" block, specifically which action is defined for "On pay button click".
Q: No such payment_intent error upon payment attempt.
A: Check Stripe API key and API secret values. If issue persists, contact web2wave support team.
Q: Stripe Wallets Express and Stripe Checkout Form does not display PayPal button.
A: In the Stripe Wallets express "Collect billing address" must be set to use "Billing address -Don't collect (PayPal will show)". In the Stripe Checkout Form "Form Options" -> "Available Payment Methods" must include separate item with paypal value.
Q: The price specified is inactive. This field only accepts active prices error.
A: It means that prices has been archived or toggled off on Stripe side.
Stripe Restricted API Keys permission
- All core resources - Write
- Optionally you can skip
- Payouts
- Ephemeral keys
- Files
- Funding Instructions
- Payouts
- Shipping Rates
- Sources
- Optionally you can skip
- All Checkout resources - Write
- All Billing resources – Write
- Optionally you can skip
- Quote
- Tax IDs
- Tax Rates
- Meters
- Meter Events
- Meter Event Adjustments
- Features
- Entitlements
- Optionally you can skip
- All Issuing resources - Write
- All Reporting resources - Read
- All webhook resources - Write
- All Payment Links resources - Write