
Connect Unlimit to a web2wave project, add prices, sell through the redirect checkout, and keep recurring payments and cancellations in sync.
Unlimit is a direct card-processing integration. web2wave sends the buyer to a payment page hosted by Unlimit, then keeps the subscription up to date from the payment notifications Unlimit sends back — including renewals and cancellations.
Use this page to go from an empty project to a working, tested Unlimit paywall:
| Step | Where you work |
|---|---|
| 1. Collect the terminal credentials | Unlimit merchant account |
| 2. Connect Unlimit to the project | Project settings → Payments → Unlimit |
| 3. Point Unlimit's callbacks at your project | Unlimit merchant account |
| 4. Add prices | Plans & Prices |
| 5. Make Unlimit the paywall's payment system | Paywall editor |
| 6. Run a test purchase and check the subscription | Paywall and subscription list |
Unlimit checkout is hosted: the buyer leaves your paywall for Unlimit's payment page and returns afterwards. There is no Unlimit payment form block to add to the paywall, so nothing in the paywall editor needs to render card fields.
Before you start
- You need an Unlimit merchant account with at least one wallet configured for the currencies you sell in. If you are still onboarding, ask your Unlimit account manager which wallet to use.
- Unlimit runs sandbox and production as separate merchant accounts, each with its own login and its own set of terminal credentials. Test in sandbox first, then repeat the connection steps with the production values.
- Decide which prices you sell through Unlimit before you start: recurring subscription prices, a one-time lifetime price, or both.
Part 1 – Collect the terminal credentials in Unlimit
web2wave needs three values from the wallet you sell through.
1: Log in to the Unlimit merchant account for the environment you are setting up (sandbox or production).
2: Open Settings → Wallets (called Wallet settings in some Unlimit accounts) and find the wallet you sell through. The wallet's identifier is the Terminal code.
3: Open that wallet and select Show credentials. Unlimit may ask for a one-time confirmation code. The panel then shows the Terminal password and the Callback secret.
Unlimit shows the terminal password and callback secret once. Copy both before you close the panel — if you lose them you have to ask Unlimit to reissue the credentials.
4: Keep the three values ready for Part 2:
| Value in web2wave | Where it comes from in Unlimit |
|---|---|
| Terminal code | The wallet identifier shown in the wallet list |
| Terminal password | Wallet → Show credentials |
| Callback secret | Wallet → Show credentials |
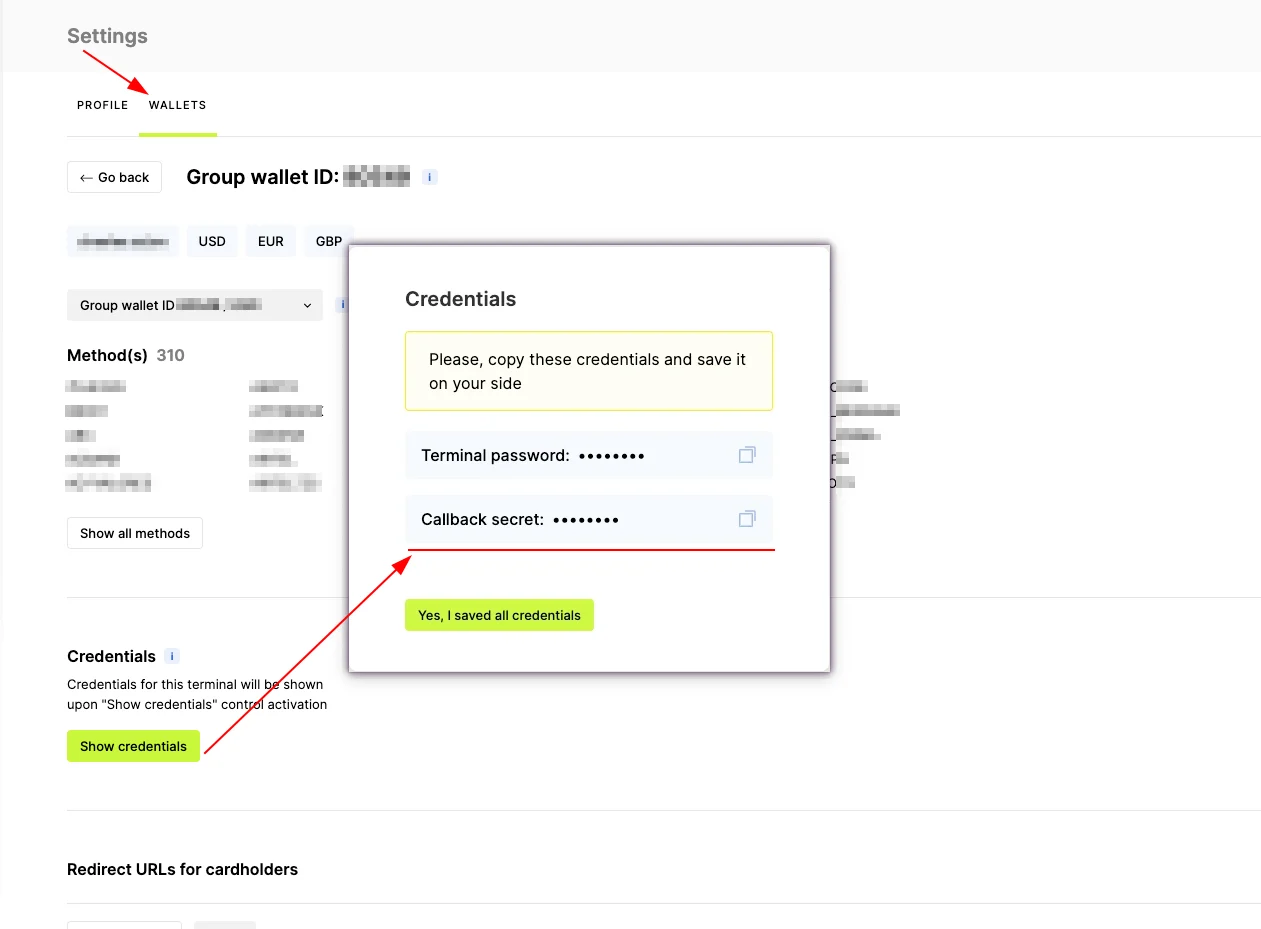
Unlimit wallet credentials — Callback secret
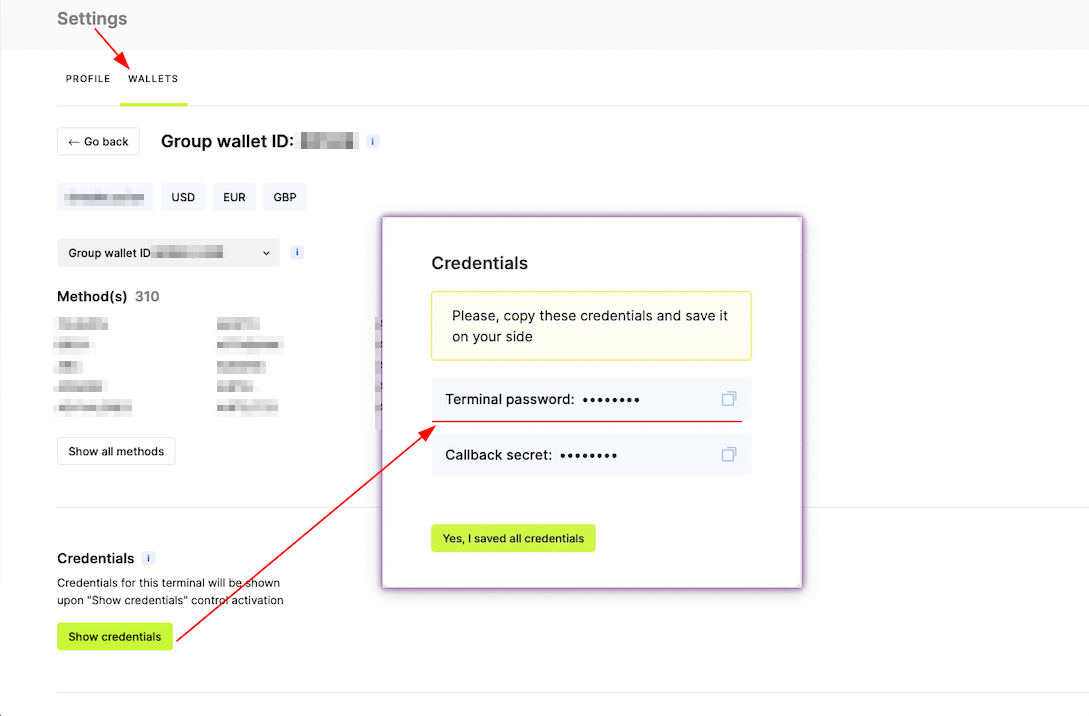
Unlimit wallet credentials — Terminal password
Screenshot: Unlimit merchant account → Settings → Wallets → wallet list with the Terminal code visible.
Part 2 – Connect Unlimit to your web2wave project
5: In web2wave open Projects, find your project and open its settings, then go to Payments → Unlimit.
6: Fill in the three fields with the values from Part 1:
- Callback secret
- Terminal password
- Terminal code
Use the credentials that match the environment you are working in — the sandbox values while you test, the production values when you go live.
7: Select Save.
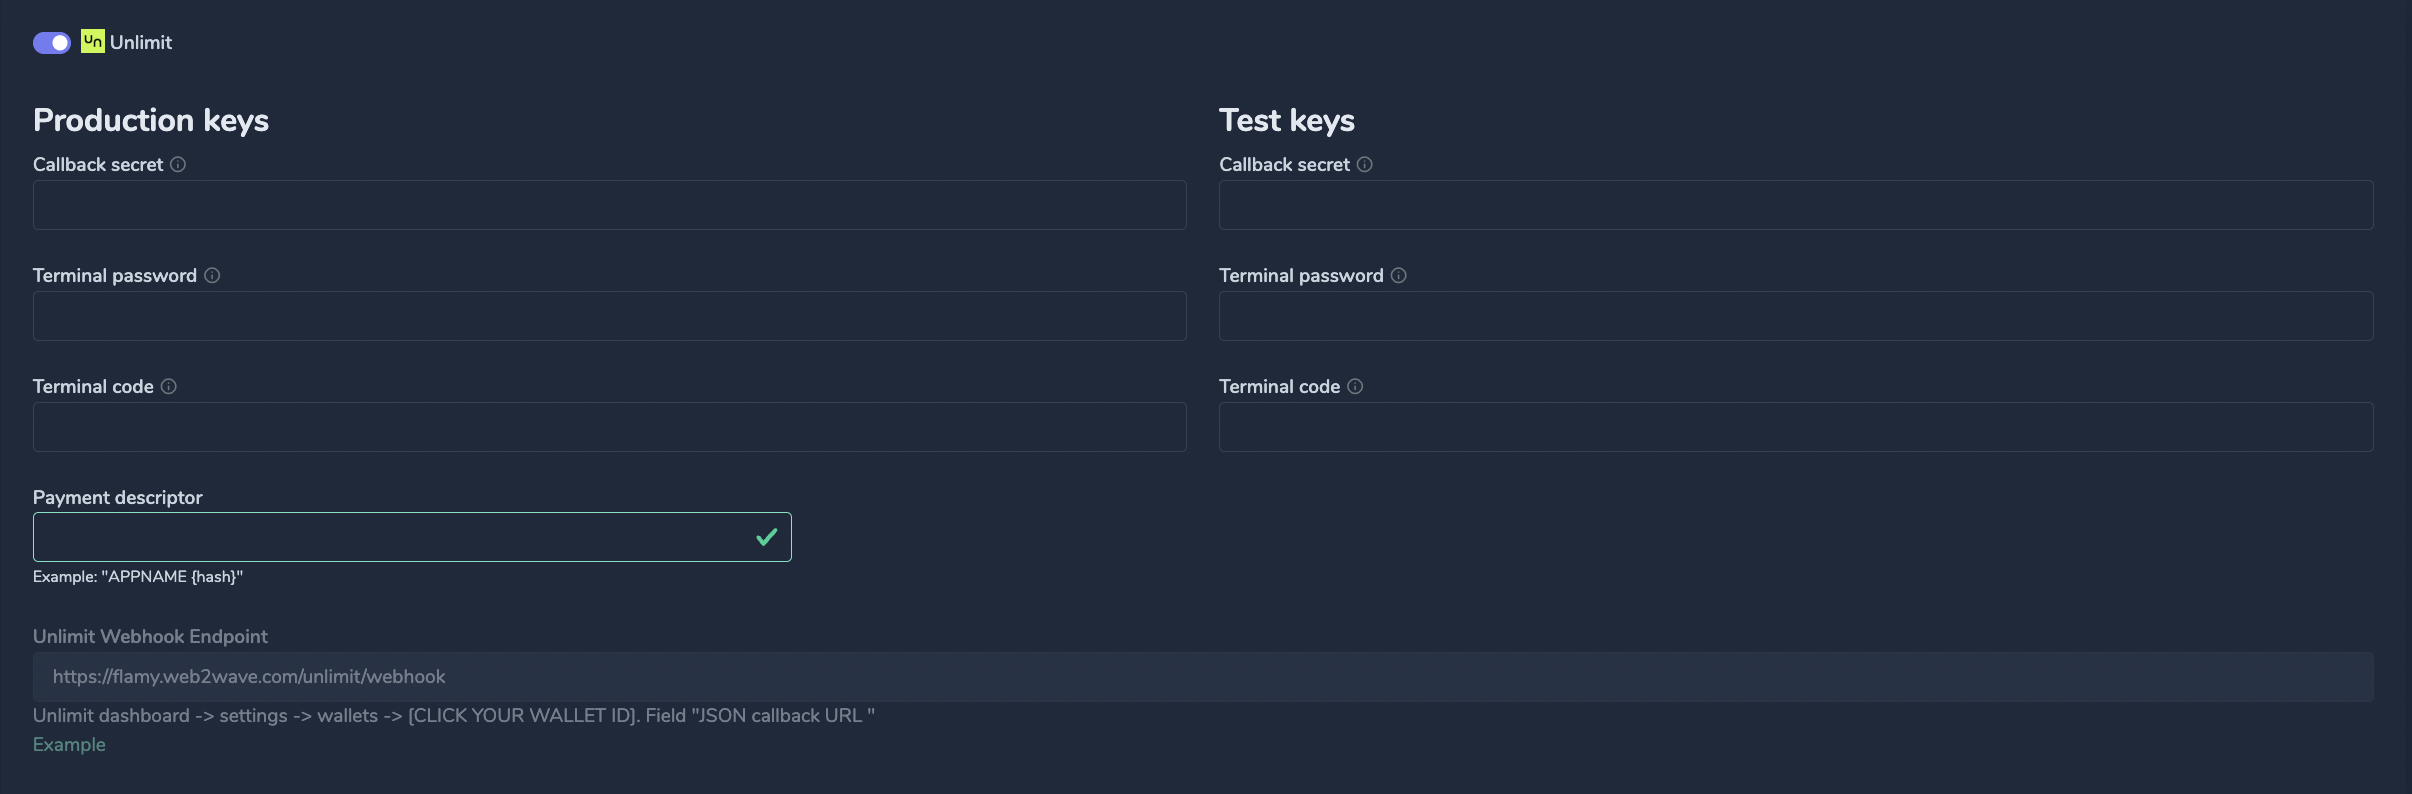
web2wave Payments tab, Unlimit integration
Part 3 – Point Unlimit's callbacks at your project
Everything that happens after the buyer leaves your paywall — a successful charge, a failed charge, a renewal, a cancellation — reaches web2wave as a payment notification from Unlimit. The Callback secret you saved in Part 2 is what web2wave uses to confirm those notifications really come from your wallet.
8: Ask web2wave support for the callback URL for your project, and enter it in the Unlimit merchant account under the wallet's Callbacks settings (JSON callback URL).
9: While you are in the wallet settings, enable Unlimit's option to redirect the cardholder back to your website after payment so buyers land on your after-payment screen instead of staying on Unlimit's page. Set the redirect timeout to a short value.
Do this once per environment. The sandbox wallet and the production wallet each need their own callback URL and redirect settings.
Screenshot: Unlimit merchant account → wallet → Callbacks → JSON callback URL, and the redirect-to-website option.
Part 4 – Add Unlimit prices
Prices decide what the paywall can sell, so create them before you touch the paywall. You have two options, and you can use both in the same project.
Import your Unlimit catalog
In Plans & Prices, select Import Plans & Prices, choose your project, set the payment system to Unlimit, and start the import. web2wave creates the matching plans and prices in the list.
Check the imported rows before moving on: currency, amount, and billing period must match what you offer in Unlimit, and each row must be in the right mode (test rows for sandbox, live rows for production).
Create a price manually
Create a price by hand when there is nothing to import — most often for a lifetime (one-time) offer.
In Plans & Prices, select Create new price, then set:
- Payment system — Unlimit
- Project and the live/test mode you are working in
- Name and, if you use them, the external identifier fields
- Currency and Amount
- Period — leave the billing period empty for a lifetime price so it is charged once instead of renewing
Everything else on the price — introductory copy, additional currencies, paywall labels — works the same as for any other payment system. See Plans & Prices for the full field reference.
Screenshot: Plans & Prices → Import Plans & Prices dialog with Unlimit selected as the payment system.
Screenshot: Plans & Prices → Create new price with Unlimit selected and no billing period, for a lifetime offer.
Part 5 – Sell through Unlimit on the paywall
Unlimit is used as the paywall's main payment system: the buyer picks a plan, presses your pay button, and web2wave hands them to Unlimit's payment page.
10: Open the paywall you want to sell through Unlimit and set its main payment system to Unlimit.
11: Add your Unlimit prices to that paywall.
12: Make sure the checkout screen uses a Button to Pay block. On press, web2wave requests a payment link from Unlimit and redirects the buyer to it — no payment form block is involved.
13: Check that your after-payment screen is configured, because that is where buyers come back to once Unlimit finishes the payment.
A paywall sells through one main payment system at a time. Prices attached to a paywall must belong to the payment system that paywall is set to, otherwise the plan will not be selectable.
Screenshot: Paywall editor → settings with the main payment system set to Unlimit and Unlimit prices attached.
Part 6 – Test the purchase
14: Point a paywall at a test-mode Unlimit price and open it in the browser.
15: Select the plan and press the pay button. You should be redirected to Unlimit's payment page. Pay with a test card from your Unlimit sandbox account — Unlimit provides the test card numbers, they are not issued by web2wave.
16: Confirm you are returned to your after-payment screen.
17: Check the analytics events recorded for the session. A healthy redirect looks like this:
| Event | What it means |
|---|---|
| Unlimit init | The Unlimit checkout was initialized on the paywall |
| Unlimit get redirect link | web2wave is requesting the payment link |
| Unlimit redirect to payment page | The buyer is being sent to Unlimit |
| Unlimit redirect request error | The payment link could not be created — see Troubleshooting |
18: Open your project's subscription list and confirm the new subscription is there with Unlimit as its payment system, the correct price and amount, and the paid invoice.
Repeat the whole test with live credentials and a live price before you send traffic.
For the general sandbox checklist across payment systems, see Making a test purchase.
Recurring payments and cancellation
- Renewals. Each recurring charge arrives from Unlimit as a payment notification. web2wave records the charge on the existing subscription, so status, next charge date, charge count, revenue, and invoices stay current without any action from you.
- Outgoing webhooks. Unlimit subscriptions are delivered to your own endpoints like any other subscription. The payload names Unlimit as the payment system and carries the price, amount, status, and invoice list. See Webhook documentation.
- Cancellation. Cancellation is supported for Unlimit subscriptions. Give buyers the self-service customer portal quiz so they can cancel on their own, optionally after a retention offer. See Customer portal and user subscription management.
- Refunds from the web2wave interface. In-cabinet refunds are currently available for Stripe, Paddle, PayPal, and Primer. Refund an Unlimit payment in your Unlimit merchant account.
Troubleshooting
Q: The buyer presses the pay button and nothing happens, and the session shows an Unlimit redirect request error event.
- What it means: Unlimit refused to create the payment link.
- Resolution: Re-check the three credentials in Project settings → Payments → Unlimit — the most common cause is credentials from the other environment (sandbox values on a live price, or the reverse). Then confirm the selected price has a currency and amount your Unlimit wallet accepts.
Q: The plan does not appear on the paywall, or cannot be selected.
- What it means: The price and the paywall do not agree on the payment system or the mode.
- Resolution: Confirm the paywall's main payment system is Unlimit, that the attached prices are Unlimit prices, and that you are testing a test-mode price on a sandbox setup and a live price in production.
Q: The payment succeeds on Unlimit's page but no subscription appears in web2wave.
- What it means: The payment notification is not reaching your project, or it is being rejected.
- Resolution: Check the callback URL saved in the Unlimit wallet settings (Part 3) and confirm the Callback secret in the project settings matches the wallet you actually charged. Credentials from a different wallet or environment will fail verification.
Q: The buyer stays on Unlimit's page after paying instead of returning to my funnel.
- What it means: The redirect back to your website is not enabled on the Unlimit wallet.
- Resolution: Enable the redirect-to-website option in the wallet settings (Part 3) and confirm your paywall has an after-payment screen configured.
Q: A renewal was charged in Unlimit but the subscription in web2wave still shows the previous charge date.
- What it means: The renewal notification did not arrive or was rejected.
- Resolution: Same checks as the missing-subscription case above — callback URL and callback secret for the wallet that processed the renewal. If the callback settings are correct, contact web2wave support with the Unlimit transaction identifier.
Related
- Plans & Prices — price fields, currencies, and introductory offers.
- Making a test purchase — sandbox flow across payment systems.
- Customer portal and user subscription management — self-service cancellation and retention offers.
- Webhook documentation — subscription payloads sent to your own systems.
- Events — the full list of Unlimit events recorded on the paywall.