
Want to draft a full sequence quickly? See Generate email sequences with AI — templates, audience setup, and best practices for what each email in the chain should do.
Email Sequence
Email sequences allow you to build multi‑step automated campaigns that react to user behavior: leaving an email, purchasing, or installing the app.
Each sequence step (email step) has:
- Status:
Active- emails are queued and sent.Draft- emails are not sent.
- Send trigger - which event starts the step:
Lead email left(user left an email in a quiz but did not necessarily purchase).Any purchase(any successful purchase in the project).Subscribe(any successful subscription in the project).Start trial(any successful trial activation in the project).App installed(requires proper app integration).API call(email is sent when you explicitly call the API). Manual on the matter.
- Delay - how long to wait after the trigger before queuing the email (e.g. 1 hour, 24 hours, several days).
- Stop trigger - an event that cancels this pending email (and potentially other steps in the same sequence).
- Email content, tracking options, and optional filters.
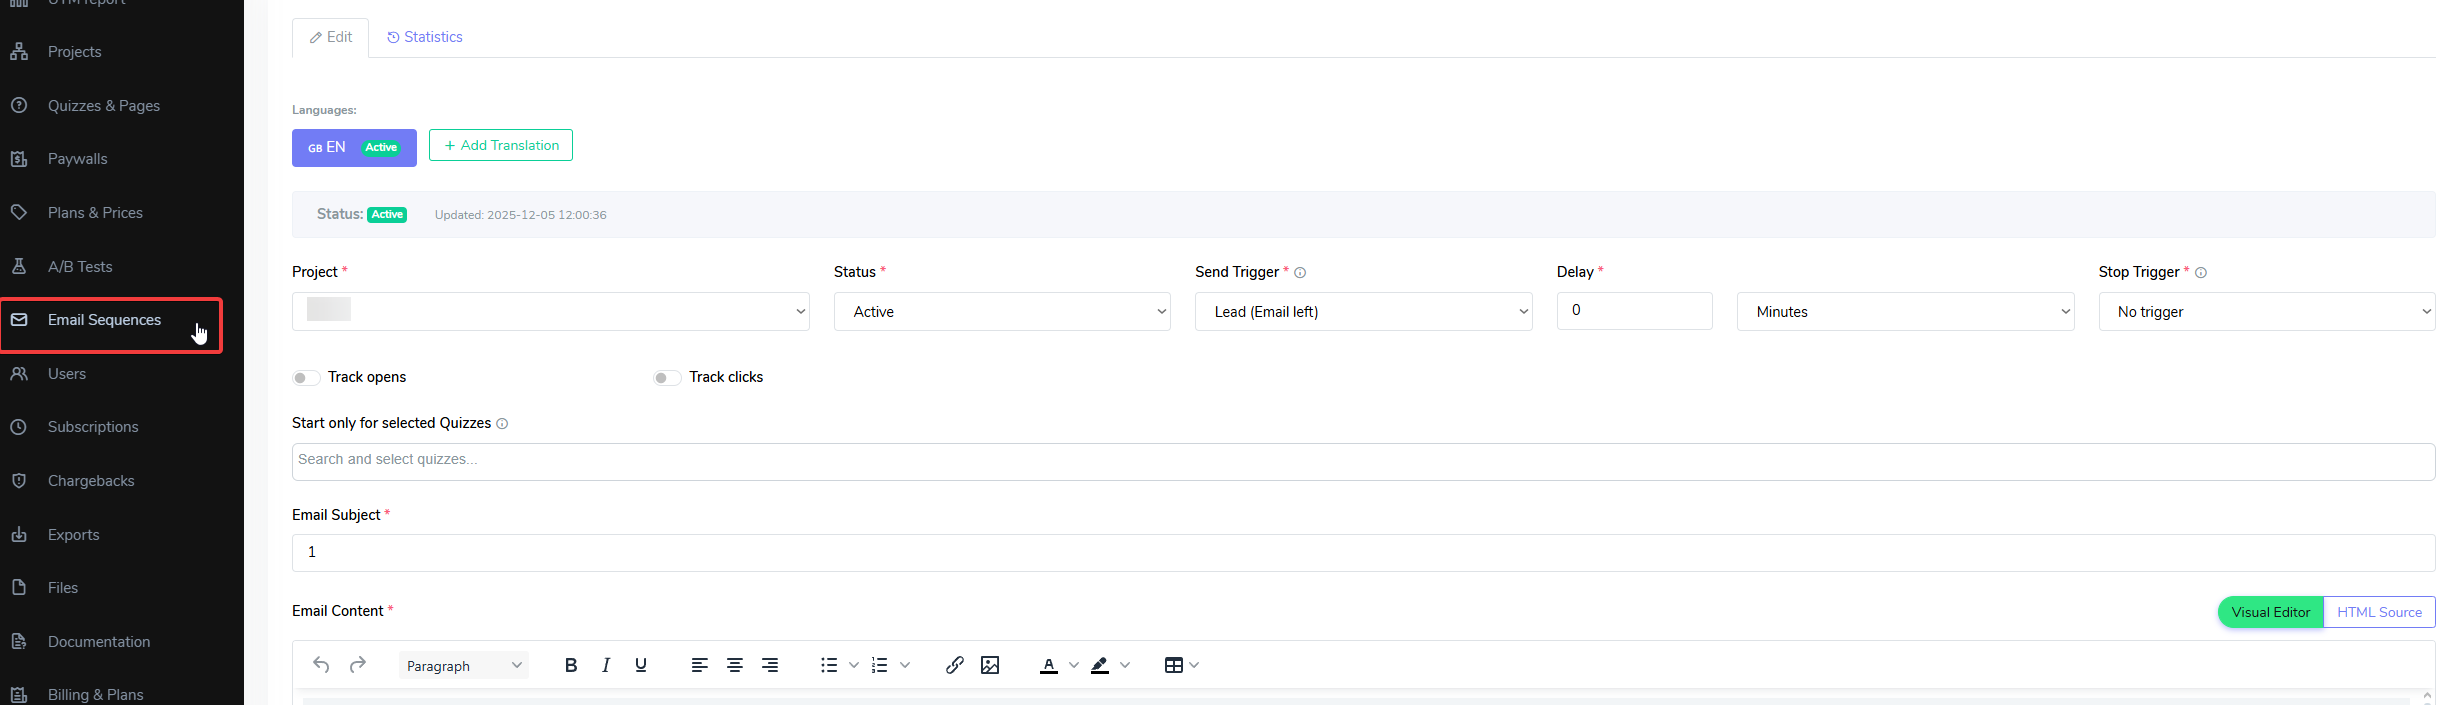
Visual illustration of the Email sequences configuration
web2wave queues all relevant steps immediately when the start event occurs and cancels them as soon as the stop event happens (e.g. the user purchases).
Lead email left sequences
The most common sequence type is triggered when a user leaves an email but does not purchase.
Typical flow:
- Trigger:
Lead email left. - Steps:
- Email 1: sent in 30–60 minutes while the lead is still “warm”.
- Email 2: sent after 12 hours with a stronger incentive (e.g. a bigger discount).
- Additional emails: 3–10 messages over several days.
Configuration example:
- Create step 1:
- Trigger:
Lead email left. - Delay:
1 hour. - Stop trigger:
Any purchase.
- Trigger:
- Create step 2:
- Trigger:
Lead email left. - Delay:
24 hours. - Stop trigger:
Any purchase.
- Trigger:
- Repeat for as many follow‑ups as needed.
Behavior:
- On email capture, web2wave queues all steps for that user with their respective delays.
- If the user purchases at any point, all future steps with
Any purchaseas stop trigger are cancelled.
Purchase‑based sequences
You can also send sequences after a purchase to increase activation or deliver additional content.
Examples:
- Follow‑up after purchase if the user did not install the app:
- Trigger:
Any purchase. - Delay:
1 hour. - Stop trigger:
App installed. - Content: reminders and installation instructions.
- Trigger:
- Post‑purchase onboarding:
- Trigger:
App installed. - Delay:
24 hours. - No stop trigger (or custom stop condition).
- Content: tips, feature highlights, and usage scenarios to improve retention.
- Trigger:
Note:
- The project‑level purchase email remains free for all plans.
- Email sequences are available on the Advanced plan (and for selected accounts individually).
Tracking opens and clicks
For each email step you can enable tracking of opens and clicks.

Track open and Track clicks toggles in the Email Sequences.
How it works:
- Open tracking:
- web2wave adds an invisible 1×1 tracking image into the email.
- When the image is loaded, this is recorded for that user and email.
- Click tracking:
- web2wave wraps all links in redirect URLs (e.g.
https://.../email/click?url=...&user_id=...). - When a user clicks a link, web2wave tracks the click and then redirects to the final URL.
- web2wave wraps all links in redirect URLs (e.g.
Important deliverability notes:
- Open tracking increases the probability that Gmail and other providers classify emails as Promotions, because of the tracking pixel.
- Most web2wave clients prefer their emails to land in the Primary inbox, so open tracking is not recommended for long‑term campaigns and should only be used when you explicitly need this data.
- Click tracking is generally safe, but can conflict with some deep‑linking providers.
Add UTM tags to links
Each email step has an Add UTM tags to links toggle (enabled by default).
When enabled, web2wave automatically appends the following query parameters to every link in the email before sending:
utm_source=email_w2w— identifies traffic as coming from a web2wave email sequence.utm_campaign={sequence_step_id}— identifies the specific email step, so you can track performance per step in analytics.user_id=USER_ID— passes the user's identifier so that web2wave can recognize them when they land on your quiz or paywall. This is only appended to links on your own project domain (first‑party links) to avoid leaking personal data to third‑party services.
If a link already contains any of these parameters they are not overwritten — your custom values take precedence.
Account continuity: passing user_id in links
user_id in linksWhen a user clicks a link in an email and lands on your quiz or paywall, web2wave needs to know who that person is in order to:
- Pre‑fill their email address.
- Apply any active discounts or personalized offers.
- Correctly attribute a purchase to their existing account (so the purchase stops the email sequence and does not create a duplicate account).
The user_id parameter is the mechanism that achieves this.
Automatic — via "Add UTM tags"
With the Add UTM tags toggle enabled (the default), web2wave injects user_id=USER_ID into every first‑party link automatically. No manual work is required.
Manual — when you build links yourself
If you disable the toggle or construct links manually in the email HTML, you must append ?user_id=USER_ID yourself:
https://yourproject.com/quiz/your-quiz?user_id=USER_ID
https://yourproject.com/paywall/your-paywall?user_id=USER_ID
USER_ID is a placeholder that web2wave replaces with the actual user identifier at send time (it is available in the email editor as the USER_ID variable).
Without
user_idin the link, the user who clicks through from the email will be treated as an anonymous visitor. Their quiz answers and any purchase they make may not be linked to the existing account, which breaks sequence cancellation and analytics attribution.
API‑triggered emails
For advanced use cases, emails can be triggered via API.
Pattern:
- Your quiz, backend, or mobile app decides that a certain email should be sent.
- It calls web2wave's API with:
- Template ID (email step or transactional template).
- User ID.
- Email address.
Common scenarios:
- Complex segmentation logic in your own backend (e.g. send different templates based on gender, inactivity, or custom events).
- Triggering emails from inside a quiz via a small JavaScript snippet.
- Sending time‑delayed transactional messages from a backend job (e.g. after 5 days of inactivity).
This allows full control over when and to whom a template is sent, while still leveraging web2wave templates and logs.
AppsFlyer OneLink limitation
If you use AppsFlyer OneLink URLs as your deep links, click tracking should be disabled for those links.
Reason:
- AppsFlyer OneLink already expects to receive specific parameters and handle attribution.
- If web2wave wraps OneLink with its own redirect for click tracking, AppsFlyer may drop or ignore parameters, breaking attribution. Article from AppsFlyer on the matter can be found here.
- In practice this means:
- For most customers who use AppsFlyer, do not enable click tracking on these links.
- Use the raw OneLink URL directly in the email.
For other landing pages and normal URLs (non‑OneLink), click tracking can be used safely.
Filters and segmentation inside sequences
Each email step can be restricted to specific conditions so that only part of your audience receives it.
Available filters include:
-
Project -> quiz filters:
-
Target only users who came from specific quizzes in the project (e.g. English learning quiz vs. Spanish learning quiz).
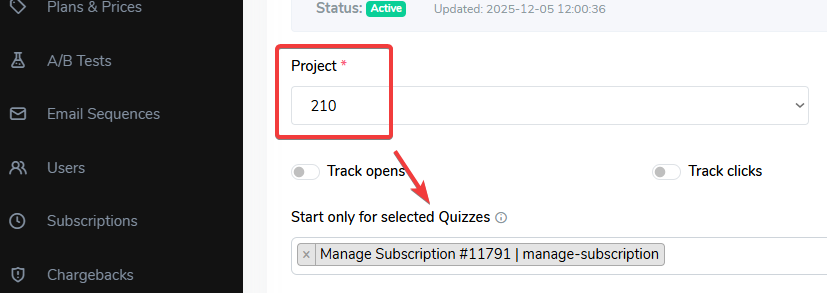
Quiz filter for the specific project
-
-
Price filters:
- Send an email only for certain prices (e.g. only for weekly subscription, not for lifetime).
-
User properties:
- You can reference any stored user property (gender, UTM source, etc.) in the email content, and some may be used for conditional targeting depending on the current product version.
This allows scenarios such as:
- Separate nurture sequences per quiz.
- Different post‑purchase flows per product.
- Language‑specific or segment‑specific emails based on quiz answers.
Localization and AI translations
Email templates in sequences support multiple languages.
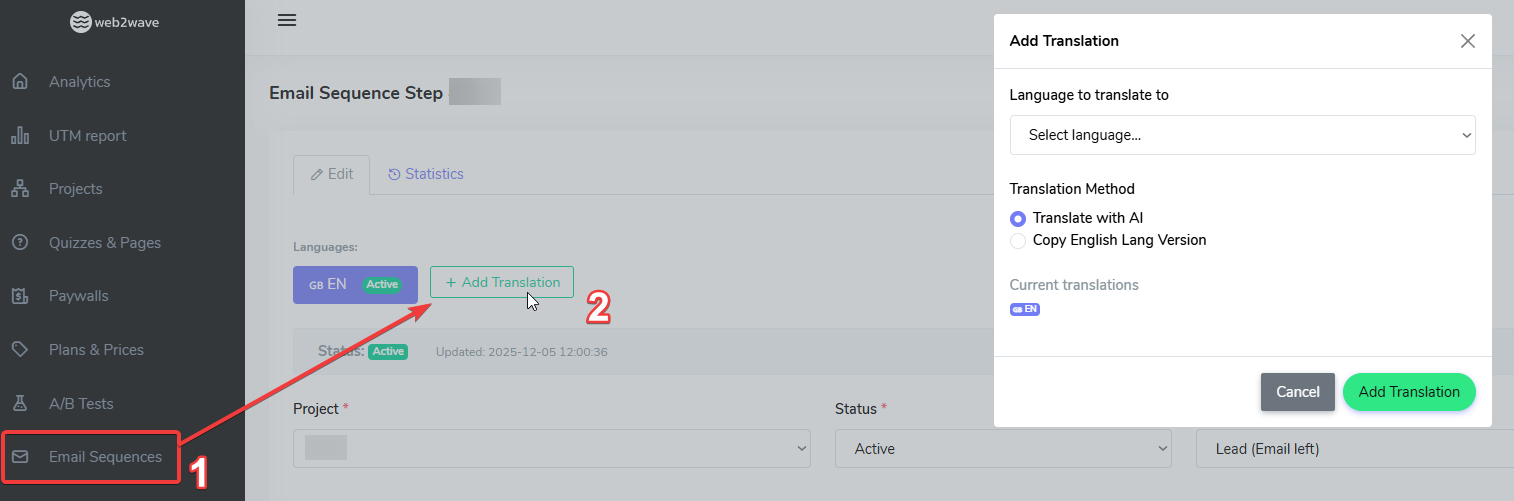
How to add new Translation
Behavior:
- web2wave determines user language by:
- The quiz language if available.
- Otherwise, the browser language.
- The system then selects the matching localized version of the template.
Workflow:
- Create or open an email step.
- Add a new language (e.g. Arabic).
- Choose:
- Translate with AI - content is auto‑translated from the default language.
- Copy from default - copy English content and edit manually.
- Save the new localized version.
Notes:
- English is currently the default language; upcoming updates will allow changing the default and deleting specific translations if needed.
- Statistics (opens, clicks, deliveries) are available per language in the email step analytics.
Email sequence analytics
Each email step has a detailed statistics view.
Metrics include:
- Queued - number of emails scheduled to be sent at a future time.
- Sent - emails successfully handed off to the provider.
- Cancelled - emails that were queued but cancelled because a stop trigger fired (e.g. purchase happened).
- Failed - emails that could not be delivered due to provider or SMTP errors.
- Open rate and Click rate - if tracking is enabled.
- The same metrics broken down by language.
Below the counters, you can see a log of individual emails:
- User identifier.
- Status (queued, sent, cancelled, failed).
- Scheduled time and actual send time.
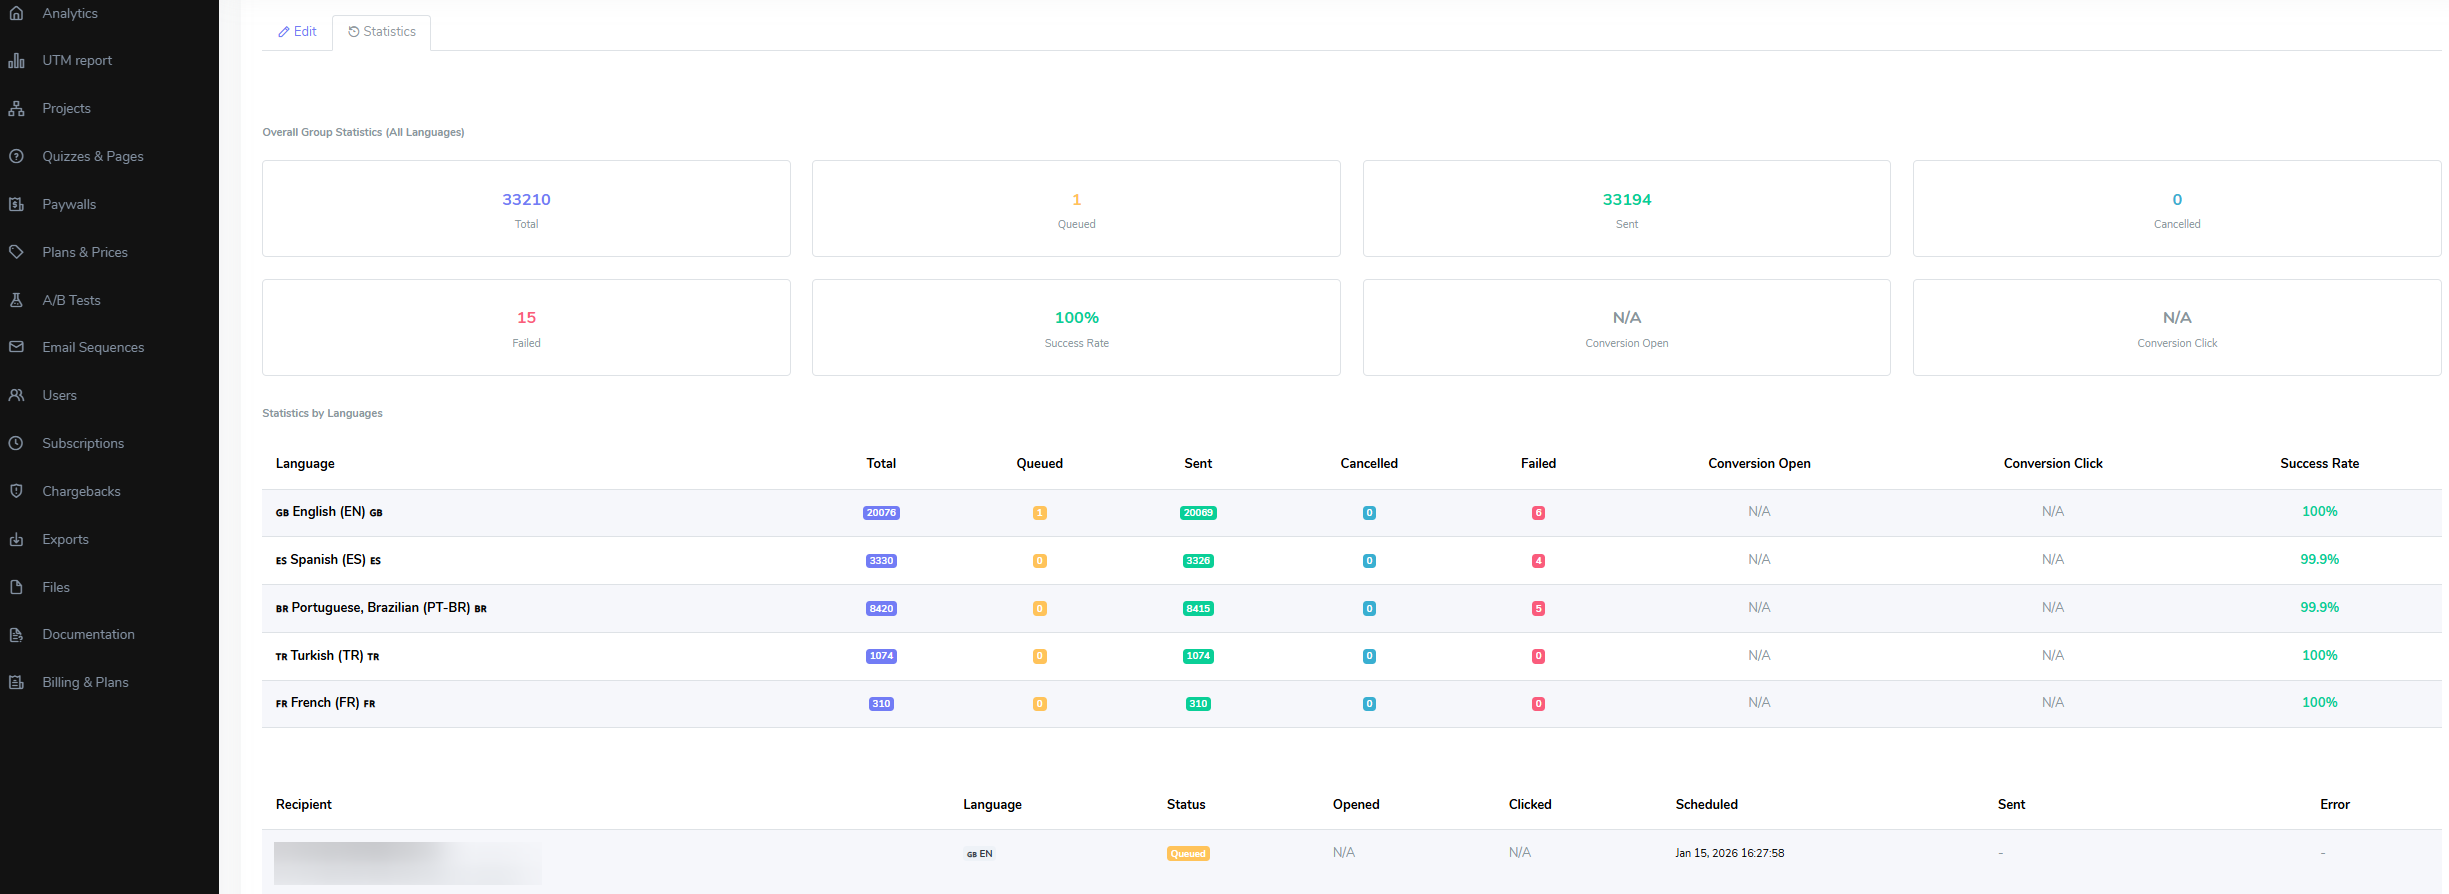
How the Statistics page looks like
The sending system processes scheduled emails approximately once per minute, so slight delays (1–2 minutes) compared to the exact scheduled time are normal.