
web2wave can send transactional and marketing emails on your behalf after a user completes a quiz, purchases a subscription, or installs the app. Emails are sent either through the built‑in provider (Resend) or via your own SMTP server.
To configure email sending for a project:
- Go to Project settings → Emails.
- Set a Support address email address.
- This address is used in system templates such as “Contact us” and support links, for example in the Terms of Service template.
- Add a From email and From name.
- The email must belong to a custom domain you control.
- Public mailboxes like Gmail, Yahoo, etc. are not supported and will be rejected.
After saving, web2wave will generate DNS records for your domain and show them in the project email settings.
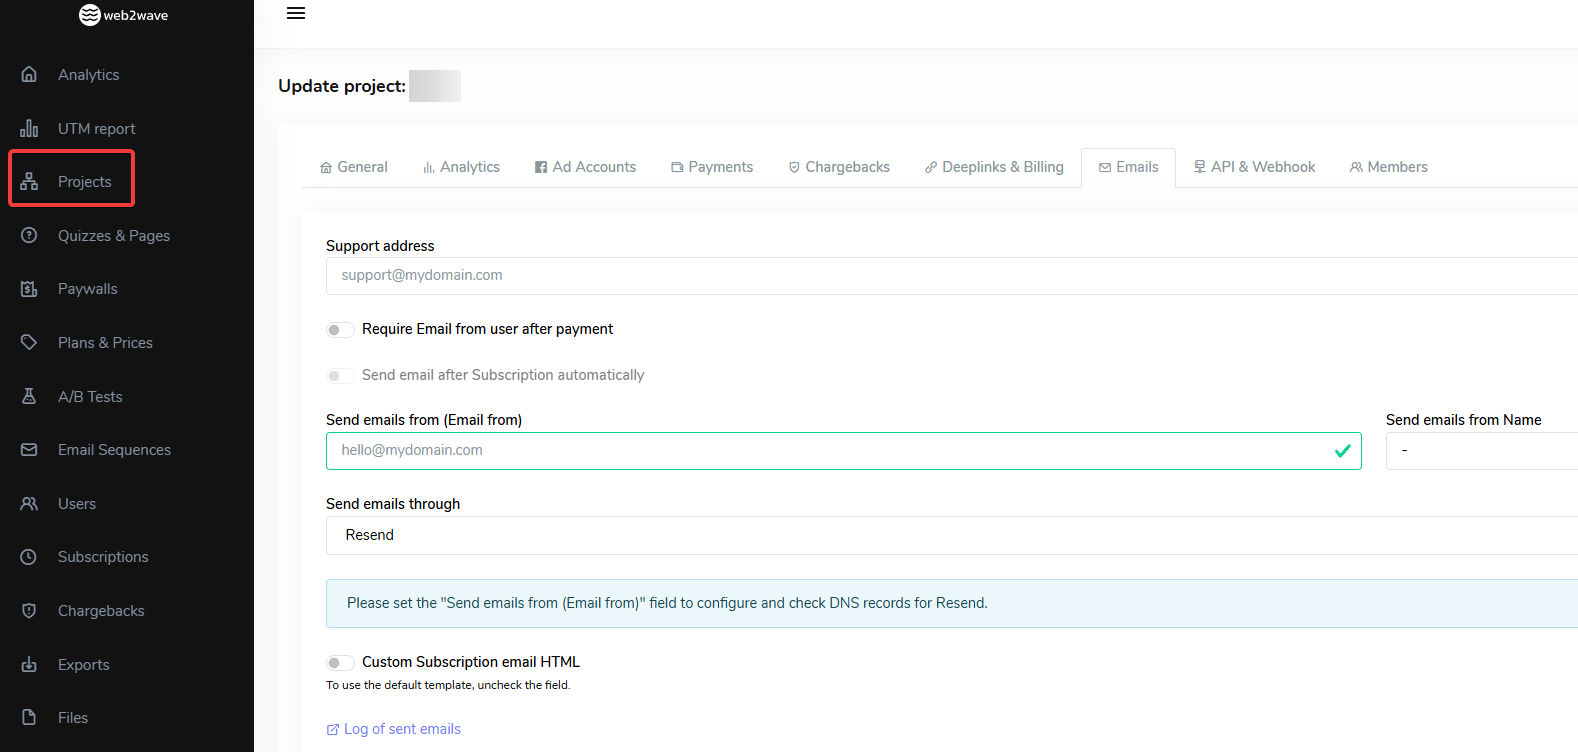
Emails tab settings view
Send emails from Name defines name of the sender:
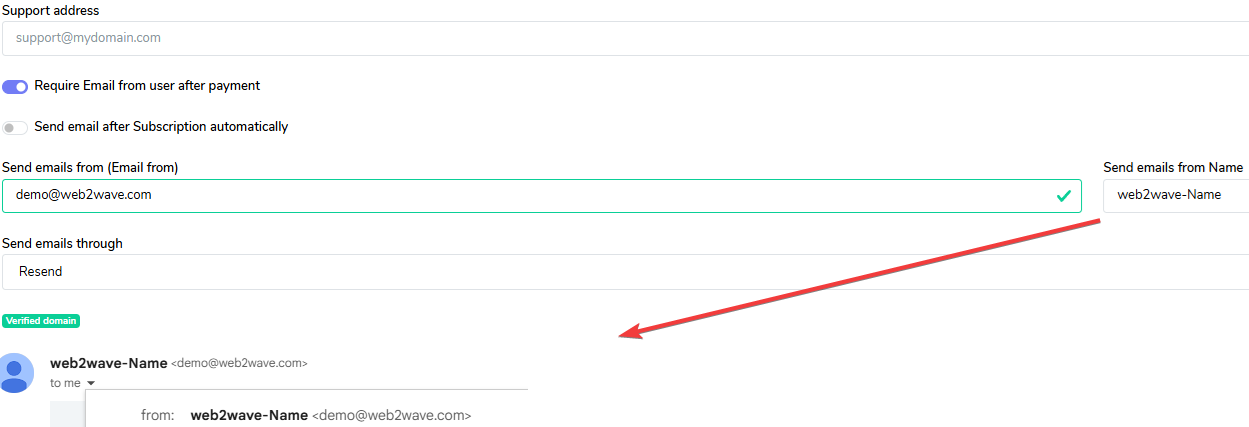
How defined name of sender would look in your inbox
Domain verification and DNS records
To send emails from your own domain, the domain must be verified via DNS records.
- After saving the From email, refresh the page.
- In the DNS records section you will see the list of required records:
- TXT records for domain verification and SPF.
- MX records with a priority (if specified, usually
10) for mail routing. - DMARC TXT record.
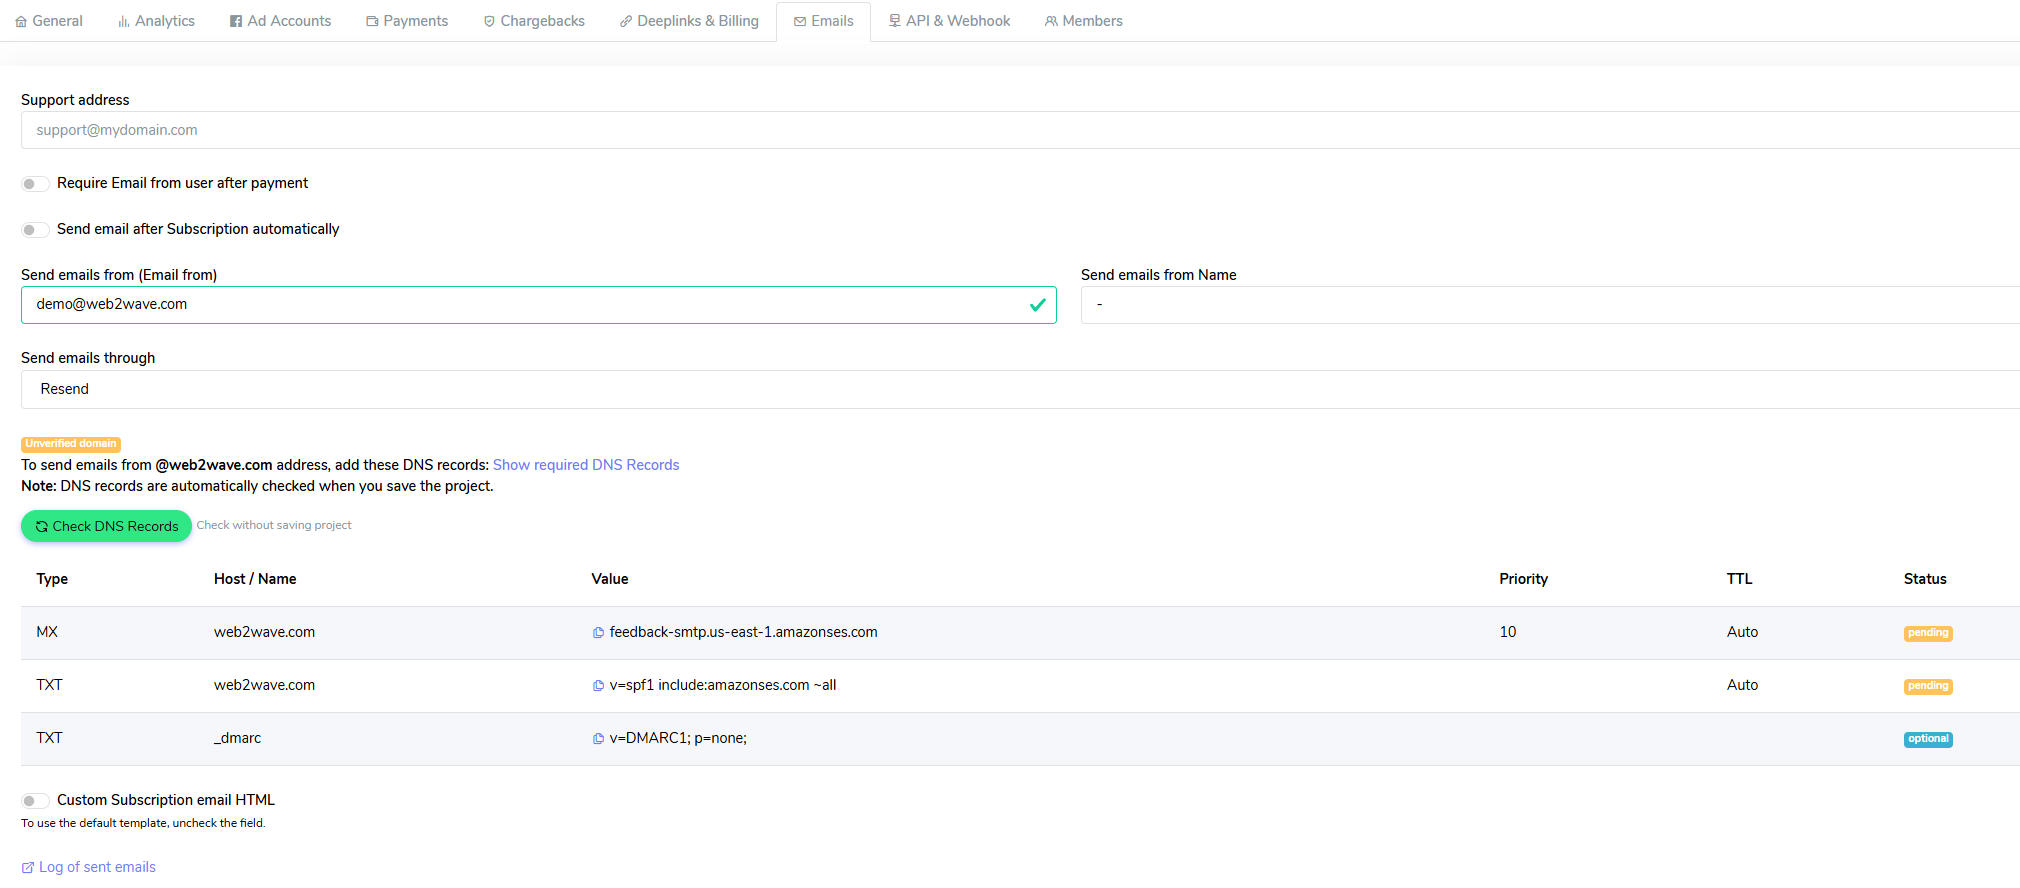
DNS Records list
Add these records at your DNS provider:
- Type:
TXTorMX, as shown in the interface. - Host/Name: copy exactly from web2wave.
- Value: copy exactly from web2wave
- optional – for SPF you can include
include:amazonses.com,google.cometc., separated by spaces
- optional – for SPF you can include
- TTL: you can usually leave the default value from your DNS provider.
DNS propagation can take several hours; in some cases, it may take up to 10 hours or more.
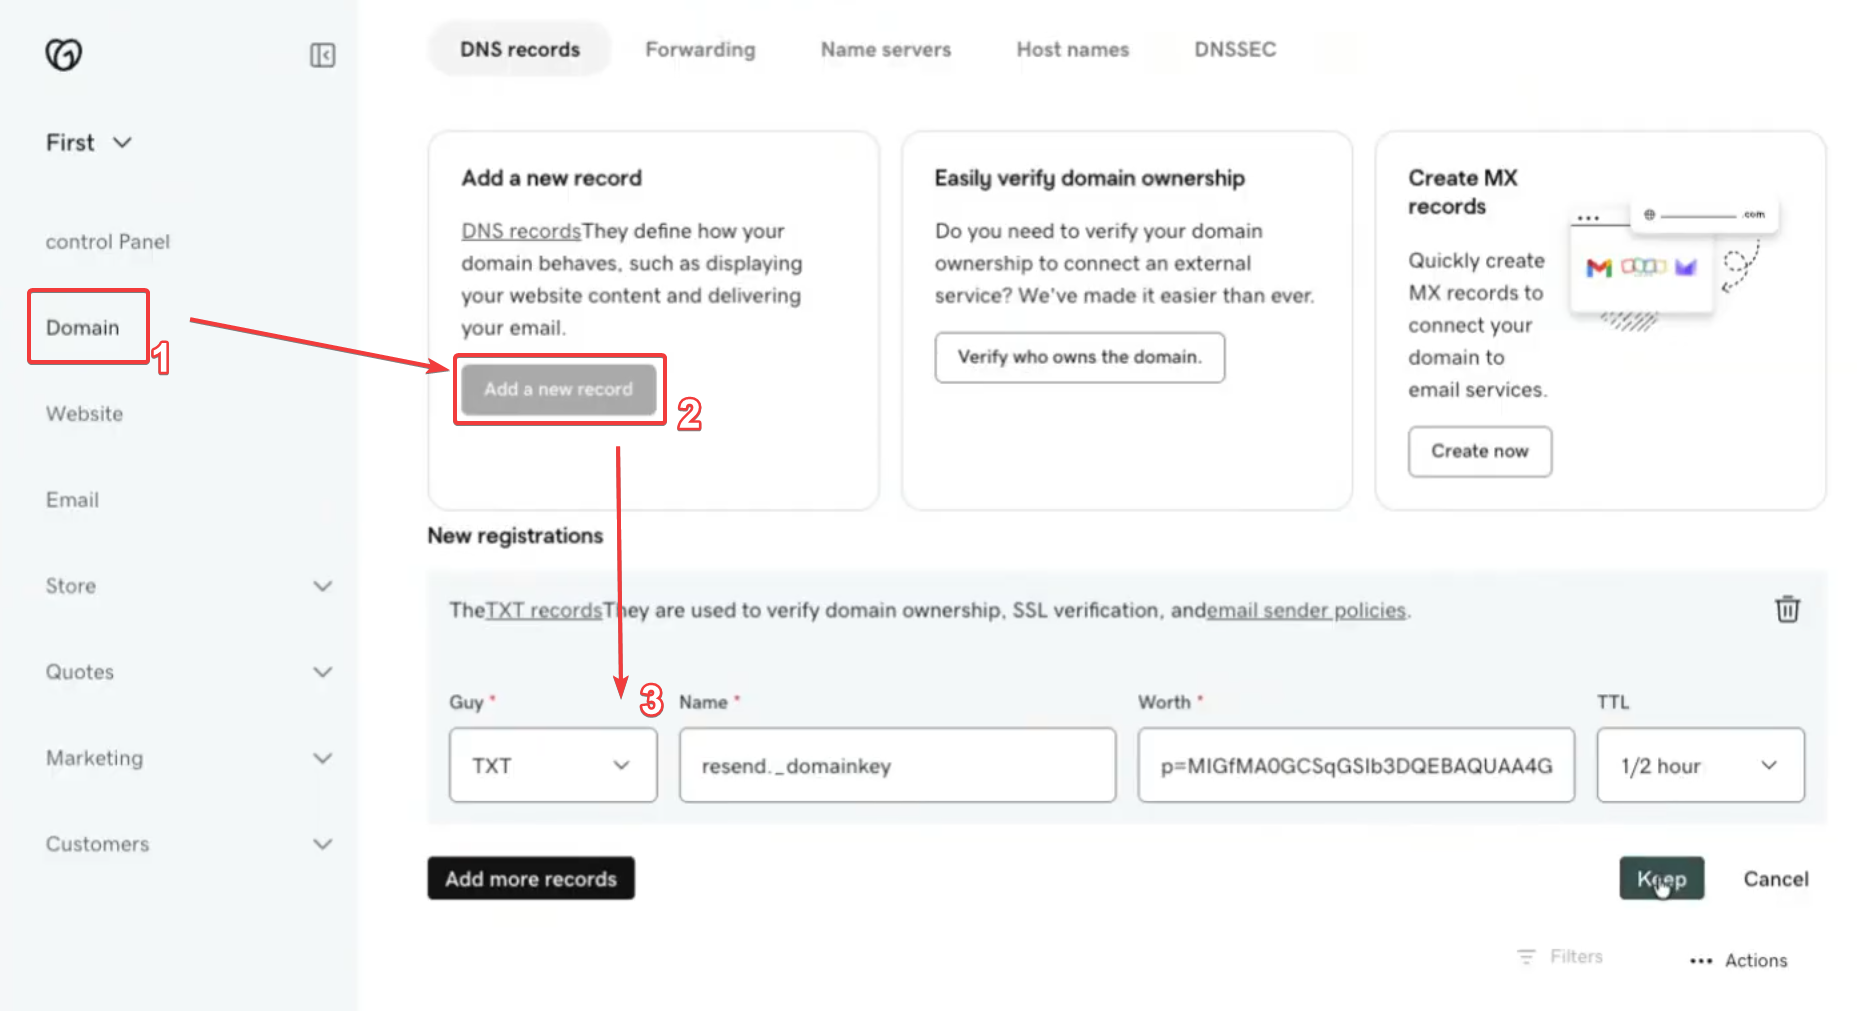
Visual illustration of steps 1->2->3 how to add records to your DNS provider. Repeat these steps to add all records.
After adding all records:
- Click Check DNS records in the project email settings.
- If verification is still pending after a long time, please send a request to web2wave support team, we will help you.
Once the domain is verified, web2wave will start sending emails from this domain and will enable Email logs for this project.
Built‑in email provider (Resend)
By default, most projects use the built‑in provider (Resend) to send transactional and sequence emails.
Key points:
- No additional SMTP configuration is required besides domain verification.
- web2wave manages the connection and IP reputation.
- You can see a full log of sent emails in Log of sent emails once the domain is verified:
- Total emails sent over time.
- Per‑user email history.
- Ability to inspect a specific email body for debugging (what was actually sent to the user).
If delivery issues are suspected:
- Use email logs inside web2wave to check whether an email was sent and whether the provider returned an error.
SMTP configuration (external mail servers)
If you prefer to send messages via your own SMTP server instead of the built‑in provider, you can configure SMTP in project email settings.
You will need:
- SMTP host
- Port
- Username
- Password (or API key)
- Encryption type (SSL/TLS)
Typical use cases:
- You already have your own mail infrastructure and do not want to manage DNS records for Resend.
- You must comply with internal IT/security policies and send mail via your corporate SMTP.
web2wave will use the same email templates and sequences, but messages will be routed through the SMTP host you configure.
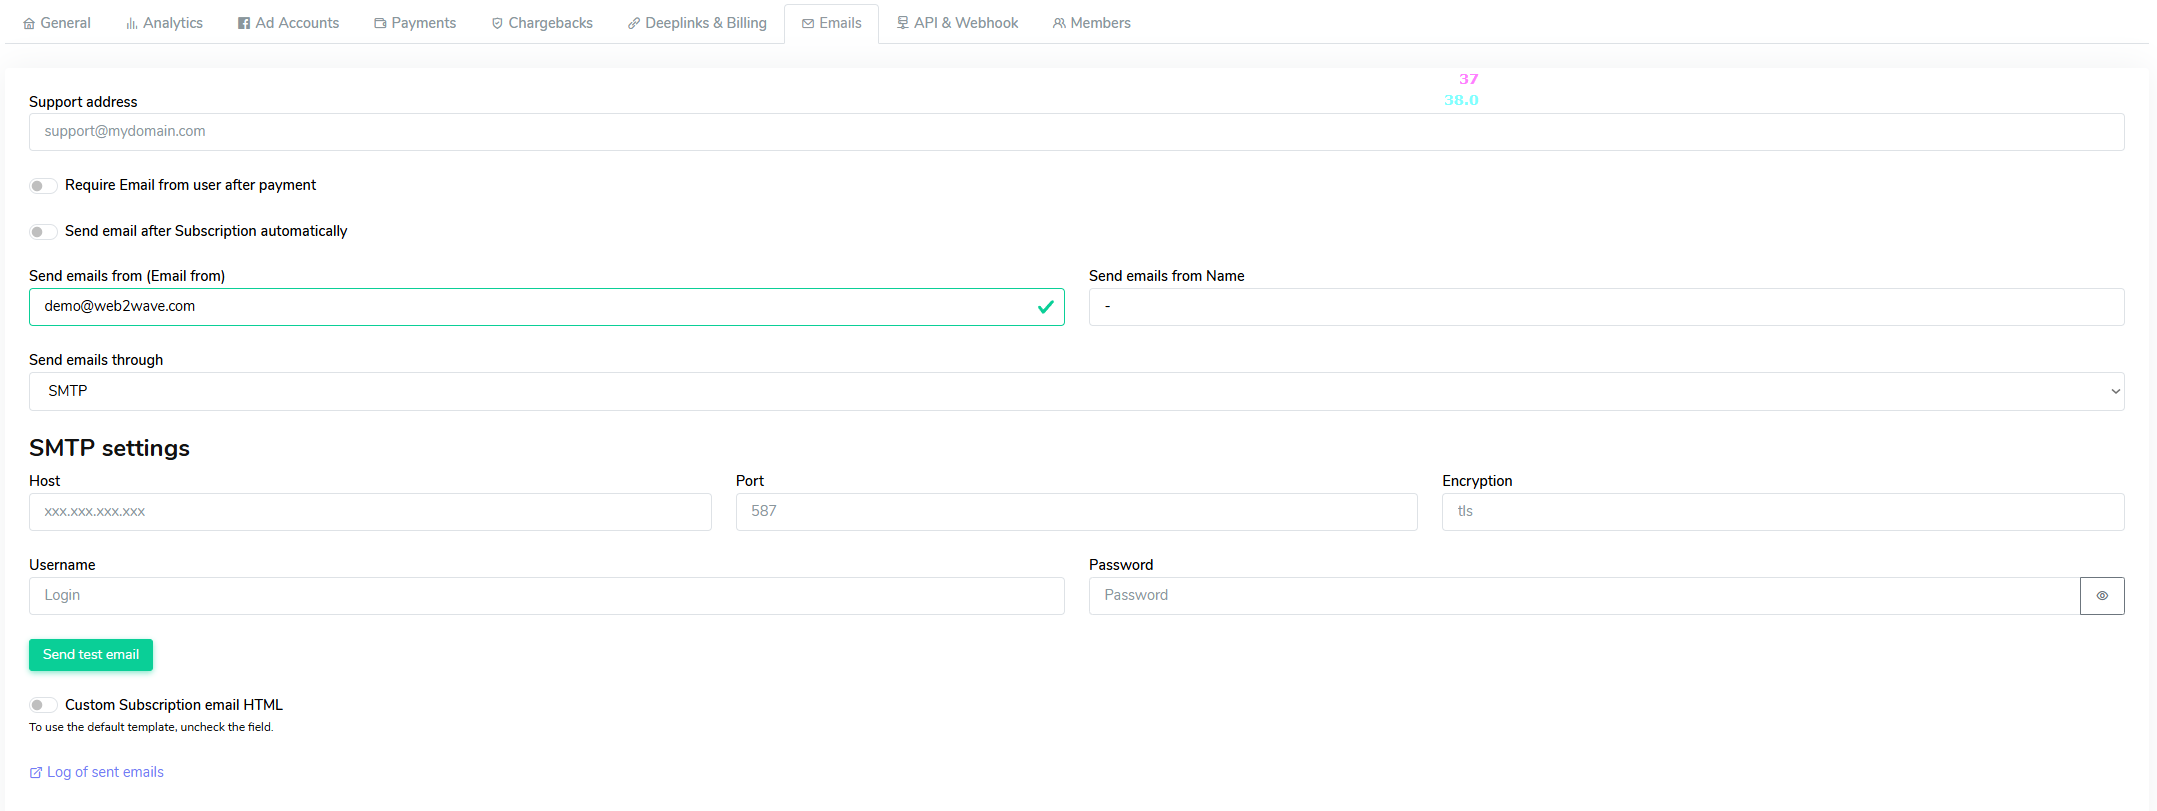
SMTP Settings view
Require Email from user after payment
When this option is enabled, a popup form appears on the After Payment page to collect the user's email address.
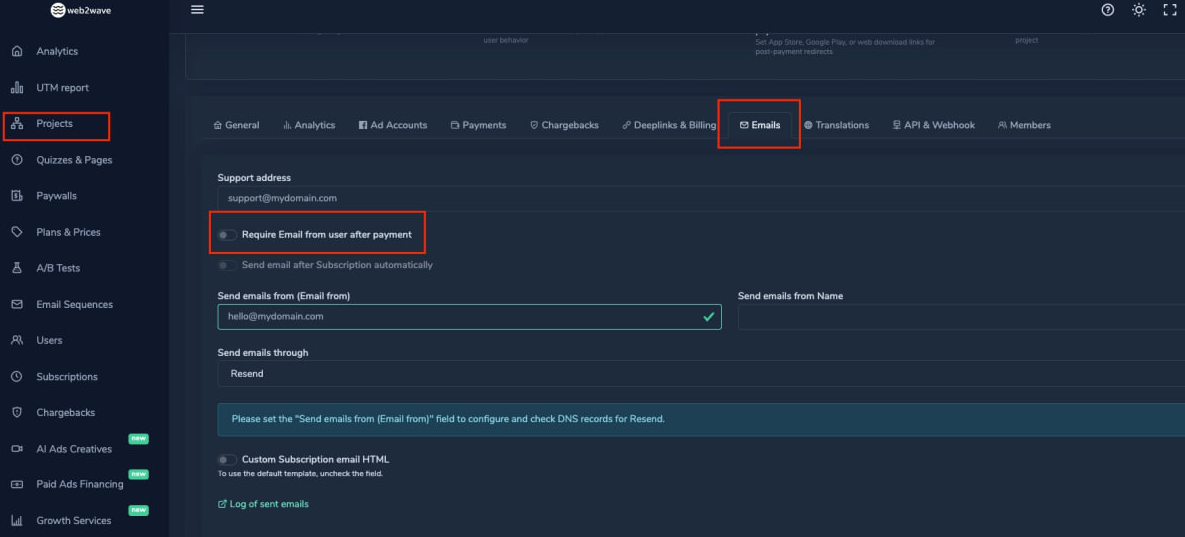
Enabling the toggle
Use case: if you are using Primer with Stripe, note that the default Primer payment form does not collect an email address. By enabling this option, a popup will appear after payment, allowing the user to enter their email. web2wave will then pass this email to Stripe after the payment.
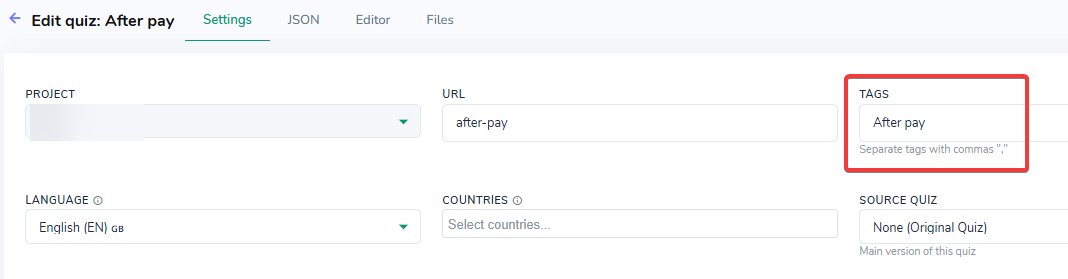
If After pay tag is assigned, then this Quiz is available to be selected at the Paywall settings - "After Payment go to"
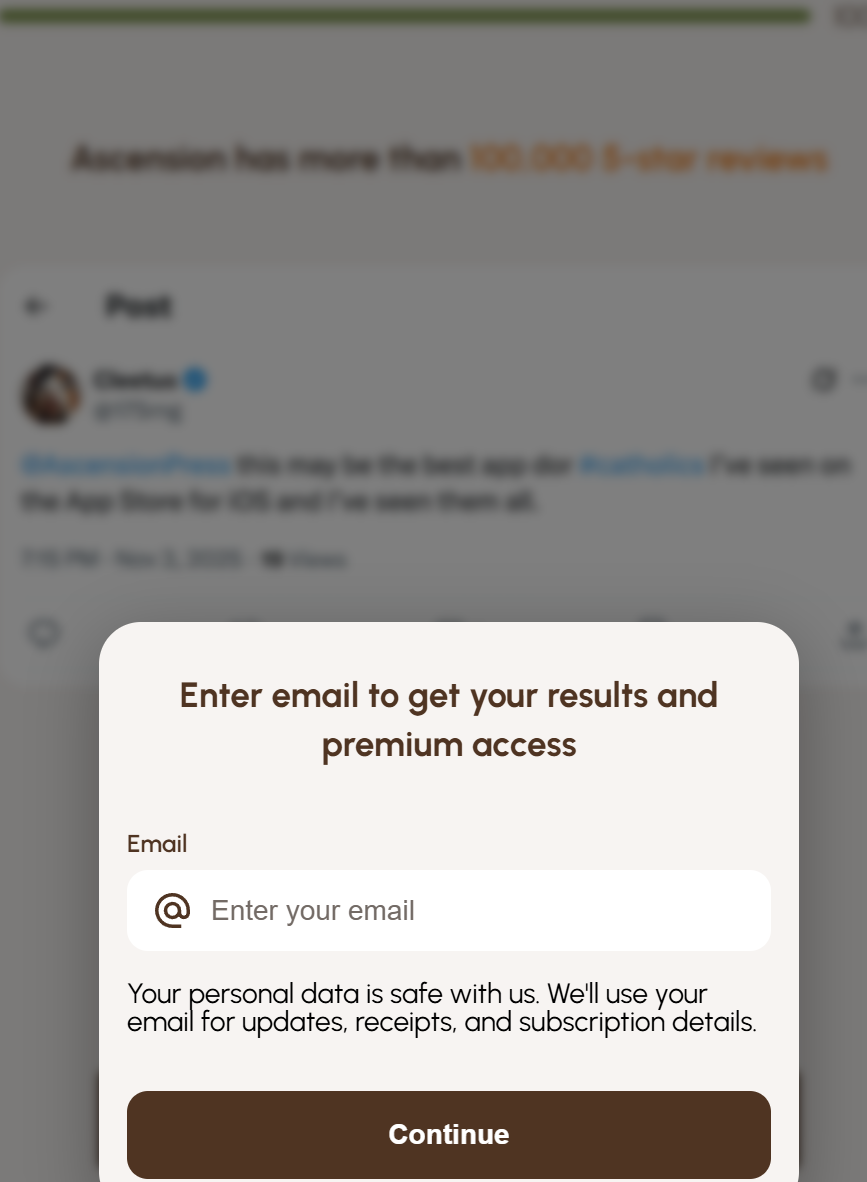
How "Require Email from user after payment" looks like
How it works:
- The system checks whether the user already has an email property.
- If no email is found, the popup form is displayed after payment.
- If an email collection already occurred in the funnel, the popup will not appear.
Default purchase confirmation email
For every project, web2wave can automatically send a purchase confirmation email after a successful subscription purchase. To enable this feature, activate the toggle Send email after Subscription automatically.
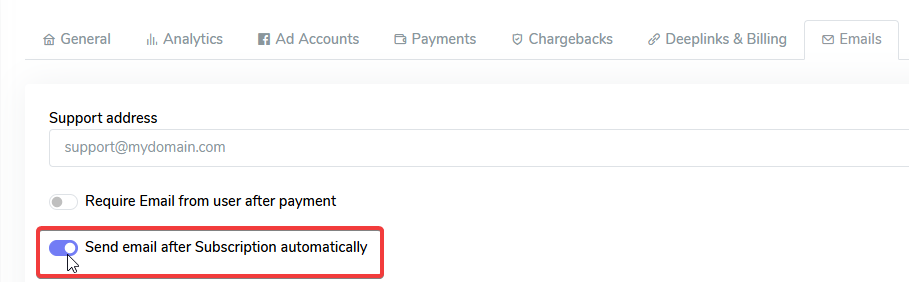
Visual reference of toggle location to activate the sending of an email after subscription
This email:
- Congratulates the user and confirms that the subscription has started.
- Usually should contain a file (e.g. PDF) or deep link to the app so the user does not lose access.
Configuration:
- Go to Project settings → Emails → Custom Subscription email HTML. You can leave it as is, or activate it to configure the default template according to your requirements.
- Edit the Subject and HTML body using the visual or HTML editor.
- Use placeholders to insert dynamic values:
USER_IDfor the User ID{project.title}for the Project title- Deep link URL
- Other user properties (e.g. answers, language) where supported.
- Send a test email to yourself to check formatting and links.
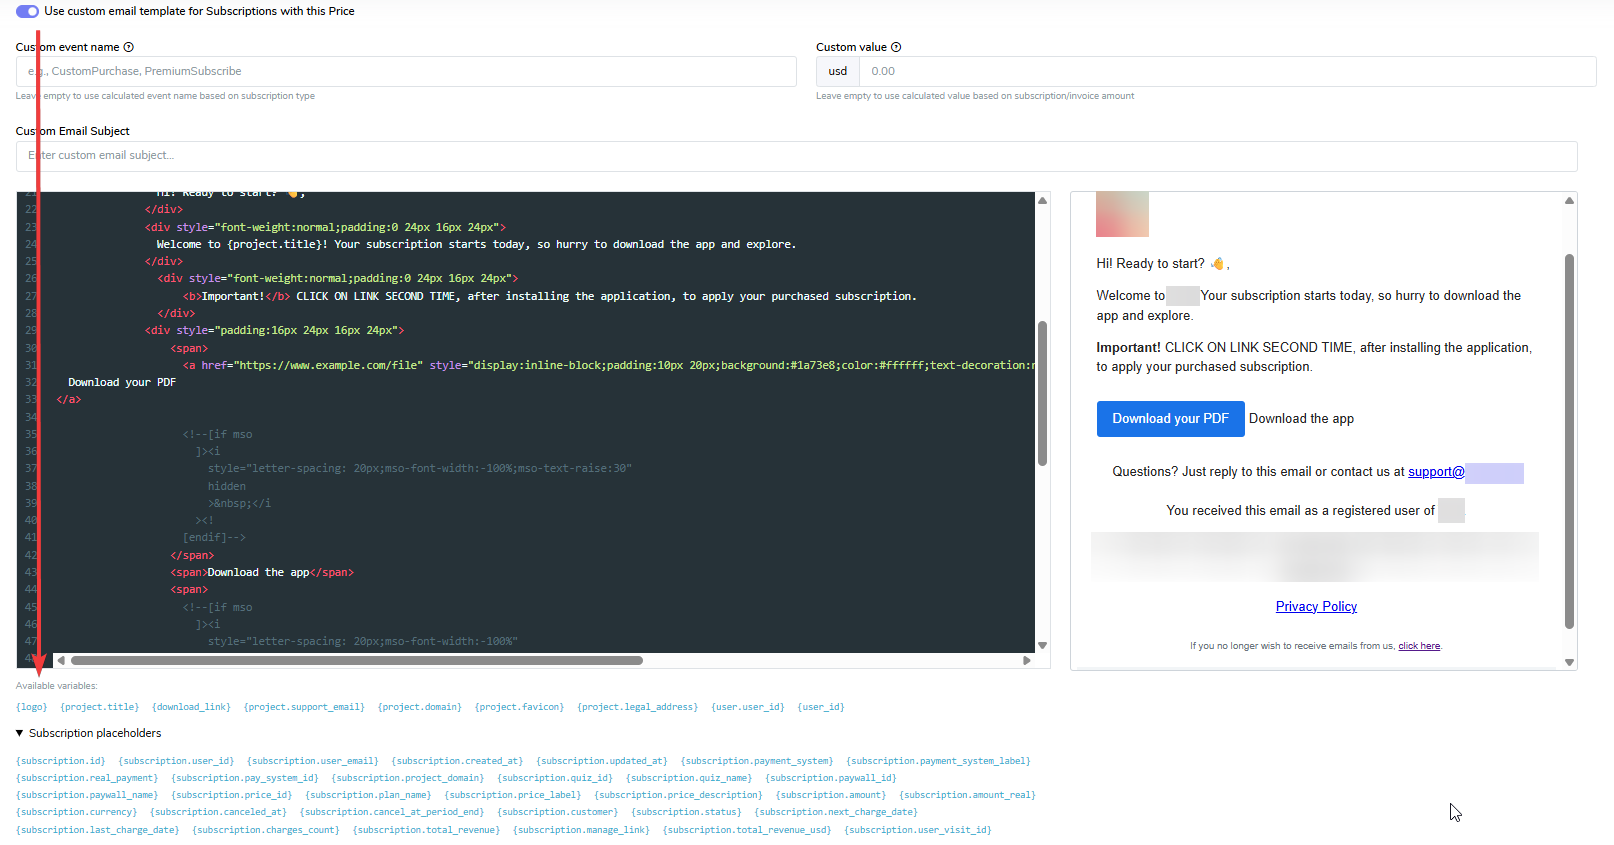
Available placeholders
This default purchase email is available on all plans and is sent after every successful subscription by default.
Q: How to add a PDF file to the email so that clients receive a download link after purchase?
A: To upload and use a custom PDF file in your email for this Price, follow these steps:
- In the dashboard or any quiz or paywall, use the "Files" tab. Upload your PDF, then right‑click on the uploaded file and select "Get info". In the info panel, find the "Link" field, right‑click the link and copy it.
- Open the corresponding Price in the "Plans & Prices" section and enable the "Use custom email template for subscriptions with this price" toggle. Paste the copied link into your email template, such as code below:
<a href="https://www.link-to-Your-File.com/file" style="display:inline-block;padding:10px 20px;background:#1a73e8;color:#ffffff;text-decoration:none;border-radius:4px;">
  Download your PDF
</a>
Price‑specific custom emails
In addition to the global project purchase email, you can define custom emails per price (e.g. per subscription plan or one‑time product).
Typical scenarios:
- For a lifetime purchase, you do not want to send the standard subscription message.
- For a digital product (e.g. PDF), you want to send a separate email with a download link.
Configuration:
- Open Project → Prices.
- Choose a specific price (use the Pencil icon to edit it).
- In the Price settings section define available options:
- Don't send emails after subscription.
- Use custom email template for Subscriptions with this Price for this price.
- For custom emails:
- Set the subject (e.g. “Here is your PDF plan”).
- Edit the HTML body.
- Add links to the asset (e.g.
https://.../file.pdf) and any additional text.
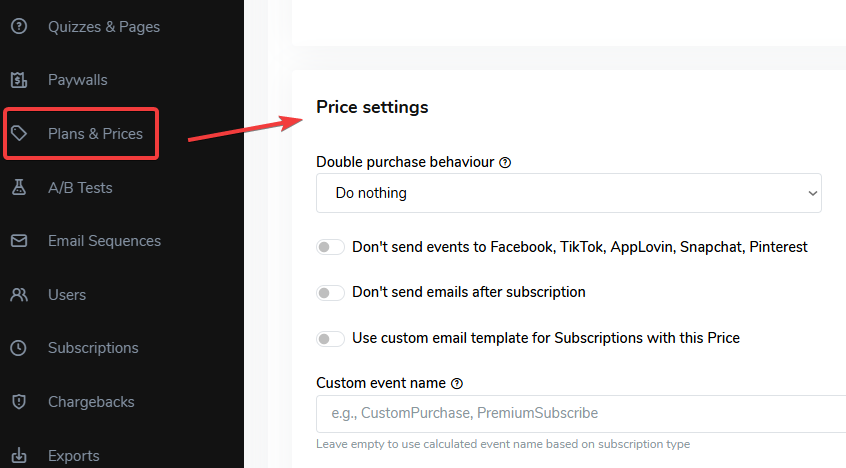
Visual illustration of adjusting email settings at the Prices tab
When a user purchases that specific price:
- web2wave sends the custom email instead of the default purchase email.
- The email is visible in email logs.
- In the prices list you will see an icon indicating that a custom template is configured.
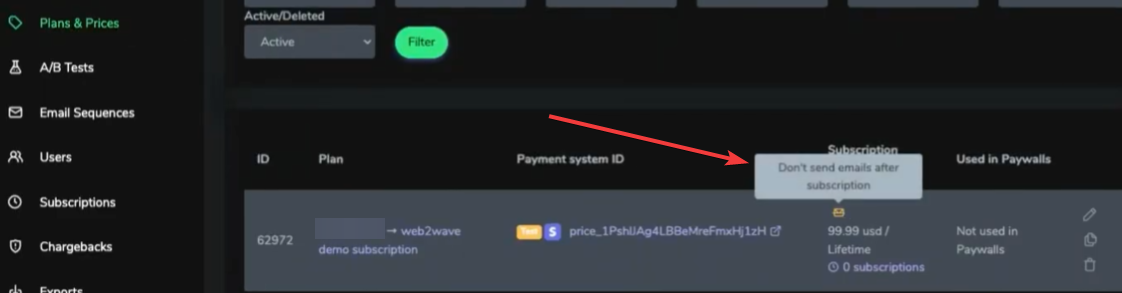
Icon of enabling the "Don't send emails after subscription" option

Icon of enabling the "custom email template for Subscriptions with this Price" option
Q: I've configured Price‑specific custom emails but can't receive emails after purchase.
A: Check if In Project settings → Emails toggle Send email after Subscription automatically is enabled.
Plan limitations:
- The built‑in email transport is available on all plans.
- Email sequences, Custom price emails are part of the Advanced plan.