
Send one quiz, paywall, or After Pay page to a different Meta, TikTok, or Snapchat pixel, add an Access Token so that pixel also gets server-side conversions, or turn a platform off for a single funnel.
Pixels for the whole project are set in Project settings → Analytics: turn on Meta Pixel, TikTok Pixel & Conversion API, or Snapchat Pixel, fill in the Pixel ID and the Access Token, and every quiz, paywall, and After Pay page in that project uses them. That is the supported way to connect pixels and server-side conversions — see the Analytics Integration Guide for the full field list.
Use the settings on this page only when one funnel has to behave differently from the project: send events to a second ad account, use a different pixel on a second domain, keep a test funnel out of your main pixel, or send nothing at all. Meta, TikTok, and Snapchat each have their own custom pixel fields in a quiz or paywall; Pinterest is configured for the project only.
| What you fill in | Where | Browser events | Conversions API (server events) |
|---|---|---|---|
| Pixel ID + Access Token for the project | Project settings → Analytics | Yes | Yes |
| Custom Pixel ID for one quiz / paywall / After Pay page | Settings tab of that quiz / paywall | Yes | Not by itself |
| Custom Pixel ID + Access Token for one quiz / paywall / After Pay page | Settings tab of that quiz / paywall | Yes | Yes |
| The ad network's own pixel snippet pasted into HTML to HEAD | Project settings → Analytics, or quiz / paywall | Yes | No |
Do not connect a pixel by pasting the network's own snippet into HTML to HEAD. That path only fires browser events, never server-side conversions, and a pixel that your own code puts on the page can also pick up web2wave funnel events — which shows up in Events Manager as duplicated or unexpected conversions. Use the Pixel ID and Access Token fields instead.
Send one quiz or paywall to a different pixel
This keeps one funnel separate from the project-wide pixel without touching the project settings. Add the Access Token as well when that pixel also needs server-side conversions — a Pixel ID on its own gives you browser events only.
- Open the quiz → Settings tab.
- Turn on the custom settings for the network you need and fill in the pair of fields:
- Use Custom Meta Pixel Settings → Custom Meta Pixel ID and Facebook Access Token
- Custom TikTok Pixel ID and TikTok Access Token
- Use Custom Snapchat Pixel Settings → Custom Snapchat pixel and Custom Snapchat Access Token
- Repeat on the Paywall and the After Pay page of that funnel.
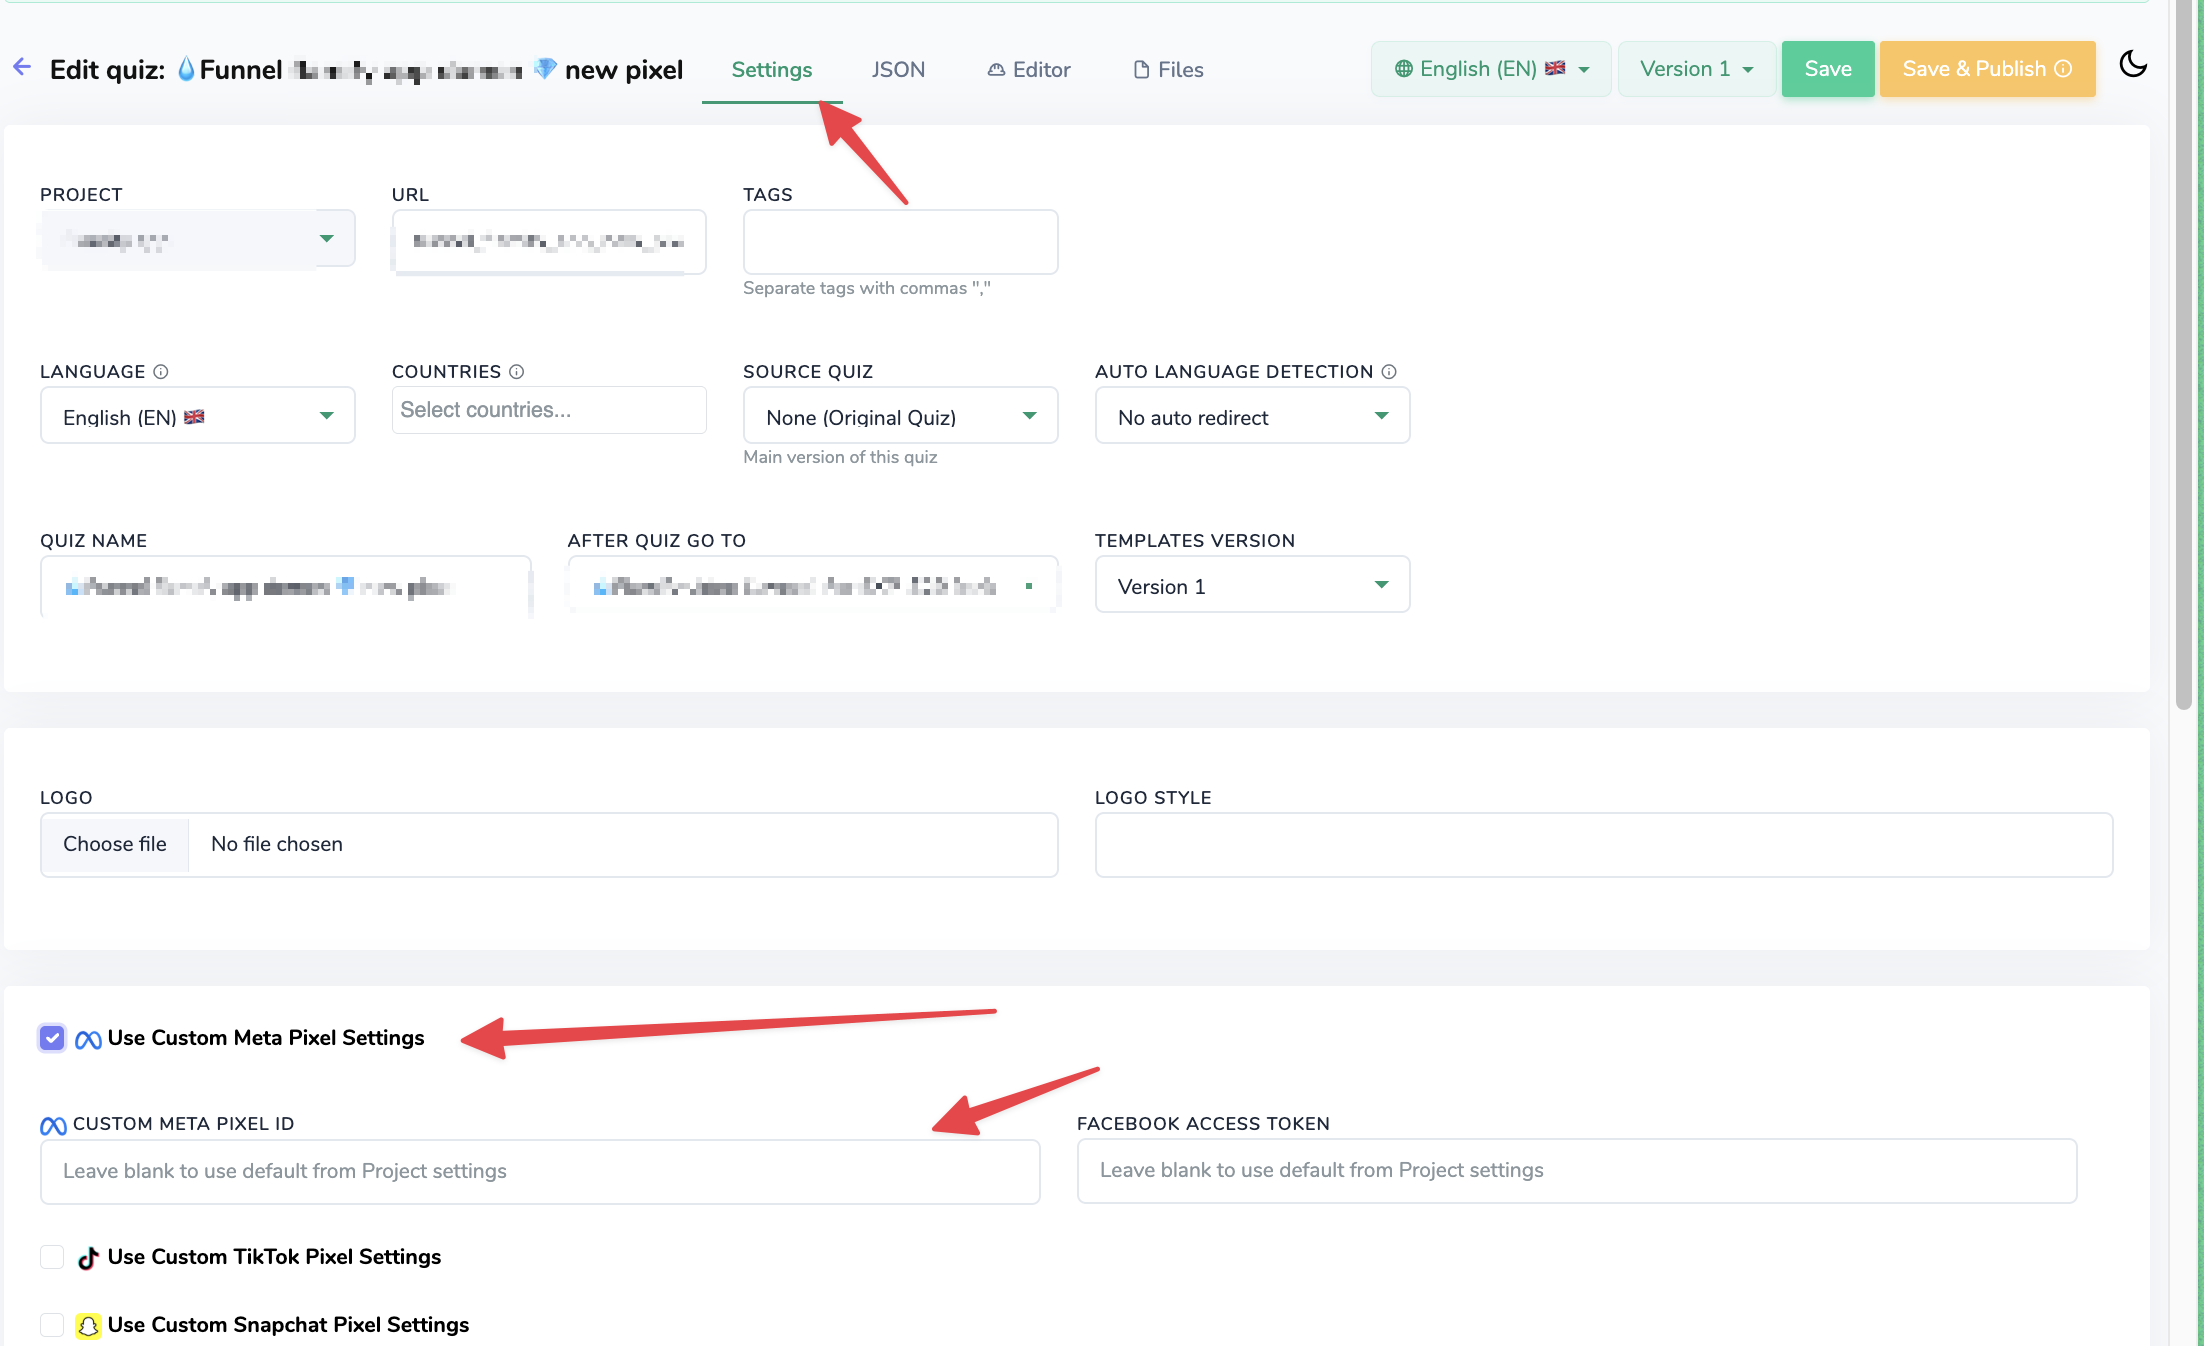
Configure the same custom pixel on every page of the funnel — quiz, paywall, and After Pay. If you set it only on the quiz, the rest of the funnel keeps sending events to the project-wide pixel and your conversions end up split between two pixels.
A custom pixel does not get its own event list. Which events go to the server side is still decided in Project settings → Analytics → Events to send via Conversion API.
Turn a platform off for one funnel
Leave a custom pixel field empty to keep using the project-wide pixel.
Enter 0 to switch that platform off for this quiz or paywall completely: no pixel is loaded in the browser and no conversion events are sent from the server, including Conversions API.
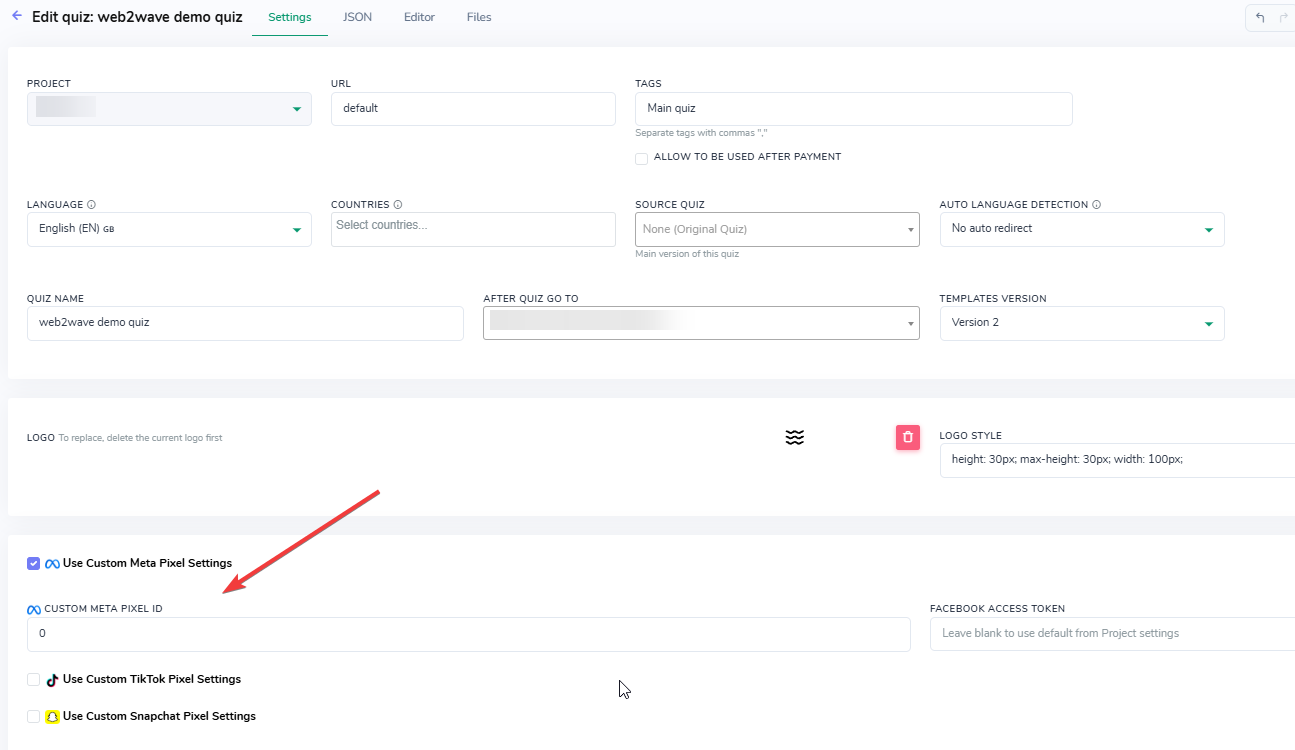
Entering 0 in the custom pixel field removes Meta from this quiz, paywall, or upsell
Two pixels on the same page (browser only, not recommended)
The Analytics tab holds one pixel per network per project, and a custom pixel replaces that pixel for a funnel rather than running next to it. So a second pixel firing in parallel on the same page has to come from the network's own snippet, pasted into the HTML to HEAD field of the project, quiz, paywall, or After Pay page. Treat it as a last resort: it is browser-only, server-side conversions are not available for a pixel added this way, and duplicate events are easy to create. Whenever one pixel per funnel is enough, use the custom Pixel ID fields above instead.
The realistic case for it is the same quiz served on two domains, where each domain has to report to its own pixel — the custom Pixel ID fields apply to the funnel, not to the domain it is opened on.
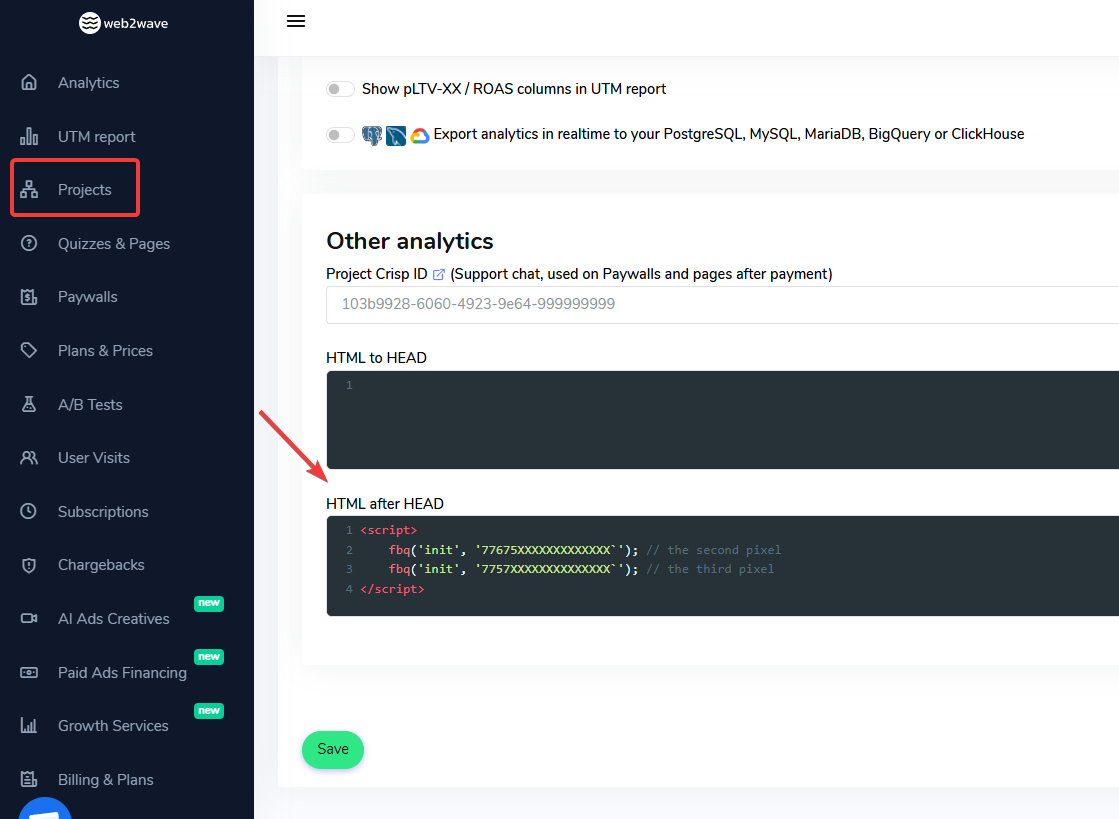
A second browser pixel added to the HTML to HEAD field in Project settings → Analytics applies to all quizzes and paywalls in the project
FAQ
Q: Will Conversions API work if we add a custom Meta Pixel ID and Access Token to a quiz or paywall?
A: Yes, and the same holds for a custom TikTok or Snapchat pixel with its token. The Access Token next to the custom Pixel ID is what makes that pixel receive server events; without it the custom pixel gets browser events only. Which events go to the server side still comes from Project settings → Analytics → Events to send via Conversion API — the custom pixel reuses the project's event list rather than defining its own.
Q: Can one funnel send the same events to two Meta pixels, both with Conversions API?
A: No. A quiz, paywall, or After Pay page resolves to one pixel per network — either the project one or its custom override. A second pixel can only be added as a browser pixel, and browser pixels have no Conversions API.
Q: We removed the pixel from Project settings but events still arrive in Meta. Why?
A: Check whether a pixel is still being loaded on the page by your own code — a snippet in HTML to HEAD, or a tag manager container. When a Meta pixel is present on the page, web2wave funnel events can be sent to it even though the Analytics tab fields are empty. Clearing the Analytics tab only stops the pixel that web2wave loads; the snippet has to be removed where you added it.